Introduction
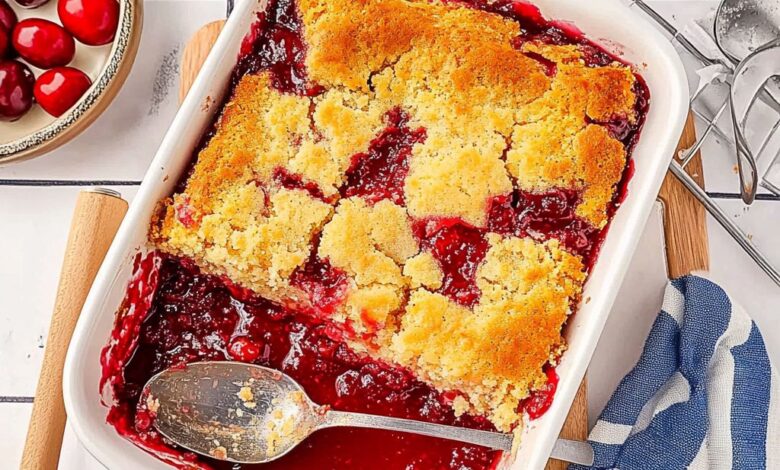
Get ready for the easiest, most delicious dessert you’ll ever make! Cherry Dump Cake is a true kitchen hero. It’s a sweet, bubbly, fruit-filled delight that tastes like pure comfort. Imagine warm, tender cherries baked under a golden, buttery cake crust. It’s simply irresistible and perfect for any occasion.
The best part? This recipe truly lives up to its name. You literally “dump” the ingredients into a baking dish. There’s no fancy mixing, no multiple bowls to wash, and no complicated steps. It’s a dessert that comes together in minutes, making it ideal for busy weeknights or when you need a quick treat for guests.
So, if you’re looking for a fuss-free dessert that delivers big on flavor, look no further. This Cherry Dump Cake is about to become your new favorite. Let’s get baking and create some sweet memories!
Cooking Time & Prep Time
- Prep Time: 10 minutes
- Cooking Time: 45-50 minutes
- Total Time: 55-60 minutes
Small tip: Gathering all your ingredients before you start will make the “dumping” process even quicker!
Ingredients
This recipe makes 8-10 generous servings.
For the Cake
- 2 cans (21 ounces each) cherry pie filling
- 1 box (15.25 ounces) yellow cake mix (or white cake mix)
- 1 cup (2 sticks) unsalted butter, melted
Optional Topping
- 1/2 cup chopped pecans or walnuts (optional, for extra crunch)
Step-by-Step Instructions
-
Preheat Your Oven
Preheat your oven to 350°F (175°C). This ensures your oven is at the correct temperature for even baking. You don’t need to grease your baking dish for this recipe.
Small tip: Make sure your oven has fully preheated before putting the cake in. This helps with proper rising and browning.
-
Prepare the Baking Dish
Pour both cans of cherry pie filling evenly into the bottom of a 9×13 inch baking dish. Spread it out gently with a spatula to create an even layer. This will be the delicious fruity base of your cake.
Small tip: Use a glass or ceramic baking dish for best results, as they retain heat well and cook evenly.
-
Add the Cake Mix
Sprinkle the dry cake mix evenly over the cherry pie filling. Do not stir it in! Just gently pour it over the cherries. The dry mix will absorb the moisture from the cherries and butter as it bakes.
Small tip: Try to get an even layer of cake mix to ensure the crust bakes consistently.
-
Pour Over Melted Butter
Melt the butter completely. Then, drizzle the melted butter evenly over the dry cake mix. Make sure to cover as much of the dry mix as possible. The butter will help create a rich, golden, crispy topping.
Small tip: If you want an extra crunchy topping, slice the butter into thin pats and arrange them over the cake mix instead of drizzling.
-
Add Optional Nuts (If Using)
If you’re using chopped pecans or walnuts, sprinkle them evenly over the butter and cake mix layer. This adds a lovely nutty crunch and flavor. They will toast nicely as the cake bakes.
Small tip: Toast your nuts lightly in a dry pan before adding them for an enhanced flavor.
-
Bake Until Golden
Place the baking dish in your preheated oven. Bake for 45-50 minutes, or until the top is golden brown and bubbly around the edges. You’ll see the cherry filling peeking through and bubbling up.
Small tip: If the top is browning too quickly, you can loosely tent it with aluminum foil for the last 10-15 minutes of baking.
-
Cool Slightly and Serve
Once baked, carefully remove the dump cake from the oven. Let it cool on a wire rack for about 10-15 minutes before serving. This allows the filling to set slightly, making it easier to scoop. Serve warm and enjoy!
Small tip: While delicious warm, the flavors also meld beautifully if you let it cool completely.
Tips & Variations
- Gluten-Free Option: Easily make this dessert gluten-free by simply using a gluten-free yellow or white cake mix. The rest of the ingredients are naturally gluten-free.
- Vegan/Vegetarian Option: For a vegan version, ensure your pie filling is vegan (most are, but check labels for gelatin). Use a vegan-friendly cake mix (many are accidentally vegan, but check for milk/egg derivatives) and substitute the unsalted butter with a plant-based butter alternative.
- Add More Fruit or Protein: Boost the fruit content by adding a cup of fresh or frozen mixed berries (like raspberries or blueberries) directly on top of the cherry pie filling before adding the cake mix. For a protein boost, stir 1/2 cup of slivered almonds or chopped walnuts into the dry cake mix before sprinkling it over the cherries.
- Spicy Version: For a subtle kick, add 1/4 teaspoon of ground cinnamon and a tiny pinch (1/8 teaspoon) of cayenne pepper to the dry cake mix before sprinkling. This adds a warm, unexpected depth to the cherry flavor.
- Other Flavor Variations: Experiment with different fruit pie fillings like apple, peach, or blueberry. You can also add 1/2 cup of chocolate chips over the cake mix with the butter for a chocolatey twist. A teaspoon of almond extract added to the cherry filling before baking can also enhance the cherry flavor beautifully.
Nutritional Information
Approximate values per serving (based on 10 servings):
- Calories: 380-420
- Protein: 3-5g
- Carbohydrates: 60-70g
- Fat: 18-22g
Please note: Values may vary depending on specific brands and ingredients used.
Health Benefits
While this is a dessert, the star ingredient, cherries, offers some wonderful health benefits!
Cherries are packed with antioxidants. These powerful compounds, especially anthocyanins, help fight free radicals in your body. This can reduce inflammation and protect your cells from damage, contributing to overall well-being.
They are also a good source of fiber. Fiber is essential for digestive health, helping to keep things moving smoothly. It can also contribute to a feeling of fullness, which is beneficial for managing appetite.
Furthermore, cherries contain melatonin, a hormone that helps regulate sleep cycles. Enjoying cherries, or cherry-based treats, might contribute to better sleep quality for some individuals, making this a truly comforting dessert.
Cherries also provide essential vitamins and minerals, including Vitamin C and potassium. Vitamin C supports your immune system, while potassium is important for heart health and maintaining proper fluid balance in the body.
Serving Suggestions
- Classic Pairing: Serve warm with a scoop of creamy vanilla ice cream. The contrast of hot and cold is simply divine!
- Whipped Dream: A dollop of fresh whipped cream is another perfect topping, adding a light, airy touch.
- Custard Comfort: For an extra rich treat, serve with warm vanilla custard or a drizzle of crème anglaise.
- Meal Prep Ideas: This dump cake is wonderful for meal prep! Bake it on Sunday, and you’ll have a delicious dessert ready for the week. You can portion it into individual containers for easy grab-and-go treats.
Storage Tips
Store any leftover Cherry Dump Cake covered tightly in the refrigerator for up to 3-4 days. You can also freeze individual portions in airtight containers for up to 3 months. To reheat, warm slices in the microwave for 30-60 seconds, or in a preheated oven at 300°F (150°C) for 10-15 minutes until heated through.
Conclusion
There you have it – the ultimate Cherry Dump Cake! It’s a testament to how simple ingredients can come together to create something truly magical. The tender, sweet cherries bursting through the buttery, golden cake topping make every bite a pure delight. It’s comforting, satisfying, and incredibly easy to make.
Don’t let another day go by without trying this incredible recipe. It’s perfect for novice bakers and seasoned pros alike. You’ll be amazed at the delicious results with so little effort. It’s a dessert that truly delivers on its promise of ease and incredible taste.
So go ahead, gather your ingredients, and whip up this fantastic Cherry Dump Cake. Share it with your family and friends, or simply enjoy a generous slice all to yourself. Happy baking!