Introduction
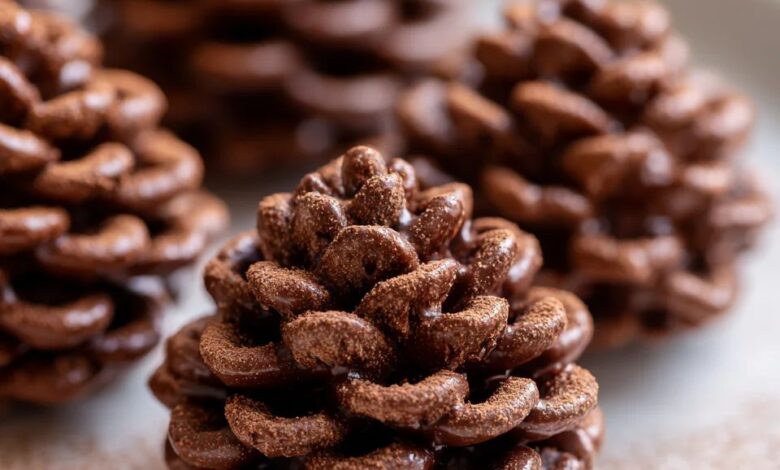
Get ready to discover your new favorite holiday treat: No Bake Pinecone Truffles! These delightful little creations are the perfect blend of rich, chocolatey goodness and a satisfying crunch. Shaped like adorable pinecones, they bring a touch of rustic charm and festive cheer to any dessert table. Each bite offers a creamy, sweet truffle base studded with biscuit crumbs, beautifully contrasted by crisp almond “scales.”
The best part? There is absolutely no baking involved! These truffles come together quickly with simple ingredients and minimal effort. You’ll spend more time admiring their cuteness than you will making them. It is a fantastic recipe for busy holiday seasons or when you want a fun kitchen project with the kids, without the oven fuss.
So, why not add a sprinkle of magic to your celebrations this year? These pinecone truffles are not just a dessert; they are a conversation starter, a delightful gift, and a truly joyful experience to make and share. Let’s dive into creating these charming confections together!
Cooking Time & Prep Time
- Prep Time: 30 minutes
- Chilling Time: 60 minutes (minimum)
- Total Time: 90 minutes
Small tip: The chilling time is crucial for the truffles to firm up, making them much easier to shape and decorate. Do not rush this step!
Ingredients
Makes about 12-15 delightful pinecone truffles.
For the Truffle Base:
- 8 tablespoons (1 stick) unsalted butter, softened
- 4 ounces (half a block) cream cheese, softened
- 1 cup powdered sugar (confectioners’ sugar), sifted
- 1/2 cup unsweetened cocoa powder, sifted
- 1 teaspoon vanilla extract
- 2 cups digestive biscuits or graham crackers, finely crushed (about 15-18 biscuits)
For Assembly and Garnish:
- 1 cup slivered almonds or almond flakes
- 2 tablespoons powdered sugar, for dusting (optional)
Step-by-Step Instructions
-
Step 1: Prepare the Biscuit Crumbs
Place your digestive biscuits or graham crackers into a large zip-top bag. Use a rolling pin or the back of a heavy pan to crush them into fine crumbs. You want a texture similar to coarse sand.
Small tip: A food processor makes this step super fast and ensures even crumbs. Just pulse until finely crushed.
-
Step 2: Cream Butter and Cream Cheese
In a large mixing bowl, combine the softened butter and cream cheese. Beat them together with an electric mixer on medium speed until the mixture is light, fluffy, and well combined. Scrape down the sides of the bowl as needed.
-
Step 3: Add Sweetness and Flavor
Gradually add the sifted powdered sugar and cocoa powder to the butter and cream cheese mixture. Beat on low speed until just combined, then increase to medium until smooth. Stir in the vanilla extract until fully incorporated.
-
Step 4: Combine Wet and Dry Ingredients
Fold the finely crushed biscuit crumbs into the chocolate mixture. Mix until everything is thoroughly combined and a thick, uniform dough forms. It should be firm enough to hold its shape.
-
Step 5: Chill the Truffle Mixture
Cover the bowl with plastic wrap and refrigerate the truffle mixture for at least 30-60 minutes. This chilling time is essential. It helps the mixture firm up, making it much easier to handle and shape later.
Small tip: If the mixture feels too sticky after chilling, add a tablespoon or two more crushed biscuits until it’s workable.
-
Step 6: Shape the Pinecone Bases
Take about 1.5 to 2 tablespoons of the chilled truffle mixture. Roll it into an oval or teardrop shape, slightly wider at one end and tapering to a point at the other. This will be the base of your pinecone.
Small tip: Keep your hands slightly cool by rinsing them with cold water if the mixture starts to get too sticky while shaping.
-
Step 7: Create the Pinecone Scales
Starting from the wider, rounded end of your truffle base, gently press slivered almonds into the mixture. Overlap them slightly, working your way up towards the pointed end. Arrange them in rows, mimicking the scales of a real pinecone.
Small tip: For a more realistic look, angle the almonds slightly upwards as you press them in.
-
Step 8: Final Chill and Dusting
Once all your pinecones are assembled, place them on a parchment-lined baking sheet. Refrigerate them again for at least 30 minutes to allow them to firm up completely. Just before serving, you can lightly dust them with additional powdered sugar to resemble snow.
-
Step 9: Serve and Enjoy
Arrange your beautiful No Bake Pinecone Truffles on a festive platter. They are now ready to be admired and devoured! Enjoy this delightful, easy-to-make holiday treat.
Tips & Variations
- Gluten-Free Option: Simply substitute regular digestive biscuits or graham crackers with your favorite gluten-free variety. The texture will remain wonderfully consistent.
- Vegan Option: To make these truffles vegan, use plant-based butter and vegan cream cheese alternatives. Ensure your digestive biscuits or graham crackers are also vegan-friendly.
- Boosted Nutrition: For a little extra protein and healthy fats, you can add 2 tablespoons of almond butter or cashew butter to the truffle base mixture. This will also deepen the flavor.
- Spicy Kick: If you enjoy a hint of heat with your chocolate, add a tiny pinch (1/8 to 1/4 teaspoon) of cayenne pepper or chili powder to the truffle base along with the cocoa powder. It creates a subtle, warming aftertaste.
- Flavor Swaps: Experiment with different extracts! Try a few drops of peppermint extract for a mint-chocolate version, or orange extract for a citrusy twist. You could also roll the finished truffles in shredded coconut for a different texture.
- Nut-Free Alternative: If you have nut allergies, you can use sunflower seeds or pumpkin seeds instead of almonds for the “scales.” Alternatively, coat the pinecones in melted chocolate and let it set for a smooth finish.
Nutritional Information
Approximate values per serving (based on 12 servings):
- Calories: 280-320
- Protein: 4-6g
- Carbohydrates: 30-35g
- Fat: 18-22g
Note: Nutritional values may vary depending on specific brands and exact amounts of ingredients used.
Health Benefits
While these are a treat, some ingredients offer delightful benefits:
- Cocoa Powder: Unsweetened cocoa powder is rich in antioxidants, particularly flavonoids. These compounds can help fight free radicals in the body and may contribute to heart health. It can also be a natural mood booster!
- Almonds: The slivered almonds provide healthy monounsaturated fats, which are good for heart health. They are also a great source of Vitamin E, an important antioxidant, and contain magnesium, which supports muscle and nerve function.
- Digestive Biscuits (if whole wheat): If you opt for whole wheat digestive biscuits, they contribute some dietary fiber. Fiber is essential for digestive health and can help you feel fuller for longer.
- Butter and Cream Cheese (in moderation): These dairy components provide energy and some fat-soluble vitamins. When consumed as part of a balanced diet, they offer a sense of satisfaction and richness to the treat.
Serving Suggestions
- Festive Dessert Platter: Arrange these pinecone truffles alongside other holiday cookies, brownies, and candies for a stunning and delicious spread.
- With Hot Beverages: They pair perfectly with a warm mug of coffee, hot chocolate, or a spiced chai latte, especially on a chilly day.
- Edible Gifts: Package a few truffles in a small decorative box or cellophane bag with a festive ribbon. They make thoughtful and delicious homemade gifts for neighbors, teachers, or friends.
- Party Favors: Offer a single pinecone truffle at each place setting for a charming and edible party favor at your holiday gathering.
Storage Tips
Store your No Bake Pinecone Truffles in an airtight container in the refrigerator for up to 5-7 days. They are best enjoyed chilled. You can freeze the truffles (without the powdered sugar dusting) for up to 1 month. Thaw them in the refrigerator overnight before serving. Reheating is not necessary as these are a cold dessert; simply allow them to sit at room temperature for 10-15 minutes before serving for optimal texture.
Conclusion
There you have it – the recipe for No Bake Pinecone Truffles, a truly special and effortless addition to your festive repertoire. Their charming appearance, rich chocolate flavor, and satisfying texture make them an instant crowd-pleaser. They are the epitome of holiday joy, wrapped up in a delightful, bite-sized package.
So, gather your ingredients, put on some festive music, and enjoy the simple pleasure of creating these adorable treats. It is a wonderful way to bring a little extra magic into your home, without the stress of complicated baking. You’ll be amazed at how quickly these disappear!
Don’t keep all this deliciousness to yourself! Share your beautiful pinecone truffles with family and friends, or pack them up as thoughtful homemade gifts. Spreading joy through food is one of the best parts of the holiday season. Happy making, and happy holidays!