

Introduction
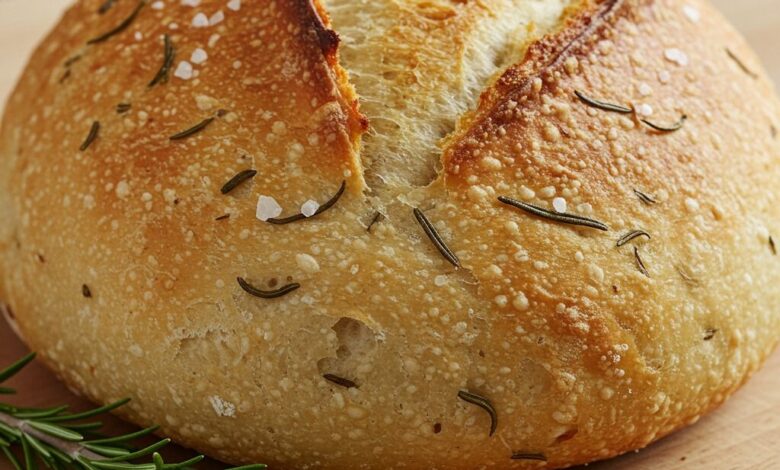
There’s nothing quite like the smell of fresh, warm bread baking in your kitchen. It fills your home with comfort and promises a delicious treat. This recipe for Crusty Warm Bread delivers just that – a beautiful loaf with a golden, crackly crust and a soft, airy interior. It’s truly a special experience to pull a homemade loaf from the oven.
You might think making bread is complicated, but I promise you, it’s easier than you imagine! This recipe uses simple ingredients and straightforward steps, making it perfect for beginners. We’ll guide you through each stage, ensuring a successful and incredibly rewarding baking journey. Forget store-bought; homemade is always best!
So, get ready to unleash your inner baker and impress yourself and your loved ones. You’re about to unlock the secret to perfect loaves today. Let’s dive in and create some amazing bread together!
Cooking Time & Prep Time
- Prep Time: 25 minutes
- First Rise Time: 60-90 minutes
- Second Rise Time: 30-45 minutes
- Cooking Time: 30-35 minutes
- Total Active Time: Approximately 55 minutes (plus resting/rising)
Small tip: Bread making involves a lot of waiting for the dough to rise. Use this time to tidy your kitchen or relax!
Ingredients
This recipe makes 1 large loaf (approximately 10-12 servings).
- For the Dough:
- 3 cups (360g) all-purpose flour, plus more for dusting
- 1 teaspoon (4g) active dry yeast
- 1 teaspoon (6g) granulated sugar (optional, helps activate yeast)
- 1 teaspoon (6g) fine sea salt
- 1 ½ cups (360ml) warm water (105-115°F / 40-46°C)
- 1 tablespoon olive oil, plus more for greasing the bowl
Step-by-Step Instructions
-
Step 1: Activate the Yeast
In a large mixing bowl, combine the warm water, yeast, and sugar (if using). Stir gently and let it sit for 5-10 minutes. The mixture should become foamy, indicating the yeast is active and ready to go.
Small tip: Make sure your water isn’t too hot, or it will kill the yeast. Lukewarm is perfect!
-
Step 2: Combine Dry Ingredients
In a separate bowl, whisk together the flour and salt. This ensures the salt is evenly distributed throughout the dough. You want every bite to be perfectly seasoned.
-
Step 3: Mix the Dough
Pour the olive oil into the activated yeast mixture. Then, gradually add the dry flour mixture to the wet ingredients, stirring with a wooden spoon or a sturdy spatula until a shaggy dough forms. It will look a bit rough and sticky at this stage.
Small tip: Don’t overmix. Just combine until there’s no dry flour visible.
-
Step 4: Knead the Dough
Transfer the dough to a lightly floured surface. Knead for 5-7 minutes until the dough becomes smooth and elastic. If it’s too sticky, add a tiny bit more flour, but be careful not to add too much. You can also use a stand mixer with a dough hook for 4-5 minutes.
Small tip: To test if it’s kneaded enough, gently stretch a small piece. If it forms a thin “windowpane” without tearing, it’s ready.
-
Step 5: First Rise (Bulk Fermentation)
Lightly grease a clean large bowl with olive oil. Place the kneaded dough in the bowl, turning it once to coat all sides with oil. Cover the bowl tightly with plastic wrap or a clean kitchen towel. Let it rise in a warm, draft-free place for 60-90 minutes, or until it has doubled in size.
Small tip: A slightly warm oven (turned off!) or a sunny spot on your counter works well for rising.
-
Step 6: Shape the Loaf
Gently punch down the risen dough to release the air. Transfer it to a lightly floured surface. Gently shape it into a round or oval loaf. Try to create some surface tension by tucking the edges underneath to form a smooth top.
Small tip: Handle the dough gently to keep some of the air bubbles created during the first rise.
-
Step 7: Second Rise (Proofing)
Place the shaped loaf on a baking sheet lined with parchment paper, or in a well-floured proofing basket (banneton) if you have one. Cover it loosely with plastic wrap or a kitchen towel. Let it rise again for 30-45 minutes, or until it looks visibly puffy and has increased by about 50%.
Small tip: While the dough is on its second rise, preheat your oven and baking vessel.
-
Step 8: Preheat Oven and Baking Vessel
About 30 minutes before baking, preheat your oven to 450°F (230°C) with a Dutch oven (with lid) or a heavy oven-safe pot inside. Heating the pot ensures a wonderfully crusty bottom and good oven spring.
Small tip: If you don’t have a Dutch oven, you can bake on a baking sheet, but place a pan of hot water on the bottom rack for steam.
-
Step 9: Score and Bake
Carefully remove the hot Dutch oven from the oven. Gently transfer the risen dough into the hot pot. Using a sharp knife or a bread lame, make one or two shallow cuts (about ½ inch deep) on the top of the loaf. This helps the bread expand beautifully. Cover the Dutch oven with its lid.
-
Step 10: Bake Covered, Then Uncovered
Bake the bread covered for 25 minutes. Then, carefully remove the lid and continue baking for another 5-10 minutes, or until the crust is deep golden brown and sounds hollow when tapped on the bottom. An instant-read thermometer inserted into the center should read 200-210°F (93-99°C).
Small tip: The covered baking creates steam, which is essential for that amazing crust!
-
Step 11: Cool Completely
Carefully remove the bread from the Dutch oven and transfer it to a wire rack. Let it cool completely for at least 1-2 hours before slicing. This allows the internal structure to set and prevents a gummy texture.
Small tip: It’s tempting, but resist slicing too early! Cooling is crucial for the best texture and flavor.
Tips & Variations
- Gluten-Free Option: For a gluten-free loaf, replace all-purpose flour with a high-quality gluten-free bread flour blend. You might need to adjust the water slightly as gluten-free flours absorb liquids differently. Psyllium husk powder (about 1-2 tablespoons) can help with structure.
- Vegan/Vegetarian Option: This recipe is naturally vegan and vegetarian! No animal products are used, making it a wonderful option for everyone.
- Add More Flavor or Protein: Incorporate ½ cup of seeds (like sunflower, pumpkin, or flax) or chopped nuts into the dough during the kneading stage for added texture and nutrition. You could also fold in ½ cup of shredded cheese (cheddar or Gruyere) for a savory twist.
- Spicy Version: For a kick, add 1-2 finely chopped jalapeños (seeds removed for less heat) and ½ teaspoon of red pepper flakes to the dry ingredients before mixing with the wet.
- Herb & Garlic Bread: Mix in 2 tablespoons of fresh chopped herbs (rosemary, thyme, or oregano) and 2 cloves of minced garlic during the kneading process for an aromatic loaf. Brush with garlic butter after baking for extra flavor.
Nutritional Information
Approximate values per serving (based on 10 servings):
- Calories: 170 kcal
- Protein: 5g
- Carbohydrates: 32g
- Fat: 2g
Note: Nutritional values may vary depending on specific brands and exact amounts of ingredients used.
Health Benefits
Making your own bread offers several health advantages. You control all the ingredients, avoiding unwanted preservatives or additives often found in store-bought loaves. This simple recipe uses basic, wholesome components.
Flour, especially if you opt for whole wheat, provides essential complex carbohydrates, which are a great source of sustained energy. It also contains dietary fiber, important for digestive health and maintaining stable blood sugar levels.
Yeast, a living organism, contributes to the fermentation process. This process can help break down some of the starches in the flour, potentially making the bread easier to digest. It also adds a unique flavor profile.
Choosing olive oil in your recipe adds healthy monounsaturated fats. These fats are known for their heart-healthy benefits. Enjoying homemade bread in moderation can be a delicious and nourishing part of a balanced diet.
Serving Suggestions
- With Soups & Stews: This crusty bread is perfect for soaking up hearty soups like lentil or tomato, and rich stews.
- For Sandwiches: Slice thick pieces for delicious sandwiches filled with your favorite meats, cheeses, or veggies.
- As a Side Dish: Serve alongside a fresh green salad or a pasta dish to complete your meal.
- Breakfast Toast: Enjoy toasted with butter and jam, or avocado for a simple, satisfying breakfast.
- Bruschetta Base: Slice, toast lightly, and top with fresh tomatoes, basil, and a drizzle of olive oil for an appetizer.
Storage Tips: Store your homemade bread at room temperature in a breathable bread bag or wrapped in a clean kitchen towel. It will stay fresh for 2-3 days. Avoid refrigerating, as it can dry out the bread quickly. For longer storage, slice the cooled loaf and freeze in an airtight freezer bag for up to 3 months. To reheat, simply toast slices from frozen, or wrap the whole loaf in foil and warm in a 350°F (175°C) oven for 15-20 minutes until warmed through and crusty again.
Conclusion
Congratulations, you’ve just created a masterpiece! This Crusty Warm Bread is more than just a recipe; it’s an experience. The satisfying aroma, the golden crust, and the soft, tender crumb are all testaments to your baking prowess. It’s truly amazing what simple ingredients can achieve with a little time and care.
Don’t hesitate to make this a regular part of your kitchen routine. Each loaf you bake will build your confidence and refine your skills. Remember, practice makes perfect, but even your first loaf will be incredibly delicious and rewarding.
Slice it, share it, and savor every bite. There’s immense joy in sharing homemade food with family and friends. So go ahead, spread the warmth and happiness that only a perfect loaf of homemade bread can bring!




