Introduction
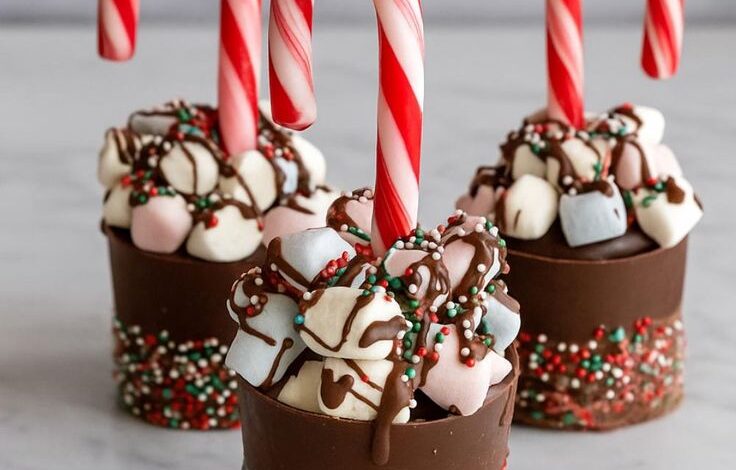
Get ready to add a sprinkle of magic to your holiday season with these incredible Christmas Chocolate Caramel Cups! Imagine a rich, snappy chocolate shell giving way to a luscious, gooey caramel filling, all topped with festive cheer. These little bites are pure indulgence, a perfect blend of sweet and satisfying that will delight everyone.
The best part? These decadent treats are surprisingly easy to make and require absolutely no baking! You can whip up a batch in no time, making them ideal for last-minute holiday gatherings or a fun project with the family. With simple ingredients and straightforward steps, you’ll be a chocolate caramel cup master in no time.
So, gather your ingredients, put on some holiday tunes, and let’s dive into making these irresistible Christmas Chocolate Caramel Cups. They’re guaranteed to bring sweet joy and festive smiles to your home. Let the indulging begin!
Cooking Time & Prep Time
- Prep Time: 35 minutes
- Chilling Time: 60 minutes (minimum)
- Total Time: 95 minutes
Small tip: The chilling time is crucial for the cups to set properly. You can easily make these a day or two in advance and store them in the fridge, making holiday entertaining a breeze!
Ingredients
This recipe makes approximately 18-24 mini Christmas Chocolate Caramel Cups, depending on the size of your molds.
For the Chocolate Shells
- 12 ounces (about 2 cups) good quality semi-sweet chocolate chips or chopped baking chocolate
- 1 tablespoon coconut oil (optional, helps with melting and shine)
For the Salted Caramel Filling
- 1/2 cup granulated sugar
- 2 tablespoons water
- 1/4 cup heavy cream (warmed slightly)
- 2 tablespoons unsalted butter, cut into small cubes (room temperature)
- 1/4 teaspoon sea salt flakes, plus more for garnish
- 1 teaspoon vanilla extract
For Decoration (Optional)
- Festive sprinkles (red, green, white)
- More sea salt flakes for sprinkling
Step-by-Step Instructions
-
Step 1: Prepare Your Molds
Line a mini muffin tin with paper liners. You can also use silicone mini muffin molds for easy removal. This preparation ensures your cups will come out perfectly shaped and easy to handle.
-
Step 2: Melt the First Chocolate Layer
In a microwave-safe bowl, combine the chocolate chips and coconut oil (if using). Microwave in 30-second intervals, stirring well after each, until smooth and fully melted. Alternatively, use a double boiler for a gentle melt. Small tip: Be careful not to overheat the chocolate, as it can seize. Low and slow is the way to go!
-
Step 3: Create the Chocolate Shells
Spoon about 1 teaspoon of melted chocolate into the bottom of each paper liner. Use the back of the spoon or a small brush to spread the chocolate up the sides of the liner, creating a cup shape. Place the muffin tin in the refrigerator for 10-15 minutes to allow the chocolate to set.
-
Step 4: Make the Salted Caramel Filling
In a small, heavy-bottomed saucepan, combine the granulated sugar and water. Cook over medium heat, stirring gently until the sugar dissolves. Once dissolved, stop stirring and let the mixture boil until it turns a deep amber color. This usually takes about 5-8 minutes. Small tip: Resist the urge to stir once the sugar dissolves to prevent crystallization. Gently swirl the pan if needed.
-
Step 5: Finish the Caramel
Carefully remove the saucepan from the heat. Slowly pour in the warmed heavy cream while whisking constantly. Be cautious, as the mixture will bubble up vigorously. Add the butter cubes, sea salt, and vanilla extract, whisking until the butter is fully melted and the caramel is smooth. Let the caramel cool slightly at room temperature for about 10-15 minutes.
-
Step 6: Fill with Caramel
Once the chocolate shells are set and the caramel has cooled slightly (it should still be pourable but not piping hot), spoon about 1/2 to 1 teaspoon of caramel into each chocolate cup. Leave a small space at the top for the final chocolate layer. Return the muffin tin to the refrigerator for another 15-20 minutes to allow the caramel to firm up slightly.
-
Step 7: Add the Top Chocolate Layer and Decorate
Re-melt any remaining chocolate if it has hardened. Spoon about 1/2 teaspoon of melted chocolate over the caramel in each cup, gently spreading to cover. Immediately sprinkle with festive sprinkles or a pinch of sea salt flakes, if desired. Small tip: Work quickly when adding the top chocolate layer and sprinkles, as the chocolate will set fast on the cold caramel.
-
Step 8: Chill and Serve
Place the muffin tin back into the refrigerator for at least 30 minutes, or until the chocolate cups are completely firm. Once set, carefully remove the cups from the muffin tin. Peel off the paper liners just before serving. Enjoy your delightful Christmas Chocolate Caramel Cups!
Tips & Variations
- Gluten-Free Option: This recipe is naturally gluten-free! Just ensure that your chocolate chips and sprinkles are certified gluten-free by checking their labels.
- Vegan Option: To make these vegan, use a good quality dairy-free chocolate (like dark chocolate), substitute the heavy cream with full-fat canned coconut cream (the thick part from the top), and use a plant-based butter alternative.
- Nutty Protein Boost: For a delightful crunch and a bit of protein, add a thin layer of your favorite nut butter (peanut, almond, or cashew) on top of the caramel before adding the final chocolate layer.
- Spicy Kick: Infuse a little warmth into your caramel by adding a tiny pinch (1/8 teaspoon) of cayenne pepper or chili powder to the caramel mixture along with the salt. It creates an unexpected and delicious flavor twist!
- Flavor Swaps: Experiment with different chocolate types (milk or dark chocolate for the shell). You can also add a few drops of peppermint extract to the chocolate for a minty twist, or a dash of espresso powder to the caramel for a coffee-caramel flavor.
Nutritional Information
Approximate values per serving (based on 20 servings):
- Calories: 180 kcal
- Protein: 2 g
- Carbohydrates: 25 g
- Fat: 10 g
Please note: These values are approximate and may vary depending on the specific brands and ingredients used.
Health Benefits
While these Christmas Chocolate Caramel Cups are an indulgence, some of their main ingredients offer surprising benefits:
- Dark Chocolate: High-quality dark chocolate (especially 70% cocoa or higher) is packed with antioxidants, which can help fight free radicals in the body. It also contains minerals like iron, magnesium, and copper.
- Mood Booster: Chocolate is known to stimulate the production of endorphins, which are natural mood elevators. Enjoying a delicious treat in moderation can contribute to feelings of happiness and well-being, especially during the festive season.
- Source of Energy: Sugar and carbohydrates provide a quick source of energy, which can be useful when you need a little pick-me-up during busy holiday preparations.
- Healthy Fats: While butter and cream contribute to the fat content, they also provide satiety, helping you feel satisfied. Coconut oil, if used, contains medium-chain triglycerides (MCTs) which are easily digestible and can be used for energy.
Serving Suggestions
- Serve these elegant cups on a festive platter alongside other holiday cookies and treats for a stunning dessert spread.
- They are perfect as a delightful after-dinner treat with a cup of hot coffee, tea, or a glass of cold milk.
- Offer them as a thoughtful homemade gift, packed in a beautiful box or tin for friends, family, or neighbors.
- These are definitely a dessert or treat, not suitable as a main or side dish. They shine as a sweet finale to any meal.
- Meal Prep Idea: Make a large batch ahead of time for holiday parties or to simply have on hand for when sweet cravings strike. They keep wonderfully.
Storage Tips
Store your Christmas Chocolate Caramel Cups in an airtight container in the refrigerator for up to 1-2 weeks. They can also be frozen for longer storage; place them in a single layer in a freezer-safe container or bag for up to 1-2 months. To enjoy after freezing, simply let them thaw in the refrigerator or at room temperature for about 30 minutes. No reheating is necessary; they are best enjoyed chilled or at room temperature.
Conclusion
And there you have it – your very own batch of gorgeous Christmas Chocolate Caramel Cups! These little gems are the epitome of holiday indulgence: rich, sweet, and utterly irresistible. They prove that you don’t need to spend hours in the kitchen to create something truly spectacular and memorable.
We hope you feel inspired to try this recipe and bring some extra sparkle to your festive celebrations. Whether you stick to the classic recipe or get creative with our variations, you’re in for a treat. The joy of making something homemade is a gift in itself.
So go ahead, make a batch (or two!), share them with your loved ones, and savor every single bite. These Christmas Chocolate Caramel Cups are more than just a dessert; they’re a little piece of sweet joy to share and create wonderful holiday memories. Happy holidays and happy indulging!