

Introduction
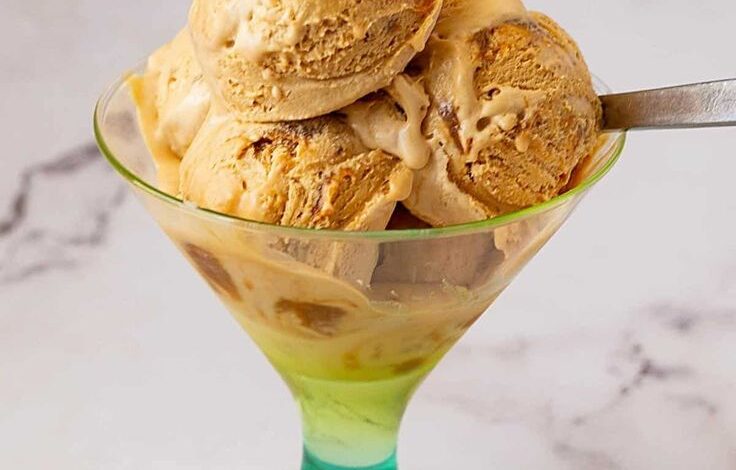
Get ready to discover your new favorite dessert! Dulce de Leche Ice Cream is a dream come true for anyone who loves rich, creamy flavors. This ice cream is packed with the sweet, caramelized goodness of dulce de leche, swirled into a velvety smooth base. It’s truly a taste of heaven in every scoop!
The best part? Making this incredible treat at home is surprisingly simple. Forget complicated custard bases or endless churning. Our recipe uses a no-churn method, meaning you just need a few ingredients and a mixer. It’s quick to put together, and the freezer does most of the hard work for you.
So, are you ready to impress your family and friends, or simply treat yourself to something truly special? Follow along, and you’ll be enjoying homemade Dulce de Leche Ice Cream sooner than you think. It’s a delightful experience from start to finish!
Cooking Time & Prep Time
- Prep Time: 20 minutes
- Cooking Time: 0 minutes (no cooking required!)
- Freeze Time: 6-8 hours (or overnight)
- Total Time: Approximately 6 hours 20 minutes (mostly inactive freeze time)
Small tip: For the best results, make sure your heavy cream and mixing bowl are very cold before you start whipping. This helps the cream whip up faster and fluffier!
Ingredients
This recipe makes about 8 servings (approximately 1.5 quarts of ice cream).
- 2 cups (475ml) cold heavy cream (at least 36% fat)
- 1 can (14 ounces / 397g) sweetened condensed milk, chilled
- 1 teaspoon vanilla extract
- 1/2 teaspoon fine sea salt
- 1 cup (240g) high-quality dulce de leche, plus extra for swirling and topping
Step-by-Step Instructions
-
Step 1: Chill Your Equipment
Place a large mixing bowl and the whisk attachment of your stand mixer (or electric hand mixer beaters) into the freezer for 10-15 minutes. This step is crucial for achieving perfectly whipped cream. A cold bowl helps the cream whip faster and maintain its volume.
Small tip: A metal bowl works best for chilling as it retains coldness longer.
-
Step 2: Whip the Heavy Cream
Remove the chilled bowl and whisk from the freezer. Pour the cold heavy cream into the bowl. Start whipping the cream on medium speed, gradually increasing to high. Continue whipping until stiff peaks form. This means the cream will hold its shape when you lift the whisk.
Small tip: Watch the cream carefully! Over-whipping can turn it into butter. Stop as soon as stiff peaks appear.
-
Step 3: Combine Condensed Milk Mixture
In a separate medium bowl, combine the chilled sweetened condensed milk, vanilla extract, and fine sea salt. Whisk these ingredients together until they are well combined and smooth. The salt helps to balance the sweetness and enhance the caramel flavor.
Small tip: Make sure your condensed milk is cold; it helps to keep the overall mixture cool for freezing.
-
Step 4: Fold in the Whipped Cream
Gently fold about one-third of the whipped cream into the condensed milk mixture. Use a spatula and a light hand to combine. This lightens the condensed milk base, making it easier to incorporate the rest of the cream without deflating it.
Small tip: Use a “cut and fold” motion, bringing the spatula down through the center and folding the mixture over itself.
-
Step 5: Add Remaining Whipped Cream
Add the remaining whipped cream to the bowl with the condensed milk mixture. Continue to gently fold until no streaks of white cream remain and the mixture is uniform. Be careful not to overmix, as this will lose the airiness of the whipped cream.
Small tip: The goal is to keep as much air in the mixture as possible for a light, fluffy ice cream texture.
-
Step 6: Swirl in Dulce de Leche
Pour about half of the ice cream mixture into a freezer-safe container (a loaf pan or a shallow dish works well). Dollop half of the 1 cup of dulce de leche over the top. Use a knife or a skewer to gently swirl the dulce de leche into the ice cream base.
Small tip: Don’t over-swirl! You want distinct ribbons of dulce de leche, not a fully mixed-in color.
-
Step 7: Layer and Swirl Again
Add the remaining ice cream mixture to the container. Dollop the rest of the 1 cup of dulce de leche on top. Repeat the gentle swirling motion. You can add a few extra dollops of dulce de leche on top for a beautiful finish before freezing.
Small tip: For extra richness, slightly warm the dulce de leche for 10-15 seconds in the microwave to make it easier to swirl.
-
Step 8: Freeze the Ice Cream
Cover the container tightly with plastic wrap or a lid. Place it in the freezer for at least 6-8 hours, or preferably overnight, until the ice cream is firm. Freezing overnight ensures it’s perfectly set and scoopable.
Small tip: Place the container at the back of the freezer where the temperature is most consistent for optimal freezing.
-
Step 9: Serve and Enjoy!
Once frozen, remove the ice cream from the freezer about 5-10 minutes before serving to allow it to soften slightly. Scoop into bowls or cones. You can drizzle with extra dulce de leche or add your favorite toppings. Enjoy your homemade treat!
Small tip: Dip your ice cream scoop in hot water before scooping for easier, cleaner scoops.
Tips & Variations
- Gluten-Free Option: This Dulce de Leche Ice Cream recipe is naturally gluten-free! Enjoy it as is without any modifications.
- Vegan Option: To make this recipe vegan, substitute heavy cream with full-fat coconut cream (chilled overnight, use the thick cream part only). Use a vegan sweetened condensed milk alternative and a plant-based dulce de leche (often made from coconut milk or cashews).
- Add More Protein: Boost the protein by stirring in 1/4 cup of unflavored or vanilla protein powder with the sweetened condensed milk mixture. You could also fold in a handful of chopped nuts like pecans or walnuts for added texture and protein.
- Spicy Version: For a delightful kick, add 1/4 teaspoon of ground cayenne pepper or a pinch of chili powder to the sweetened condensed milk mixture. This adds a subtle warmth that beautifully complements the sweet caramel.
- Coffee Swirl: Add 1-2 tablespoons of strong brewed coffee or espresso powder (dissolved in a tiny bit of hot water) to your dulce de leche before swirling for a delicious coffee-caramel twist.
- Chocolate Chip Delight: Fold in 1/2 cup of mini chocolate chips or chopped chocolate chunks into the ice cream base before the final swirl for a delightful texture and flavor contrast.
Nutritional Information
Approximate values per serving (based on 8 servings):
- Calories: 420-450 kcal
- Protein: 5-6g
- Carbohydrates: 45-50g
- Fat: 28-32g
Note: Values may vary depending on specific brands and exact amounts of ingredients used. This is an estimate for guidance only.
Health Benefits
While this is a delightful dessert, the ingredients do offer some nutritional benefits!
- Dairy Goodness: Heavy cream and sweetened condensed milk are dairy products. They are excellent sources of calcium, which is vital for strong bones and teeth. Dairy also provides phosphorus and vitamin D (if fortified), further supporting bone health.
- Protein Power: Dairy contains high-quality protein, essential for muscle repair, growth, and overall body function. Each serving contributes a small but meaningful amount of protein.
- Energy Boost: The sugars in dulce de leche and condensed milk provide a quick source of energy. While best enjoyed in moderation, they can offer a delightful pick-me-up.
- Mood Enhancer: The simple act of enjoying a delicious homemade treat can boost your mood and reduce stress. Food enjoyment is an important part of a balanced lifestyle.
Serving Suggestions
- Classic Scoop: Serve simply in a bowl or a sugar cone, perhaps with an extra drizzle of dulce de leche or a sprinkle of sea salt.
- Dessert Companion: Pair it with warm brownies, apple pie, or a slice of chocolate cake for an ultimate dessert experience.
- Affogato Style: Add a scoop to a shot of hot espresso for a decadent coffee treat.
- Milkshake Magic: Blend a few scoops with milk and a touch more dulce de leche for an amazing milkshake.
Storage Tips
Store Dulce de Leche Ice Cream in an airtight, freezer-safe container. It will keep well in the freezer for up to 2-3 weeks for the best quality. Beyond that, it might start to develop ice crystals, though it will still be safe to eat. This is an ice cream, so it cannot be stored in the fridge for long periods, as it will melt. Do not reheat; simply let it soften at room temperature for a few minutes before serving.
Conclusion
There you have it – a truly irresistible Dulce de Leche Ice Cream recipe that’s surprisingly easy to make at home. The rich, creamy texture combined with that unmistakable caramel flavor makes it a dessert that’s hard to forget. It’s perfect for any occasion, from a casual weeknight treat to a special gathering.
Don’t be intimidated by making ice cream from scratch. Our no-churn method takes away all the fuss, leaving you with pure frozen delight. The effort is minimal, but the reward is immense. You’ll be amazed at how professional and delicious your homemade version tastes.
So go ahead, gather your ingredients, and whip up a batch of this fantastic ice cream. Share it with your loved ones, or keep it all to yourself – we won’t tell! Enjoy every single scoop of this sweet, caramel dream.




