

Introduction
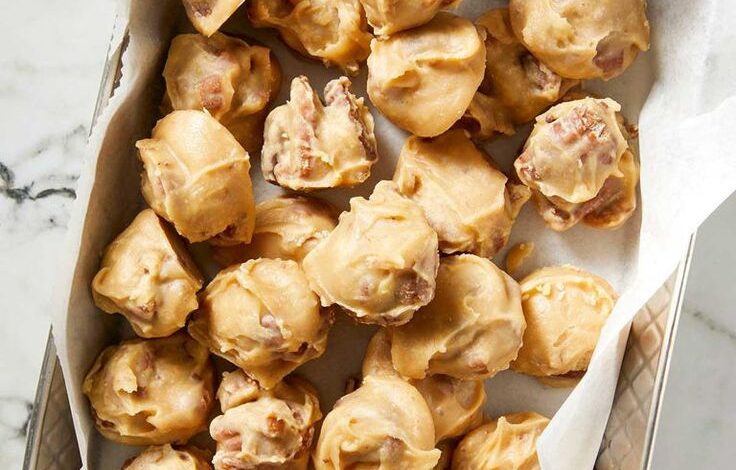
Get ready to discover a truly magical holiday treat: Christmas Pralines! These delightful Southern confections are famous for their creamy, melt-in-your-mouth texture and rich, buttery pecan flavor. They are a beloved staple during the festive season, bringing a taste of warmth and tradition to any gathering. Each bite is a sweet, nutty hug that captures the spirit of Christmas.
You might think making pralines is complicated, but it’s surprisingly simple! With just a few common ingredients and straightforward steps, you can create these gourmet candies right in your own kitchen. The process is quick, rewarding, and fills your home with an irresistible aroma that truly signals the holidays are here. Forget store-bought; homemade pralines are always the best!
So, why not add a touch of homemade charm to your holiday celebrations this year? This recipe will guide you through every step, ensuring perfect, delicious Christmas Pralines every time. Gather your ingredients, put on some festive music, and let’s make some sweet memories together!
Cooking Time & Prep Time
- Prep Time: 15 minutes
- Cooking Time: 15-20 minutes
- Total Time: 30-35 minutes
Small tip: Have all your ingredients measured and ready before you start cooking. Praline making moves quickly once the heat is on!
Ingredients
This recipe makes approximately 24-30 pralines, depending on size.
- 2 cups granulated sugar
- 1 cup packed light brown sugar
- 1/2 cup heavy cream
- 1/2 cup whole milk
- 1/2 cup (1 stick) unsalted butter, cut into cubes
- 1 teaspoon pure vanilla extract
- 1/2 teaspoon salt
- 2 cups pecan halves
Step-by-Step Instructions
-
Step 1: Prepare Your Baking Surface
Line two large baking sheets with parchment paper or silicone mats. This is where your hot pralines will cool and set. Make sure your surface is ready before you begin cooking.
Small tip: You can also lightly grease the parchment paper for extra non-stick insurance, though it’s usually not necessary.
-
Step 2: Combine Sugars and Liquids
In a large, heavy-bottomed saucepan, combine the granulated sugar, brown sugar, heavy cream, and whole milk. Stir these ingredients together gently until they are well mixed. Use a sturdy whisk or spoon for this step.
Small tip: A heavy-bottomed pan helps distribute heat evenly and prevents scorching.
-
Step 3: Add Butter and Heat
Add the cubed unsalted butter to the sugar and liquid mixture in the saucepan. Place the saucepan over medium heat. Stir constantly until the sugar dissolves and the butter melts completely.
Small tip: Don’t rush this step; ensure the sugar is fully dissolved to prevent a grainy texture in your finished pralines.
-
Step 4: Bring to a Boil and Cook
Once the sugar is dissolved and the mixture is smooth, stop stirring. Bring the mixture to a rolling boil. Continue to boil without stirring until a candy thermometer reads 238°F (114°C), which is the soft-ball stage.
Small tip: Periodically dip a pastry brush in water and wipe down the sides of the pan to prevent sugar crystals from forming.
-
Step 5: Remove from Heat and Add Flavorings
Carefully remove the saucepan from the heat once it reaches the correct temperature. Immediately stir in the vanilla extract and salt. Add the pecan halves to the mixture as well.
Small tip: Have your vanilla, salt, and pecans measured and ready to add as soon as the pan comes off the heat.
-
Step 6: Stir to Thicken
Now comes the crucial part! Stir the mixture continuously and vigorously with a wooden spoon or heat-proof spatula. You’ll notice the mixture start to thicken and become opaque, losing its glossy sheen. It will also begin to look slightly grainy around the edges.
Small tip: This stirring process can take 3-5 minutes. Keep stirring until it looks like thick peanut butter and drops in dollops, not a stream.
-
Step 7: Drop Pralines onto Prepared Sheets
Working quickly, drop spoonfuls of the praline mixture onto your prepared parchment-lined baking sheets. Use about 1 1/2 to 2 tablespoons per praline. Shape them into rough circles or ovals.
Small tip: If the mixture starts to harden too much in the pan, you can gently warm it over very low heat for a few seconds to loosen it, but be careful not to overcook.
-
Step 8: Cool and Set
Allow the pralines to cool completely on the baking sheets. This will take about 30-60 minutes at room temperature. They will firm up and become solid as they cool. Once firm, they are ready to enjoy!
Small tip: Do not try to move them before they are fully set, or they will lose their shape.
Tips & Variations
- Gluten-Free Option: This recipe is naturally gluten-free! All ingredients used are free from gluten, making it a wonderful treat for everyone.
- Vegan or Vegetarian Option: To make these pralines vegan, substitute the heavy cream with full-fat coconut cream (chilled overnight, use the thick cream from the top), whole milk with plant-based milk (like almond or oat milk), and unsalted butter with a high-quality vegan butter stick.
- Boost Nutrient Content: While pralines are a treat, you can add more healthy fats and fiber by incorporating other nuts like chopped walnuts or almonds alongside the pecans. A sprinkle of chia seeds or flax meal can also be folded in during the final stirring stage for a subtle boost, though it may alter texture slightly.
- Spicy Version: For a delightful kick, add 1/4 teaspoon of cayenne pepper along with the salt and vanilla extract. The subtle heat beautifully complements the sweet, nutty flavor. You can also use a pinch of chili powder.
- Festive Flavors: Enhance the Christmas spirit by adding 1/2 teaspoon of ground cinnamon or a pinch of nutmeg with the vanilla. A tiny splash of bourbon or rum (about 1 tablespoon) can also be added at the end for an adult twist, just before stirring to thicken.
Nutritional Information
Approximate values per serving (based on 24 servings):
- Calories: 220 kcal
- Protein: 2g
- Carbohydrates: 28g
- Fat: 12g
Note: These values are approximate and may vary depending on specific brands and exact amounts of ingredients used.
Health Benefits
While Christmas Pralines are a delicious indulgence, some of their key ingredients do offer nutritional benefits.
Pecans, the star of this dish, are packed with healthy fats, primarily monounsaturated and polyunsaturated fats. These are known to be good for heart health when consumed in moderation. They also provide a good source of dietary fiber, which aids digestion and can help manage blood sugar levels.
Beyond healthy fats and fiber, pecans are rich in antioxidants, which help protect your body’s cells from damage. They are also a good source of several important minerals, including manganese, copper, and zinc. Manganese is vital for bone health and metabolism, while copper supports nerve function and red blood cell formation.
Dairy products like heavy cream and whole milk contribute calcium for strong bones and teeth, and essential vitamins like Vitamin A and D (if fortified). Butter, in moderation, provides some fat-soluble vitamins. While the sugar content means these should be enjoyed as a treat, the pecans certainly bring some goodness to the table!
The combination offers a burst of energy, thanks to the sugars and fats, making them a comforting treat for the colder holiday season.
Serving Suggestions
- Holiday Dessert Platter: Arrange your beautiful pralines on a festive platter with other holiday cookies and candies for an impressive dessert spread.
- Coffee & Tea Companion: Enjoy a praline alongside a warm cup of coffee, espresso, or your favorite herbal tea. The creamy sweetness pairs wonderfully.
- Gift Giving: Wrap individual pralines in cellophane bags or pack them in decorative boxes. They make thoughtful, homemade gifts for friends, family, and neighbors.
- Ice Cream Topping: Roughly chop a few pralines and sprinkle them over a scoop of vanilla or pecan ice cream for an extra decadent dessert.
Storage Tips
Store Christmas Pralines in an airtight container at room temperature for up to 1 week. If your home is particularly warm, they can be stored in the refrigerator for up to 2 weeks, but allow them to come to room temperature for the best texture before serving. Pralines can be frozen for up to 2-3 months; wrap them individually in plastic wrap, then place them in a freezer-safe bag or container. Thaw at room temperature before serving. Reheating is generally not recommended as it can alter their delicate texture, but if desired, a few seconds in the microwave might soften them slightly.
Conclusion
And there you have it – your very own batch of homemade Christmas Pralines! These sweet, nutty, and utterly irresistible treats are more than just candy; they’re a symbol of holiday warmth and tradition. The process is simple, the aroma is divine, and the result is a truly special confection that will delight everyone.
Don’t be intimidated by candy making; this recipe makes it easy to achieve perfect pralines every time. The joy of creating something so delicious from scratch is incredibly rewarding. You’ll be amazed at how quickly these disappear once your loved ones get a taste!
So go ahead, embrace the festive spirit and make these Christmas Pralines a new tradition in your home. Share them with family, gift them to friends, or simply enjoy them yourself with a cozy cup of tea. Happy baking and happy holidays!




