

Introduction
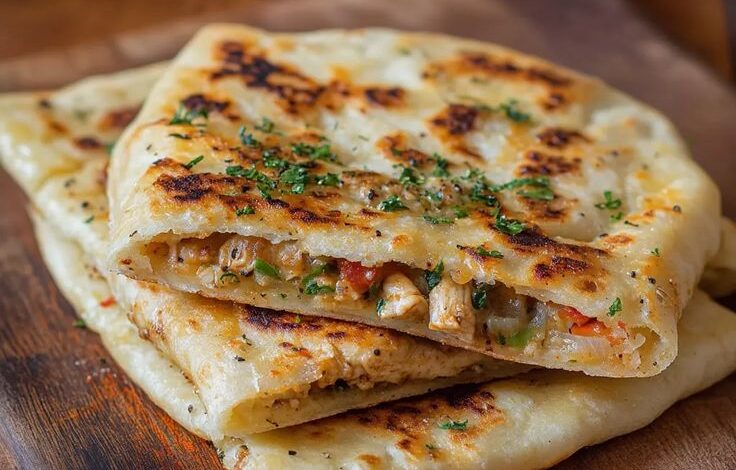
Get ready to discover a true Moroccan treasure: Msemen! These delightful Moroccan square pancakes are a beloved staple, served at breakfast, snack time, or alongside a warm cup of mint tea. They are incredibly flaky, wonderfully chewy, and have a rich, satisfying texture that makes every bite a pure joy.
You might think making such a layered pastry is complicated, but I promise you, it’s surprisingly simple! The process involves a few easy steps of mixing, resting, and folding. With just a handful of basic ingredients and a little patience, you’ll be creating these golden, crispy-edged delights in your own kitchen in no time.
So, roll up your sleeves and let’s bring a taste of Morocco right to your home. This recipe is designed for everyone, from beginners to experienced bakers. Get ready to impress your family and friends with these irresistible Msemen!
Cooking Time & Prep Time
- Prep Time: 30 minutes
- Resting Time: 60 minutes
- Cooking Time: 30 minutes
- Total Time: 2 hours
Small tip: The resting time is crucial for a pliable dough, so don’t rush this step! It makes the dough much easier to work with.
Ingredients
This recipe makes 8-10 delicious servings.
For the Dough:
- 3 cups (360g) all-purpose flour
- 1 cup (160g) fine semolina flour (durum wheat semolina)
- 1 teaspoon salt
- 1 teaspoon granulated sugar (optional, helps with browning)
- 1 ½ cups (360ml) warm water, plus more if needed
For Shaping and Cooking:
- ½ cup (120ml) vegetable oil, or a mix of vegetable and olive oil
- ½ cup (100g) fine semolina flour
- 2 tablespoons (30g) unsalted butter, melted (optional, for extra flakiness)
Step-by-Step Instructions
-
Step 1: Mix the Dough Ingredients
In a large mixing bowl, combine the all-purpose flour, fine semolina, salt, and sugar (if using). Gradually add the warm water, mixing with your hands or a stand mixer with a dough hook. Continue mixing until a shaggy dough forms.
Small tip: The water should be warm, not hot, to activate the gluten without cooking it.
-
Step 2: Knead the Dough
Turn the dough out onto a lightly floured surface. Knead the dough for about 10-15 minutes until it is smooth, elastic, and no longer sticky. It should feel soft and springy to the touch.
Small tip: Don’t be afraid to really work the dough; good kneading develops the gluten for that perfect Msemen texture.
-
Step 3: Rest the Dough
Lightly grease a clean bowl with a little oil. Place the kneaded dough in the bowl, turning it once to coat. Cover the bowl tightly with plastic wrap or a damp kitchen towel. Let the dough rest at room temperature for at least 1 hour.
Small tip: This resting period is essential. It relaxes the gluten, making the dough incredibly easy to stretch thinly.
-
Step 4: Form Dough Balls
After resting, lightly oil your hands and a clean work surface. Divide the dough into 8-10 equal-sized balls, each about the size of a golf ball. Arrange them on the oiled surface, making sure they don’t touch. Lightly oil the tops of the balls to prevent them from drying out.
Small tip: Keep your hands and the surface well-oiled throughout this process to prevent sticking.
-
Step 5: Prepare the Semolina and Butter Mixture
In a small bowl, mix the ½ cup fine semolina with the melted butter (if using). This mixture will be sprinkled on the dough layers for extra flakiness. If not using butter, just have the semolina ready.
Small tip: The semolina prevents the layers from sticking together and gives Msemen its signature crispness.
-
Step 6: Flatten the First Dough Ball
Take one dough ball and place it on your oiled work surface. Using your oiled hands, gently flatten and stretch the dough into a very thin, almost transparent square or rectangle. Try to make it as thin as possible without tearing. You should be able to see through it.
Small tip: Work from the center outwards, gently pulling and stretching. If it tears, just patch it up, it won’t show in the final product.
-
Step 7: Oil and Semolina Dust
Once the dough is stretched thin, drizzle a little oil (and melted butter if using) over the surface. Sprinkle about a teaspoon of the semolina mixture evenly over the entire surface of the stretched dough.
Small tip: Don’t overdo the oil or semolina. A light coating is all you need for perfect layers.
-
Step 8: Fold the Dough (First Fold)
Fold one side of the stretched dough towards the center, about one-third of the way across. Then, fold the opposite side over the first fold, creating a long, narrow rectangle. Drizzle with a little more oil and semolina.
Small tip: Aim for neat folds. This creates the distinct square shape and layers.
-
Step 9: Fold the Dough (Second Fold)
Now, fold one end of the long rectangle towards the center, about one-third of the way. Then, fold the other end over the first fold, forming a neat square. Place the folded square on the oiled surface and cover it to prevent drying. Repeat this process for all remaining dough balls.
Small tip: As you finish each square, cover them with plastic wrap to keep them moist while you work on the others.
-
Step 10: Cook the Msemen
Heat a large non-stick pan or griddle over medium heat. Lightly oil the pan. Take one folded Msemen square and gently flatten it slightly with your hands to your desired thickness (not too thin, or it will lose its layers). Place it on the hot griddle.
Small tip: Cook Msemen one or two at a time, depending on the size of your pan, to avoid overcrowding.
-
Step 11: Flip and Cook Until Golden
Cook for 2-3 minutes on one side until it turns golden brown and slightly puffy. Flip it over, drizzle a tiny bit more oil if needed, and cook for another 2-3 minutes until the second side is also golden and cooked through. The layers should separate slightly.
Small tip: Press gently on the Msemen with a spatula while cooking to encourage even browning and flakiness.
-
Step 12: Serve Warm
Remove the cooked Msemen from the pan and place it on a serving plate. Repeat with the remaining squares. Serve immediately while warm and flaky.
Small tip: You can stack them on a plate covered with a clean kitchen towel to keep them warm while you finish cooking the rest.
Tips & Variations
- Gluten-Free Option: While traditional Msemen relies on wheat gluten for its stretch, you can experiment with a blend of gluten-free flours like rice flour, tapioca starch, and a little xanthan gum. The texture will be different, but still delicious.
- Vegan Option: This recipe is naturally vegan if you omit the optional melted butter for brushing. Simply use vegetable oil for all brushing and cooking steps.
- Add More Vegetables or Protein: For a savory twist, prepare a filling with finely diced onions, bell peppers, cooked ground meat (like beef or lamb), or crumbled firm tofu. Spread a thin layer of the cooled filling over the stretched dough before folding.
- Spicy Version: Incorporate a pinch of cayenne pepper or a teaspoon of harissa paste into the semolina mixture for a subtle kick. For a bolder flavor, mix it into a savory filling.
- Sweet Variations: Serve Msemen with a drizzle of honey, maple syrup, or a sprinkle of powdered sugar. You can also add a touch of orange blossom water or ground cinnamon to the semolina mixture for an aromatic touch.
Nutritional Information
Approximate values per serving (based on 8 servings):
- Calories: 300 kcal
- Protein: 7g
- Carbohydrates: 46g
- Fat: 7.5g
Please note: These values are approximate and may vary depending on the exact ingredients and quantities used.
Health Benefits
Msemen, while a delightful treat, also offers some nutritional benefits from its core ingredients.
- Semolina Flour: Fine semolina, made from durum wheat, is a good source of protein and dietary fiber. Fiber is essential for digestive health and can help keep you feeling full. It also contains B vitamins like folate and thiamine, crucial for energy metabolism.
- All-Purpose Flour: While often refined, all-purpose flour provides carbohydrates, which are the body’s primary source of energy. Opting for unbleached versions can sometimes retain more natural nutrients.
- Healthy Fats: Using a good quality vegetable oil or a blend with olive oil provides healthy monounsaturated and polyunsaturated fats. These fats are important for heart health and can help with the absorption of fat-soluble vitamins.
- Satiety and Energy: The combination of carbohydrates, protein from the flours, and healthy fats makes Msemen a satisfying food. It provides sustained energy, making it a great option for breakfast or a hearty snack.
Serving Suggestions
- Classic Moroccan Style: Serve warm Msemen with a drizzle of honey, a dollop of soft cheese, or alongside a glass of traditional Moroccan mint tea.
- Breakfast Delight: Enjoy Msemen with jam, butter, Nutella, or a side of fresh fruit for a delightful start to your day.
- Savory Snack: Pair plain Msemen with a savory dip like zaalouk (Moroccan eggplant salad) or a spicy harissa sauce.
- Meal Prep Idea: Cook a large batch of Msemen, let them cool, and store them for quick breakfasts or snacks throughout the week. They reheat beautifully.
Storage Tips
Cooked Msemen can be stored in an airtight container at room temperature for up to 2 days, or in the refrigerator for up to 5 days. For longer storage, Msemen freezes exceptionally well. Wrap individual squares tightly in plastic wrap, then place them in a freezer-safe bag or container for up to 2-3 months. To reheat, simply warm them in a dry pan over medium heat until heated through and crisp, or microwave briefly for a softer texture.
Conclusion
There you have it – your very own homemade Moroccan Msemen! These flaky, tender, and utterly delicious square pancakes are more than just a recipe; they’re a taste of Moroccan hospitality and culinary tradition. The process is a delightful journey, and the reward is a stack of golden perfection.
Don’t be intimidated by the folding steps; they are much easier than they look, and practice makes perfect. The joy of pulling apart those soft, layered squares is truly unmatched. It’s a wonderful way to bring a little bit of exotic flavor into your everyday.
So go ahead, give this recipe a try! Share your freshly made Msemen with family and friends, perhaps with a cup of aromatic mint tea. It’s a simple pleasure that creates lasting memories. Happy cooking!




