

Introduction
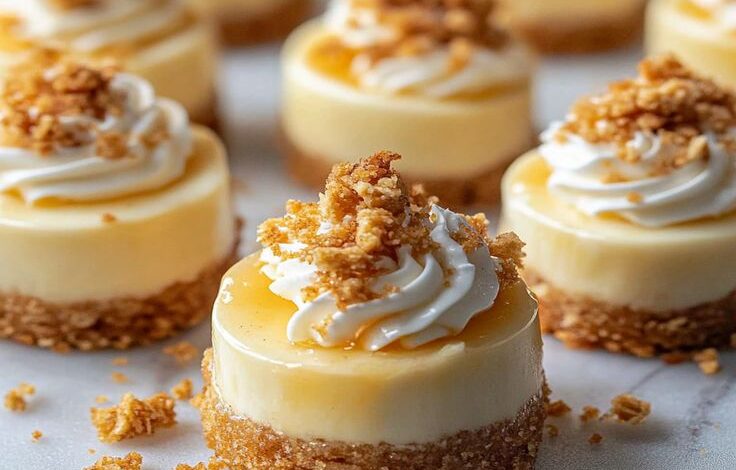
Get ready to discover your new favorite dessert: Apple Crisp Cheesecake Bites! Imagine a delightful combination of creamy, tangy cheesecake, nestled on a buttery graham cracker crust. Then, picture it topped with warm, spiced apple filling and a crunchy, golden oat crisp. These little bites are pure magic, offering all the comforting flavors of apple crisp and the luxuriousness of cheesecake in one perfect mouthful.
What makes these bites truly special is how surprisingly easy they are to create. Forget complicated water baths or long baking times. We’re making individual portions in a muffin tin, which means quick assembly and even quicker baking. It’s a fantastic recipe for both seasoned bakers and beginners alike. You’ll be amazed at how such an impressive dessert can come together with minimal fuss.
Whether you’re looking for a show-stopping treat for a dinner party, a cozy dessert for a quiet evening, or just something wonderfully delicious to brighten your day, these Apple Crisp Cheesecake Bites are the answer. They are utterly irresistible and promise a delightful experience with every bite. So, gather your ingredients, and let’s create some joy!
Cooking Time & Prep Time
- Prep Time: 40 minutes
- Cooking Time: 25 minutes
- Total Time: 65 minutes
Small tip: You can prepare the apple crisp topping and the crust mixture the day before to save time on baking day. Just store them separately in airtight containers in the fridge.
Ingredients
Makes 12-16 bites
For the Graham Cracker Crust:
- 1 ½ cups graham cracker crumbs (about 10-12 full graham cracker sheets)
- ¼ cup granulated sugar
- 6 tablespoons unsalted butter, melted
For the Cheesecake Filling:
- 16 ounces (2 blocks) cream cheese, softened
- ½ cup granulated sugar
- 1 large egg
- 1 teaspoon vanilla extract
- 1 tablespoon fresh lemon juice (optional, but adds a lovely brightness)
For the Apple Crisp Topping:
- 2 medium apples (such as Honeycrisp or Granny Smith), peeled, cored, and finely diced
- 2 tablespoons unsalted butter
- ¼ cup packed light brown sugar
- ½ teaspoon ground cinnamon
- ¼ teaspoon ground nutmeg
- 1 tablespoon all-purpose flour
- ½ cup old-fashioned rolled oats
Step-by-Step Instructions
-
Preheat and Prepare
Preheat your oven to 350°F (175°C). Line a 12-cup standard muffin tin with paper liners. This makes it easy to remove the cheesecake bites once they are baked and cooled.
Small tip: If you don’t have paper liners, you can lightly grease the muffin tin cups instead.
-
Make the Crust
In a medium bowl, combine the graham cracker crumbs and ¼ cup granulated sugar. Pour in the melted butter and mix well until the crumbs are evenly moistened. The mixture should resemble wet sand.
Small tip: You can crush graham crackers in a food processor or by placing them in a Ziploc bag and crushing with a rolling pin.
-
Press the Crust
Divide the graham cracker mixture evenly among the prepared muffin cups. Press the crumbs firmly into the bottom of each cup to form a compact crust. You can use the bottom of a small glass or your fingers to achieve a nice, even layer.
-
Prepare the Cheesecake Filling
In a large bowl, using an electric mixer, beat the softened cream cheese on medium speed until smooth and creamy. Add ½ cup granulated sugar and continue beating until light and fluffy. Scrape down the sides of the bowl as needed.
Small tip: Ensure your cream cheese is truly at room temperature. This prevents lumps and ensures a smooth, silky filling.
-
Add Egg and Flavorings
Beat in the egg, vanilla extract, and lemon juice (if using) until just combined. Be careful not to overmix once the egg is added, as this can introduce too much air and cause cracks in the cheesecake.
-
Fill the Crusts
Spoon the cheesecake filling evenly over the graham cracker crusts in each muffin cup. Fill each cup about two-thirds full. The filling will expand slightly as it bakes.
-
Pre-Bake the Cheesecake
Bake the cheesecake bases in the preheated oven for 12-15 minutes, or until the edges are just set but the centers are still slightly wobbly. Remove from the oven and set aside to cool slightly while you prepare the topping.
-
Prepare the Apple Filling
While the cheesecakes are pre-baking, melt 2 tablespoons of butter in a small saucepan over medium heat. Add the diced apples, ¼ cup brown sugar, cinnamon, and nutmeg. Cook for 5-7 minutes, stirring occasionally, until the apples are slightly softened but still hold their shape. Remove from heat.
-
Make the Crisp Topping
In a separate small bowl, combine the all-purpose flour and rolled oats. Add the softened, cooked apples to this mixture and stir gently to combine. This creates a wonderful apple-oat crisp topping.
Small tip: Don’t overcook the apples. They will soften more in the final bake.
-
Top and Final Bake
Spoon the apple crisp topping evenly over the slightly cooled cheesecake bases in the muffin tin. Return the muffin tin to the oven and bake for another 8-10 minutes, or until the crisp topping is golden brown and the cheesecake centers are set. The topping should look wonderfully inviting.
-
Cool and Chill
Let the cheesecake bites cool completely in the muffin tin on a wire rack. Once cooled to room temperature, transfer the muffin tin to the refrigerator and chill for at least 2 hours, or preferably overnight. Chilling is crucial for the cheesecake to firm up properly and for the flavors to meld beautifully.
Small tip: Chilling also makes them much easier to remove from the liners.
Tips & Variations
- Gluten-Free Option: Simply use gluten-free graham cracker crumbs for the crust and ensure your oats are certified gluten-free. Most other ingredients are naturally gluten-free.
- Vegan Option: Replace cream cheese with vegan cream cheese, butter with vegan butter sticks, and the egg with a flax egg (1 tbsp ground flaxseed meal + 3 tbsp water, let sit for 5 minutes).
- Add More Protein: Boost the protein by adding a tablespoon of finely chopped pecans or walnuts to the crisp topping. You could also sprinkle a tiny bit of protein powder (vanilla or unflavored) into the crisp mixture, ensuring it’s well combined.
- Spicy Version: For a subtle kick, add a pinch of ground ginger or a very tiny dash of cayenne pepper (¼ teaspoon max) to the apple mixture. It adds a surprising warmth that complements the sweet apples.
- Other Flavor Tips: Try adding a drizzle of caramel sauce over the top before serving for extra indulgence. You can also experiment with other fruits like diced pears or a mix of berries in place of or alongside the apples. A sprinkle of sea salt flakes on top of the crisp once baked can also enhance the flavors!
Nutritional Information
Approximate values per serving (based on 12 servings):
- Calories: 320
- Protein: 5g
- Carbohydrates: 35g
- Fat: 18g
Please note that nutritional values are approximate and may vary depending on the specific brands and exact amounts of ingredients used.
Health Benefits
While these Apple Crisp Cheesecake Bites are a delightful treat, they do contain some ingredients with beneficial properties:
- Apples: These wonderful fruits are a good source of dietary fiber, which aids digestion and helps maintain gut health. They also contain Vitamin C, an important antioxidant, and various other antioxidants that can help protect your cells from damage.
- Oats: Rolled oats are whole grains packed with soluble fiber, specifically beta-glucan. This type of fiber is known for its heart-healthy benefits, including helping to lower cholesterol levels and stabilizing blood sugar.
- Cinnamon: More than just a fragrant spice, cinnamon is rich in antioxidants and has been studied for its potential anti-inflammatory properties. It can also help regulate blood sugar levels, making it a great addition to desserts.
- Dairy (Cream Cheese): In moderation, dairy products like cream cheese provide calcium, which is essential for strong bones and teeth. They also offer a source of protein and other vitamins.
Serving Suggestions
- Serve these bites slightly chilled with a dollop of whipped cream or a small scoop of vanilla bean ice cream for an extra special touch.
- A light drizzle of warm caramel sauce or a sprinkle of toasted nuts (pecans, walnuts) elevates their presentation and flavor even further.
- These individual bites are perfect for parties, potlucks, or holiday gatherings. They make excellent portion-controlled desserts.
- Enjoy them with your morning coffee for a decadent breakfast treat, or as an afternoon pick-me-up.
Storage Tips
Store any leftover Apple Crisp Cheesecake Bites in an airtight container in the refrigerator for up to 3-4 days. They taste wonderful cold! For longer storage, these bites can be frozen. Place them in a single layer on a baking sheet to freeze solid, then transfer to a freezer-safe bag or container for up to 1-2 months. Thaw in the refrigerator overnight before serving. Reheating is generally not recommended for cheesecake as it can alter the texture, but if you prefer the crisp topping warm, a quick 5-10 minute reheat in a 300°F (150°C) oven might work, keeping an eye on the cheesecake.
Conclusion
There you have it – a recipe for Apple Crisp Cheesecake Bites that is sure to become a cherished favorite in your kitchen. These delightful treats perfectly balance the creamy richness of cheesecake with the comforting warmth of spiced apples and the satisfying crunch of an oat crisp. They are beautiful to look at, easy to handle, and absolutely heavenly to eat.
Don’t let the idea of making cheesecake intimidate you. Our step-by-step guide is designed to make the process simple and enjoyable, leading you to a dessert that tastes like it came straight from a gourmet bakery. The effort is minimal, but the reward is immense, offering a burst of flavor and texture in every single bite.
So, go ahead and treat yourself, your family, and your friends to these incredible Apple Crisp Cheesecake Bites. They are perfect for any occasion, bringing a touch of sweetness and joy wherever they go. Happy baking, and enjoy every delicious moment!




