Introduction
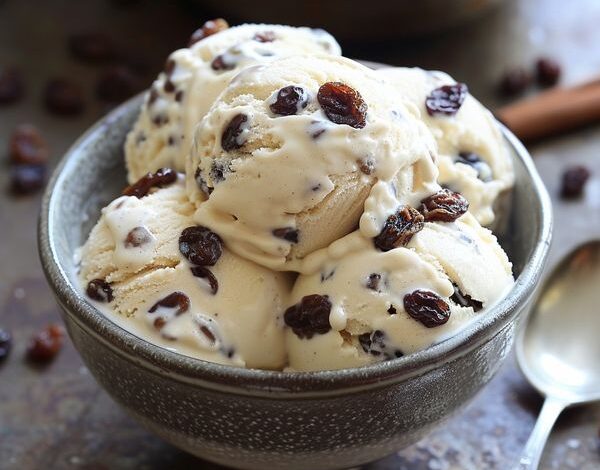
Get ready for a truly special treat! This Rum Raisin Ice Cream is a classic for a reason. It is wonderfully creamy, perfectly sweet, and has a delightful hint of warmth from the rum-soaked raisins. Every spoonful brings a burst of flavor and a touch of nostalgic comfort.
You might think making homemade ice cream is tricky, but it’s much simpler than you imagine. This recipe uses a basic custard base that comes together easily on your stovetop. Most of the time is hands-off, letting the flavors meld and the ice cream churn to perfection.
So, ditch the store-bought tubs and make your own gourmet dessert. You’ll be so proud of this homemade masterpiece. Invite your friends and family to share this incredible Rum Raisin Ice Cream!
Cooking Time & Prep Time
- Prep Time: 25 minutes
- Chilling Time: 4 hours (minimum)
- Churning Time: 25 minutes
- Total Time: 4 hours 50 minutes (plus final freezing time)
Small tip: The chilling time for the custard base is crucial for a smooth, creamy ice cream. Don’t rush this step!
Ingredients
This recipe makes about 8 servings.
For the Rum Raisins:
- 1 cup (150g) seedless raisins
- ½ cup (120ml) dark rum (such as Meyer’s or Gosling’s)
For the Custard Base:
- 2 cups (470ml) whole milk
- 1 cup (240ml) heavy cream
- ¾ cup (150g) granulated sugar, divided
- 6 large egg yolks
- 1 teaspoon pure vanilla extract
- Pinch of salt
Step-by-Step Instructions
-
Step 1: Soak the Raisins
In a small bowl, combine the raisins and dark rum. Stir them gently to ensure all raisins are submerged. Let them soak for at least 30 minutes, or even overnight for a richer flavor. This step plumps up the raisins beautifully.
Small tip: If you’re short on time, you can microwave the raisins and rum for 30 seconds to speed up the soaking process.
-
Step 2: Heat Milk and Cream
In a medium saucepan, combine the whole milk, heavy cream, and half of the granulated sugar (3/8 cup). Heat this mixture over medium heat, stirring occasionally. Bring it just to a simmer, but do not let it boil. You should see small bubbles forming around the edges.
Small tip: Keep an eye on the milk mixture to prevent scorching. A gentle simmer is perfect.
-
Step 3: Whisk Egg Yolks and Sugar
While the milk mixture heats, whisk the egg yolks and the remaining half of the sugar (3/8 cup) in a separate medium bowl. Whisk vigorously until the mixture becomes pale yellow and slightly thickened. This creates a smooth base for your custard.
Small tip: Whisking the yolks and sugar well helps prevent a grainy texture in your finished ice cream.
-
Step 4: Temper the Egg Yolks
Slowly pour about half of the hot milk mixture into the egg yolk mixture, whisking constantly. This crucial step is called tempering and prevents the eggs from scrambling. Once combined, pour the tempered egg mixture back into the saucepan with the remaining hot milk.
Small tip: Pour slowly and whisk quickly to ensure the eggs temper properly.
-
Step 5: Cook the Custard
Return the saucepan to medium-low heat. Cook, stirring constantly with a wooden spoon or spatula, until the custard thickens enough to coat the back of the spoon. It should reach about 175-180°F (79-82°C). Do not let it boil.
Small tip: If you run your finger across the back of the coated spoon, the line should hold without the custard running back together.
-
Step 6: Chill the Custard Base
Remove the custard from the heat and stir in the vanilla extract and a pinch of salt. Pour the custard into a clean bowl or container. Cover it with plastic wrap, pressing the wrap directly onto the surface to prevent a skin from forming. Chill in the refrigerator for at least 4 hours, or preferably overnight, until completely cold.
Small tip: A well-chilled base is vital for the best ice cream texture. You can even place the bowl in an ice bath to speed up initial cooling.
-
Step 7: Churn the Ice Cream
Once the custard is thoroughly chilled, drain the rum from the soaked raisins, reserving the rum for another use if desired. Pour the cold custard base into your ice cream maker and churn according to the manufacturer’s instructions. This usually takes about 20-25 minutes.
Small tip: Make sure your ice cream maker’s bowl is frozen solid before you start churning.
-
Step 8: Add Raisins and Freeze
During the last 5 minutes of churning, add the drained rum raisins to the ice cream maker. Let them incorporate fully. Transfer the soft ice cream to an airtight container and freeze for another 2-4 hours, or until firm enough to scoop. Enjoy your delicious homemade treat!
Small tip: For easier scooping, let the ice cream sit at room temperature for 5-10 minutes before serving.
Tips & Variations
- Gluten-Free Option: This Rum Raisin Ice Cream recipe is naturally gluten-free! All ingredients are free from gluten, making it a safe and delicious choice for those with gluten sensitivities.
- Vegan Option: To make this recipe vegan, substitute whole milk with full-fat coconut milk or a rich plant-based milk (like oat or cashew milk). Replace heavy cream with full-fat coconut cream. For the egg yolks, use a cornstarch slurry (2 tbsp cornstarch mixed with 2 tbsp cold water) added to the hot milk mixture as a thickener, or use a commercial egg replacer suitable for custards.
- Add More Protein/Fiber: Boost the nutritional value by adding a handful of finely chopped toasted almonds or walnuts during the last few minutes of churning. These nuts add healthy fats, protein, and fiber, complementing the rum raisin flavor beautifully.
- Spicy Warmth Version: For a delightful kick, add ¼ teaspoon of ground cinnamon and a tiny pinch (1/8 teaspoon) of freshly grated nutmeg to the milk and cream mixture in Step 2. You could also add an even smaller pinch of cayenne pepper for a subtle fiery warmth.
- Different Spirits or Dried Fruits: Experiment with other spirits like brandy or bourbon instead of rum. You can also swap out raisins for other dried fruits like chopped dried apricots, dried cranberries, or a mix of dried cherries and blueberries, soaked in a complementary liqueur.
Nutritional Information
Approximate values per serving (based on 8 servings):
- Calories: 360 kcal
- Protein: 6g
- Carbohydrates: 38g
- Fat: 22g
Note: Nutritional values may vary depending on the specific brands and quantities of ingredients used.
Health Benefits
While ice cream is a treat, the ingredients in Rum Raisin Ice Cream offer some benefits!
- Dairy Goodness: Milk and cream are excellent sources of calcium, which is vital for strong bones and teeth. They also provide protein, important for muscle repair and growth, and often contain Vitamin D, which aids in calcium absorption.
- Egg Power: Egg yolks are packed with essential nutrients. They are a great source of high-quality protein, choline (important for brain health), and Vitamins A, D, and B12.
- Raisin Benefits: Raisins, though sweet, are a natural source of dietary fiber, which aids digestion and promotes gut health. They also contain antioxidants that help protect your body’s cells, as well as potassium and iron.
- Antioxidants: The dark rum, in moderation, can contribute to the antioxidant content of the dish, similar to other fermented products. However, remember it’s primarily for flavor!
Serving Suggestions
- Serve a scoop alongside a warm slice of apple pie or a fudgy brownie for an ultimate dessert experience.
- Enjoy it simply in a bowl, perhaps with a sprinkle of toasted pecans or a drizzle of caramel sauce.
- Create an elegant dessert by pairing it with fresh berries like raspberries or blackberries, offering a lovely contrast in texture and flavor.
- Make an adult ice cream float with a splash of ginger ale or sparkling cider for a unique twist.
Storage Tips
Store your homemade Rum Raisin Ice Cream in an airtight container in the freezer. For the best taste and texture, consume it within 2-3 weeks. Beyond that, ice cream can start to develop ice crystals, though it will still be safe to eat for longer. To serve if it’s too hard, simply let it sit at room temperature for 5-10 minutes to soften slightly before sco