

Introduction
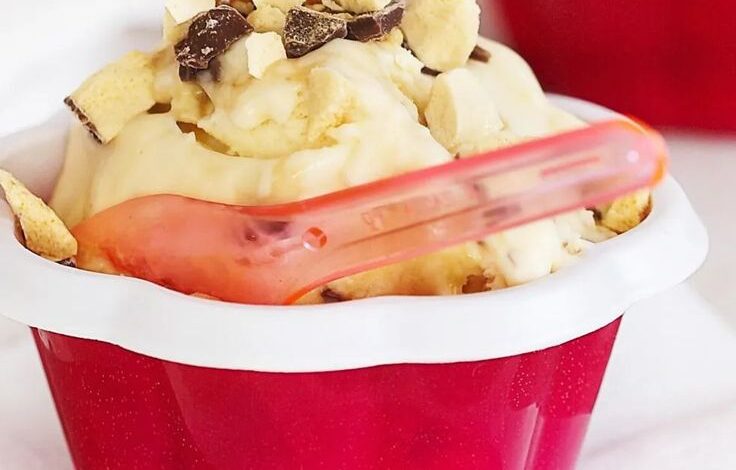
Get ready for a truly delightful treat that will bring smiles to everyone! Hokey Pokey Ice Cream is a classic for a reason. It’s wonderfully creamy vanilla ice cream, generously studded with crunchy, golden pieces of homemade honeycomb candy. Every bite offers a fantastic contrast of smooth, cool ice cream and sweet, airy, crisp toffee bits. It’s a texture and flavor explosion!
You might think making ice cream from scratch is complicated, but not this recipe! We’re using a simple no-churn method that skips the ice cream machine entirely. Plus, making the hokey pokey (honeycomb) is surprisingly easy and incredibly fun. You’ll be amazed at how quickly you can whip up this impressive dessert with just a few basic ingredients.
So, why wait? This recipe is perfect for a special occasion or just a sweet everyday indulgence. Gather your ingredients and get ready to create some magic in your kitchen. Your taste buds will thank you!
Cooking Time & Prep Time
- Prep Time: 25 minutes
- Cooking Time: 10 minutes (for honeycomb)
- Freezing Time: 6-8 hours (or overnight)
- Total Time: Approximately 35 minutes active time + freezing
Small tip: The longest part is the freezing time, so plan to make this a day before you want to serve it.
Ingredients
This recipe makes approximately 8-10 servings.
For the Hokey Pokey (Honeycomb)
- 100g (½ cup) granulated sugar
- 4 tablespoons golden syrup (or light corn syrup)
- 2 tablespoons water
- 1 teaspoon baking soda
For the No-Churn Ice Cream Base
- 600ml (2 ½ cups) cold heavy cream (at least 35% fat)
- 397g (1 can) sweetened condensed milk
- 1 teaspoon pure vanilla extract
Step-by-Step Instructions
-
Step 1: Prepare Your Baking Tray
First, get ready for the honeycomb. Line a medium baking tray (approx. 20×20 cm or 8×8 inches) with baking parchment paper. Make sure the paper extends over the sides, creating a little handle for easy removal later. Set this aside near your stovetop.
Small tip: Do not grease the paper; the parchment alone is enough to prevent sticking.
-
Step 2: Start the Honeycomb Syrup
In a medium-sized, heavy-bottomed saucepan, combine the granulated sugar, golden syrup, and water. Place the saucepan over medium-low heat. Stir gently until the sugar has completely dissolved.
Small tip: Dissolving the sugar slowly prevents crystallization later.
-
Step 3: Cook the Honeycomb Syrup
Once the sugar is dissolved, stop stirring. Increase the heat to medium. Let the mixture boil without stirring until it reaches a deep amber color, like caramel. This usually takes about 5-8 minutes. Watch it carefully, as it can burn quickly.
Small tip: Use a heat-proof spatula or spoon to gently swirl the pan if needed, but avoid stirring directly.
-
Step 4: Add the Baking Soda
As soon as the syrup reaches the amber color, remove the pan from the heat immediately. Quickly add the baking soda and stir it in vigorously with a whisk or wooden spoon. The mixture will instantly foam up and lighten in color. This is the magic!
Small tip: Work fast here! The reaction happens very quickly once the baking soda is added.
-
Step 5: Pour and Cool the Honeycomb
Immediately pour the foamy honeycomb mixture onto your prepared baking tray. Do not spread it or touch it. Just let it settle naturally. Allow it to cool completely at room temperature for at least 30-45 minutes, or until it is hard and brittle.
Small tip: Resist the urge to poke or touch the honeycomb while it’s cooling, as this can make it deflate.
-
Step 6: Break the Honeycomb
Once fully cooled and hardened, gently lift the parchment paper to remove the honeycomb from the tray. Place it on a clean surface. Break the honeycomb into small, bite-sized pieces using your hands, or place it in a strong freezer bag and gently tap it with a rolling pin. You want varied sizes for texture.
Small tip: Don’t make the pieces too small, as some will dissolve slightly in the ice cream.
-
Step 7: Prepare the Ice Cream Base
In a large mixing bowl, pour the cold heavy cream. Using an electric mixer (handheld or stand mixer with a whisk attachment), whip the cream on high speed until stiff peaks form. The cream should hold its shape firmly.
Small tip: Ensure your cream is very cold; this helps it whip up faster and more effectively.
-
Step 8: Combine the Ice Cream Ingredients
Gently fold the sweetened condensed milk and vanilla extract into the whipped cream. Use a spatula and a light hand to preserve the airiness of the whipped cream. Mix until just combined and smooth.
Small tip: Overmixing will deflate the cream, so fold carefully until no streaks of condensed milk remain.
-
Step 9: Fold in the Hokey Pokey and Freeze
Now, gently fold about three-quarters of your broken hokey pokey pieces into the ice cream mixture. Reserve the remaining quarter for a topping or swirl. Pour the ice cream into a freezer-safe container. Sprinkle the remaining hokey pokey pieces over the top. Cover tightly and freeze for at least 6-8 hours, or preferably overnight, until firm.
Small tip: An airtight container prevents ice crystals from forming on your delicious ice cream.
Tips & Variations
- Gluten-Free Option: This recipe is naturally gluten-free! Just ensure your golden syrup (or corn syrup) and baking soda are certified gluten-free if you have severe sensitivities.
- Vegan Option: For a delicious vegan version, use full-fat canned coconut cream (chilled overnight, scoop out the thick cream) instead of heavy cream, and a plant-based sweetened condensed milk. Ensure your golden syrup is vegan (most are).
- Add More Protein: To boost protein, serve your Hokey Pokey Ice Cream with a sprinkle of chopped nuts like almonds or cashews, or a dollop of Greek yogurt on the side. You could also swirl in a tablespoon of unflavored protein powder into the ice cream base, though this might slightly alter the texture.
- Spicy Version: For a surprising kick, add a tiny pinch (¼ teaspoon) of chili powder or cayenne pepper to the sugar mixture when making the hokey pokey. It creates a subtle, warming heat that pairs wonderfully with the sweet crunch.
- Chocolate Swirl Variation: Drizzle melted chocolate or a chocolate fudge sauce through the ice cream mixture before freezing. The chocolate pairs beautifully with the honeycomb.
Nutritional Information
Approximate values per serving (based on 10 servings):
- Calories: 390 kcal
- Protein: 4g
- Carbohydrates: 45g
- Fat: 23g
Note: Values may vary depending on specific brands and exact amounts of ingredients used.
Health Benefits
- Dairy Goodness: Heavy cream and condensed milk provide calcium, which is essential for strong bones and teeth. They also contain protein, important for muscle repair and growth.
- Energy Boost: The sugars in this recipe offer a quick source of energy. While ice cream is a treat, a moderate serving can provide a delightful pick-me-up.
- Mood Enhancer: Enjoying a delicious treat like homemade ice cream can genuinely lift your spirits. The act of creating something special in the kitchen and sharing it can be very beneficial for mental well-being.
- Simple Ingredients: Making ice cream at home means you know exactly what goes into it. This recipe uses basic, recognizable ingredients, avoiding artificial flavors or preservatives often found in store-bought options.
Serving Suggestions
- Classic Cone or Bowl: Serve generous scoops in a waffle cone or a chilled dessert bowl. It’s perfect on its own!
- Dessert Platter: Pair it with fresh berries, a drizzle of chocolate sauce, or a scattering of extra hokey pokey pieces for an elegant dessert.
- Affogato Style: For an adult treat, place a scoop of Hokey Pokey Ice Cream in a mug and pour a shot of hot espresso over it. The melting ice cream creates a creamy, coffee-infused delight.
- Make Ahead Magic: This ice cream is fantastic for meal prep in the sense that it’s a perfect make-ahead dessert. Prepare it the day before a party or gathering, and it’s ready to serve straight from the freezer.
Storage Tips
Store your homemade Hokey Pokey Ice Cream in an airtight freezer-safe container. It will keep beautifully in the freezer for up to 2-3 weeks. Beyond that, the texture might start to become a bit icier, and the honeycomb pieces might soften slightly. No reheating is needed; simply take it out of the freezer a few minutes before serving to soften slightly for easier scooping.
Conclusion
And there you have it – your very own batch of incredible Hokey Pokey Ice Cream! This dessert truly is a showstopper. The creamy vanilla base, combined with those irresistible, crunchy pieces of golden honeycomb, creates a symphony of textures and flavors that’s hard to beat. It’s a taste of pure joy in every spoonful.
We hope you’ve enjoyed this journey into making homemade ice cream. It’s such a rewarding experience, especially when the results are this delicious and impressive. The best part is knowing you created




