

Introduction
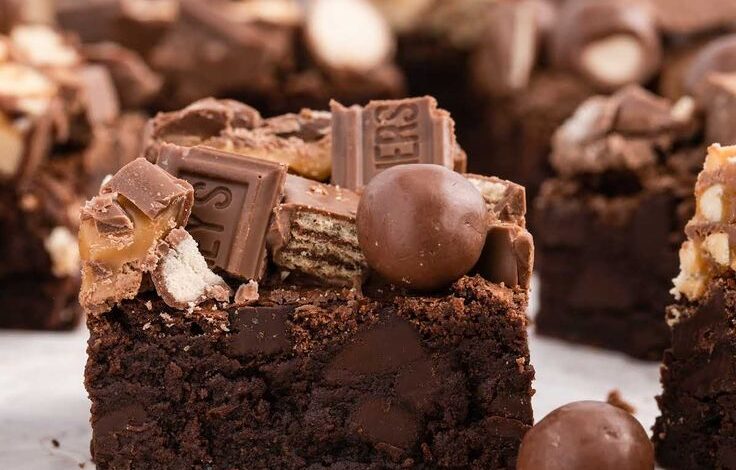
Get ready for a treat that will make your taste buds sing! We are diving into the wonderful world of Candy Bar Brownies. Imagine your favorite fudgy, chewy brownie. Now, picture it loaded with delicious, melted pieces of your go-to candy bars. It’s a dessert dream come true, combining the best of two classic treats into one incredible bite. Every square offers a delightful surprise of chocolate, caramel, nougat, or peanut butter, all nestled in a rich brownie base.
The best part? These Candy Bar Brownies are surprisingly easy to whip up. You don’t need to be a master baker to create this masterpiece. The recipe uses a straightforward brownie batter, and the “hardest” part is simply chopping up your chosen candy bars. It’s a fantastic recipe for beginners and a fun one for experienced bakers looking for a quick, impressive dessert. You’ll have warm, gooey brownies ready to enjoy in no time.
So, grab your apron and get ready for some serious baking fun! This recipe is perfect for parties, potlucks, or just a cozy night in. Your family and friends will absolutely adore these. Trust us, once you try these Candy Bar Brownies, they’ll become a regular request in your kitchen. Let’s get baking!
Cooking Time & Prep Time
- Prep Time: 25 minutes
- Cooking Time: 30 minutes
- Total Time: 55 minutes
Small tip: To save a little time, you can chop your candy bars while the butter and sugar mixture cools slightly.
Ingredients
This recipe makes 16 generous servings.
For the Fudgy Brownies
- 1 cup (2 sticks) unsalted butter, melted
- 2 cups granulated sugar
- 4 large eggs, at room temperature
- 1 teaspoon vanilla extract
- 1 cup all-purpose flour
- ¾ cup unsweetened cocoa powder (Dutch-processed for darker brownies)
- ½ teaspoon baking powder
- ¼ teaspoon salt
For the Candy Bar Topping
- 2 ½ to 3 cups assorted candy bars, chopped into bite-sized pieces (e.g., Snickers, Reese’s Peanut Butter Cups, Twix, Kit Kat, Milky Way)
Step-by-Step Instructions
-
Step 1: Prepare Your Baking Pan
Preheat your oven to 350°F (175°C). Lightly grease a 9×13-inch baking pan. Then, line it with parchment paper, leaving an overhang on the sides. This will make it super easy to lift your brownies out later. Small tip: Crisscross two strips of parchment paper for maximum lift and easy removal.
-
Step 2: Melt Butter and Sugar
In a large mixing bowl, combine the melted butter and granulated sugar. Whisk them together until they are well combined and smooth. The mixture should look glossy. Small tip: Make sure your butter isn’t too hot when you add the sugar; let it cool for a minute or two after melting.
-
Step 3: Add Eggs and Vanilla
Crack the eggs into the butter-sugar mixture, one at a time. Whisk well after each addition. Stir in the vanilla extract. Continue whisking until the mixture is light in color and fluffy, about 1-2 minutes. This step is key for a chewy brownie texture. Small tip: Using room temperature eggs helps them incorporate better into the batter.
-
Step 4: Combine Dry Ingredients
In a separate medium bowl, whisk together the all-purpose flour, unsweetened cocoa powder, baking powder, and salt. Make sure there are no lumps. This ensures all the ingredients are evenly distributed throughout the batter. Small tip: Sifting your dry ingredients can help prevent lumps and create a smoother batter.
-
Step 5: Mix Wet and Dry Ingredients
Gradually add the dry ingredient mixture to the wet ingredient mixture. Fold them together gently with a spatula or wooden spoon until just combined. Be careful not to overmix the batter. Overmixing can lead to tough brownies. Small tip: Stop mixing as soon as you no longer see streaks of flour. A few small lumps are fine!
-
Step 6: Pour into Pan
Pour the brownie batter evenly into your prepared 9×13-inch baking pan. Use your spatula to spread it smoothly to all the corners. The batter will be thick and rich. Small tip: Use an offset spatula to get an extra even layer.
-
Step 7: Add Candy Bar Topping
Generously sprinkle the chopped candy bar pieces evenly over the top of the brownie batter. Gently press some of them down slightly into the batter. Don’t worry if some sink a bit; that just adds to the surprise when you bite into them. Small tip: Use a variety of candy bars for the best flavor and texture combination!
-
Step 8: Bake to Perfection
Place the pan in the preheated oven and bake for 25-30 minutes. The brownies are done when a toothpick inserted into the center comes out with moist crumbs, but not wet batter. The edges should be set. Small tip: Keep an eye on them; ovens can vary. You want fudgy, not dry, brownies!
-
Step 9: Cool Completely
Remove the brownies from the oven and let them cool completely in the pan on a wire rack. This is crucial for fudgy, neat slices. Resist the urge to cut them warm, as they will be too gooey and fall apart. Small tip: Cooling for at least 2 hours, or even chilling in the fridge, will give you the cleanest cuts.
-
Step 10: Slice and Serve
Once completely cooled, use the parchment paper overhang to lift the brownies out of the pan. Place them on a cutting board and slice into 16 squares. Serve them up and watch them disappear! Small tip: For super clean slices, wipe your knife with a warm, damp cloth between each cut.
Tips & Variations
- Gluten-Free Option: Easily make these brownies gluten-free by swapping the all-purpose flour for a 1:1 gluten-free baking flour blend. Make sure your chosen candy bars are also certified gluten-free.
- Vegan/Vegetarian Option: To make these brownies vegan, use a plant-based butter substitute (like Miyoko’s Kitchen or Earth Balance), replace the eggs with flax eggs (1 tablespoon ground flaxseed + 3 tablespoons water per egg, let sit for 5 minutes), and ensure your chocolate and candy bars are dairy-free and vegan-friendly.
- Add More Goodness: While these are an indulgent treat, you can add some texture and nutrients by mixing in ½ cup of chopped walnuts or pecans into the batter. You could also sneak in a half cup of black bean puree (pureed cooked black beans) for added fiber and moisture, which surprisingly won’t affect the taste!
- Spicy Kick: For a surprising and sophisticated twist, add ¼ to ½ teaspoon of cayenne pepper to the dry ingredients. The subtle heat beautifully complements the rich chocolate flavor.
- Different Candy Bar Combos: Get creative with your candy bars! Try using all one type for a focused flavor, or go wild with a mix of dark chocolate, milk chocolate, and white chocolate candies. M&M’s, peanut butter cups, or even crushed potato chips for a salty crunch are great additions. A swirl of caramel or peanut butter on top before baking would also be delicious!
Nutritional Information
Approximate values per serving (based on 16 servings):
- Calories: 390-450 kcal
- Protein: 4-6 g
- Carbohydrates: 50-60 g
- Fat: 20-25 g
Please note: These values are approximate and may vary significantly depending on the specific brands and types of candy bars used, as well as exact portion sizes.
Health Benefits
While Candy Bar Brownies are undeniably a treat, some of their core ingredients do offer small pockets of goodness. It’s all about enjoying them in moderation!
Dark chocolate, often a component of the cocoa powder and some candy bars, is a good source of antioxidants. These compounds can help protect your cells from damage. It also contains minerals like iron, magnesium, and copper, which are essential for various bodily functions. Plus, chocolate is known to release endorphins, which can boost your mood!
Eggs, a fundamental ingredient in our brownies, are packed with protein. Protein is vital for building and repairing tissues, and for making enzymes and hormones. Eggs also provide a range of vitamins, including Vitamin D, B6, B12, and minerals like zinc and iron, contributing to overall health.
Even basic ingredients like flour provide carbohydrates, which are our body’s primary source of energy. While this recipe uses all-purpose flour, it still contributes to giving you the fuel you need. Butter, in moderation, provides energy and some fat-soluble vitamins, though its primary role here is to create that rich, satisfying texture.
Ultimately, the biggest “health benefit” of these brownies might be the joy they bring! Allowing yourself an occasional, delicious treat can contribute to mental well-being and happiness. Food isn’t just about nutrition; it’s also about pleasure, connection, and celebration. So, savor every bite!
Serving Suggestions
- Classic Dessert: Serve warm with a scoop of vanilla bean ice cream and a drizzle of chocolate fudge or caramel sauce.
- Coffee Break Treat: Pair a square with a hot cup of coffee, espresso, or a glass of cold milk for an afternoon pick-me-up.
- Party Platter: Cut into smaller, bite-sized pieces and arrange on a platter for a crowd-pleasing party dessert. They’re always a hit!
- Lunchbox Surprise: Pack a single brownie square for a delightful treat in school or work lunchboxes (if allowed!).
Storage Tips
Store leftover Candy Bar Brownies in an airtight container at room temperature for up to 3 days, or in the refrigerator for up to 5 days. For longer storage, you can freeze individual squares. Wrap each brownie tightly in plastic wrap, then place them in a freezer-safe bag or container. They will keep well in the freezer for up to 3 months. To reheat, simply microwave a frozen brownie for 30-60 seconds, or let it thaw at room temperature before enjoying. You can also warm them gently in a low oven (250°F/120°C) for 10-15 minutes.
Conclusion
And there you have it – your very own batch of irresistible Candy Bar Brownies! This recipe truly takes a beloved classic and elevates it to a whole new level of deliciousness. The combination of




