

Introduction
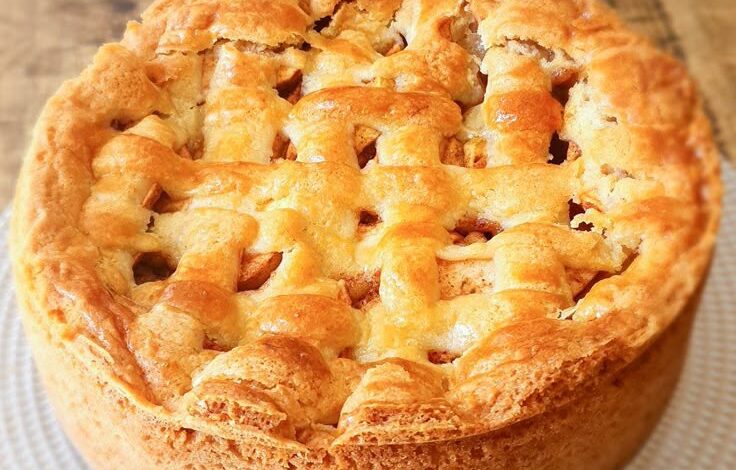
Get ready to bake a truly special dessert: the classic Dutch Apple Tart! This isn’t just any apple pie. It’s a comforting, rustic tart with a beautiful, often lattice-topped crust, brimming with tender, spiced apples. Every bite offers a delightful balance of crisp pastry and a warm, sweet-tart filling. It’s a timeless treat that brings joy to any table.
You might think making a tart is complicated, but I promise you, this recipe makes it surprisingly easy. We’ll use simple ingredients and straightforward steps. Whether you’re a seasoned baker or just starting out, you’ll find this recipe approachable and fun. Plus, the aroma of apples and cinnamon filling your kitchen is a reward in itself!
So, roll up your sleeves and let’s create something delicious together. This Dutch Apple Tart is perfect for family gatherings, a cozy evening at home, or simply to satisfy your sweet tooth. Prepare to impress everyone with your baking skills!
Cooking Time & Prep Time
- Prep Time: 35 minutes
- Cooking Time: 55 minutes
- Total Time: 90 minutes
Small tip: To save even more time, you can prepare the apple filling mixture the night before and store it in the fridge. This makes assembly very quick on baking day!
Ingredients
This recipe makes 8 generous servings.
For the Tart Crust (or use 2 sheets of store-bought pie crust)
- 2 ½ cups (300g) all-purpose flour, plus more for dusting
- 1 tablespoon granulated sugar
- 1 teaspoon salt
- 1 cup (226g) unsalted butter, very cold and cut into ½-inch cubes
- ½ cup (120ml) ice water, plus more if needed
For the Apple Filling
- 6-7 medium apples (about 3 lbs / 1.3 kg), a mix of Granny Smith and Honeycrisp works best
- ½ cup (100g) granulated sugar (adjust to taste, depending on apple sweetness)
- ¼ cup (50g) packed light brown sugar
- 2 tablespoons cornstarch
- 1 tablespoon fresh lemon juice
- 1 ½ teaspoons ground cinnamon
- ¼ teaspoon ground nutmeg
- ⅛ teaspoon ground cloves (optional, but lovely!)
- Pinch of salt
For the Egg Wash & Garnish
- 1 large egg, beaten
- 1 tablespoon water or milk
- 1 tablespoon demerara sugar (for sprinkling)
Step-by-Step Instructions
-
Prepare the Tart Dough (if making from scratch)
In a large bowl, whisk together the flour, granulated sugar, and salt. Add the cold, cubed butter to the flour mixture. Use a pastry blender or your fingertips to cut the butter into the flour until it resembles coarse crumbs with some pea-sized pieces of butter remaining. Gradually add the ice water, 1 tablespoon at a time, mixing until the dough just comes together. Be careful not to overmix.
Small tip: If using a food processor, pulse the dry ingredients and butter until crumbly, then add water slowly while pulsing until a dough forms.
-
Chill the Dough
Divide the dough in half, flatten each half into a disk, and wrap tightly in plastic wrap. Refrigerate for at least 30 minutes, or up to 2 days. This chilling step is crucial for a flaky crust.
Small tip: Don’t skip chilling! It helps the butter solidify and prevents the dough from shrinking during baking.
-
Preheat Oven and Prepare Pan
Preheat your oven to 400°F (200°C). Lightly grease a 9-inch tart pan with a removable bottom, or a 9-inch pie plate. Set it aside while you prepare the crust.
-
Roll Out the Bottom Crust
On a lightly floured surface, roll out one disk of chilled dough (or one sheet of store-bought crust) into a 12-inch circle. Carefully transfer the dough to your prepared tart pan. Gently press it into the bottom and up the sides. Trim any excess dough, leaving a slight overhang if using a tart pan, then crimp or flute the edges as desired. Prick the bottom of the crust several times with a fork.
Small tip: If your dough cracks, simply press it back together with your fingers. Cold dough is easier to handle.
-
Prepare the Apple Filling
Peel, core, and slice the apples into ¼-inch thick pieces. In a large bowl, combine the sliced apples with both granulated and brown sugars, cornstarch, lemon juice, cinnamon, nutmeg, cloves (if using), and a pinch of salt. Toss gently until the apples are evenly coated. The lemon juice prevents browning and brightens the flavors.
Small tip: Slice apples uniformly for even cooking. A mandoline can help, but a sharp knife works just as well.
-
Assemble the Tart
Pour the apple filling into the prepared tart crust, mounding it slightly in the center. Ensure the apples are distributed evenly. Roll out the second disk of dough (or second store-bought crust) for the top. You can cut it into strips for a lattice top or simply place it over the filling and cut slits for steam to escape.
Small tip: For a beautiful lattice, cut the dough into ¾-inch wide strips. Weave them over the apples, then trim and crimp the edges.
-
Apply Egg Wash and Garnish
In a small bowl, whisk together the beaten egg and water (or milk) to create an egg wash. Brush the top crust of the tart generously with the egg wash. This will give it a beautiful golden-brown shine. Sprinkle the demerara sugar evenly over the top for extra sparkle and a bit of crunch.
Small tip: The demerara sugar adds a lovely texture and visual appeal, but it’s optional if you prefer less sweetness.
-
Bake the Tart
Place the tart on a baking sheet to catch any potential drips. Bake at 400°F (200°C) for 15 minutes. Then, reduce the oven temperature to 375°F (190°C) and continue baking for another 40-50 minutes, or until the crust is golden brown and the apples are tender when pierced with a knife. If the crust starts to brown too quickly, loosely cover the edges with aluminum foil.
Small tip: Listen for bubbling sounds from the filling – that’s a good sign the apples are cooking through!
-
Cool the Tart
Once baked, remove the tart from the oven and place it on a wire rack to cool completely. This is very important! Cooling allows the filling to set properly, preventing a runny tart when you slice it. It usually takes at least 2-3 hours.
Small tip: Patience is key! A warm slice is tempting, but a fully cooled tart holds its shape and flavor much better.
Tips & Variations
- Gluten-Free Option: Easily make this tart gluten-free by using your favorite gluten-free pie crust mix or a pre-made gluten-free tart shell. The apple filling is naturally gluten-free!
- Vegan Option: For a delicious vegan Dutch Apple Tart, use a dairy-free pie crust (many store-bought versions are accidentally vegan, or make your own with vegan butter). Omit the egg wash; instead, brush the crust with a little plant-based milk or melted vegan butter for shine.
- Add More Flavor/Texture: Enhance the filling by adding ½ cup of chopped walnuts or pecans for extra crunch. A handful of dried cranberries or golden raisins can also add a lovely chewiness and tartness.
- Spiced-Up Version: Want a little extra kick? Add ¼ teaspoon of ground ginger or a tiny pinch of freshly ground black pepper to the apple filling. It really makes the other spices pop! A splash of brandy or rum (1-2 tablespoons) can also add depth to the filling.
- Less Sugar Option: If your apples are naturally very sweet, or if you prefer a less sweet dessert, reduce the granulated sugar in the filling by ¼ cup. Taste the apple mixture before adding it to the crust to ensure it’s to your liking.
Nutritional Information
Approximate values per serving (based on 8 servings):
- Calories: 420 kcal
- Protein: 4g
- Carbohydrates: 60g
- Fat: 20g
Note: Nutritional values are approximate and may vary depending on specific ingredients and brands used.
Health Benefits
Our Dutch Apple Tart, while a treat, offers some wonderful benefits from its star ingredient: apples!
- Rich in Fiber: Apples are an excellent source of dietary fiber, especially pectin. Fiber aids digestion, helps regulate blood sugar levels, and can contribute to a feeling of fullness.
- Packed with Vitamins and Antioxidants: Apples contain Vitamin C, an important antioxidant that supports the immune system. They also provide various other antioxidants, which help protect your body’s cells from damage.
- Cinnamon’s Goodness: The cinnamon in our tart isn’t just for flavor. It’s known for its anti-inflammatory properties and may help improve blood sugar control.
- Hydration: Apples are about 85% water, contributing to your daily hydration needs.
So, you can enjoy a slice knowing you’re getting a dose of wholesome goodness alongside that delicious flavor!
Serving Suggestions
- Classic Pairing: Serve a warm slice of Dutch Apple Tart with a scoop of vanilla bean ice cream or a dollop of freshly whipped cream. The contrast of warm tart and cold cream is pure bliss!
- Breakfast Treat: While typically a dessert, a small slice can be a delightful, comforting treat with your morning coffee or tea.
- Special Occasion Dessert: This tart shines as the grand finale for any dinner party or family gathering. It’s beautiful to look at and even better to eat!
Storage Tips
Store any leftover Dutch Apple Tart loosely covered at room temperature for up to 2 days, or in the refrigerator for up to 3-4 days. To freeze, wrap the cooled tart (whole or in slices) tightly in plastic wrap, then in aluminum foil. It will keep in the freezer for up to 3 months. To reheat, thaw overnight in the refrigerator if frozen, then warm slices in a preheated oven at 300°F (150°C) for 10-15 minutes, or until heated through. A quick zap in the microwave also works, but the crust won’t be as crisp.
Conclusion
There you have it – a truly magnificent Dutch Apple Tart, ready to be enjoyed! This recipe proves that baking a show-stopping dessert doesn’t have to be intimidating. With its flaky crust, tender spiced apples, and inviting aroma, it’s the epitome of comfort food.
I hope you feel inspired and confident to try this recipe. The process is rewarding, and the result is absolutely delicious. Don’t be afraid to make it your own with a few personal touches from our tips and variations!
So go ahead, bake this beautiful tart and share it with those you love. It’s perfect for creating cherished memories around the table. Happy baking, everyone!




