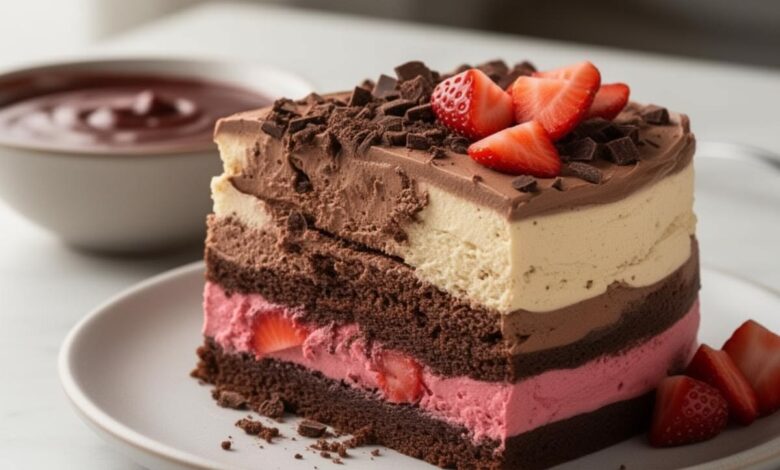
Introduction
Get ready to dive into a classic dessert that never goes out of style: the Neapolitan Cake! This delightful treat brings together three beloved flavors—vanilla, chocolate, and strawberry—into one beautiful, layered masterpiece. Each bite offers a harmonious blend of creamy, sweet, and fruity notes, making it a true showstopper for any occasion. It’s a feast for both the eyes and the taste buds, promising a nostalgic trip with every forkful.
You might think a layered cake is complicated, but I promise you, this Neapolitan Cake is surprisingly straightforward to make. We’ll break down the process into easy, manageable steps, ensuring that even beginner bakers can achieve stunning results. With a little planning and some simple techniques, you’ll be layering and frosting like a pro in no time. The joy of creating something so delicious and visually appealing is truly rewarding.
So, clear your kitchen counter, gather your ingredients, and let’s embark on this sweet adventure together. This recipe is designed to guide you smoothly from start to finish, making the baking process fun and stress-free. Prepare to impress your family and friends with this irresistible Neapolitan Cake—it’s a guaranteed crowd-pleaser that everyone will adore!
Cooking Time & Prep Time
- Prep Time: 60 minutes
- Cooking Time: 30-35 minutes (per batch of cakes)
- Total Time: Approximately 2 hours 30 minutes (including cooling and assembly)
Small tip: To save time, you can bake the cake layers a day in advance and store them wrapped tightly at room temperature. This makes assembly on the serving day much quicker!
Ingredients
This recipe makes 12-16 generous servings.
For the Cake Layers (Vanilla Base)
- 3 cups (360g) all-purpose flour
- 1 tablespoon baking powder
- 1/2 teaspoon salt
- 1 cup (226g) unsalted butter, softened
- 2 cups (400g) granulated sugar
- 4 large eggs, at room temperature
- 1 cup (240ml) whole milk, at room temperature
- 2 teaspoons vanilla extract
For the Flavoring Each Layer
- For the Vanilla Layer: No additional flavoring needed (uses the base batter as is)
- For the Chocolate Layer: 1/2 cup (60g) unsweetened cocoa powder, 1/4 cup (60ml) hot water or coffee
- For the Strawberry Layer: 1/2 cup (120g) strawberry puree (from fresh or frozen strawberries), 1/2 teaspoon red or pink food coloring (optional)
For the Buttercream Frosting
- 2 cups (452g) unsalted butter, softened
- 6-8 cups (720-960g) powdered sugar, sifted
- 1/2 cup (120ml) heavy cream or whole milk
- 2 teaspoons vanilla extract
- Pinch of salt
For Flavoring Each Frosting Portion
- For Vanilla Frosting: 1 teaspoon vanilla extract (additional)
- For Chocolate Frosting: 1/2 cup (60g) unsweetened cocoa powder, 2 tablespoons additional heavy cream/milk
- For Strawberry Frosting: 1/4 cup (60g) strawberry puree (reduced, if possible, for thicker consistency), 1/2 teaspoon red or pink food coloring (optional)
For Decoration (Optional)
- Fresh strawberries, sliced
- Chocolate shavings or curls
- Sprinkles (neapolitan colors are fun!)
Step-by-Step Instructions
-
Step 1: Gather Your Tools & Preheat
Preheat your oven to 350°F (175°C). Make sure your oven rack is in the middle position. Having all your tools and ingredients ready makes the baking process much smoother.
-
Step 2: Prepare the Cake Pans
Grease and flour three 8-inch round cake pans. You can also line the bottoms with parchment paper for easy removal. This step prevents your beautiful cakes from sticking.
-
Step 3: Make the Vanilla Cake Batter Base
In a medium bowl, whisk together the flour, baking powder, and salt. In a large bowl, cream together the softened butter and granulated sugar until light and fluffy. Beat in the eggs one at a time, ensuring each is fully incorporated before adding the next.
-
Step 4: Combine Wet and Dry Ingredients
Gradually add the dry ingredients to the wet ingredients, alternating with the milk, beginning and ending with the dry ingredients. Mix until just combined; do not overmix. Stir in the 2 teaspoons of vanilla extract. This is your base vanilla batter.
-
Step 5: Create the Vanilla Layer
Divide the batter evenly into three separate bowls. Leave one portion as is for the vanilla layer. Pour this vanilla batter into one of your prepared cake pans.
Small tip: Use a kitchen scale to ensure even division of batter for uniform cake layers.
-
Step 6: Create the Chocolate Layer
To the second portion of batter, whisk in the 1/2 cup cocoa powder and 1/4 cup hot water (or coffee). Mix until smooth and well combined. Pour this chocolate batter into the second prepared cake pan.
-
Step 7: Create the Strawberry Layer
To the third portion of batter, gently fold in the 1/2 cup strawberry puree and the optional red food coloring. Mix until the color is even and the puree is incorporated. Pour this strawberry batter into the third prepared cake pan.
-
Step 8: Bake the Cake Layers
Bake all three cake layers for 30-35 minutes, or until a wooden skewer inserted into the center comes out clean. The cakes should be lightly golden and spring back when gently pressed. Baking all at once saves time.
-
Step 9: Cool the Cake Layers
Let the cakes cool in their pans on a wire rack for 10-15 minutes. Then, carefully invert them onto the wire rack to cool completely. Ensure they are fully cool before frosting, or your frosting will melt.
Small tip: Cooling cakes completely is crucial for a stable, beautiful frosted cake. Patience is key here!
-
Step 10: Prepare the Vanilla Buttercream
While the cakes cool, make the buttercream. In a large bowl, beat the softened butter until creamy. Gradually add 3-4 cups of sifted powdered sugar, alternating with half of the heavy cream/milk and the 2 teaspoons of vanilla extract. Beat until light and fluffy.
-
Step 11: Divide and Flavor the Frosting
Divide the vanilla buttercream evenly into three separate bowls. This will be the base for our three flavored frostings. Keep one portion as vanilla for now.
-
Step 12: Create the Chocolate Buttercream
To one portion of buttercream, beat in the 1/2 cup unsweetened cocoa powder and 2 tablespoons of additional heavy cream/milk. Add more powdered sugar if needed for desired consistency. Mix until smooth and chocolatey.
-
Step 13: Create the Strawberry Buttercream
To the third portion of buttercream, beat in the 1/4 cup strawberry puree and the optional red food coloring. Add more powdered sugar if needed for consistency. Mix until smooth and vibrantly pink.
-
Step 14: Assemble the Cake Base
Place the vanilla cake layer on your serving plate or cake stand. Spread an even layer of vanilla buttercream over the top. This forms the delicious base of our Neapolitan creation.
-
Step 15: Add the Chocolate Layer
Carefully place the chocolate cake layer on top of the vanilla buttercream. Spread an even layer of chocolate buttercream over the chocolate cake. Make sure the layers are centered.
-
Step 16: Top with the Strawberry Layer
Place the strawberry cake layer on top of the chocolate buttercream. Spread an even layer of strawberry buttercream over the strawberry cake. This completes the stacking of your beautiful cake.
-
Step 17: Frost the Entire Cake
Use the remaining vanilla buttercream (or a combination of the three, if you like a marbled look) to frost the sides and top of the entire cake. Use an offset spatula or bench scraper for smooth sides. Make sure to cover the entire cake for a polished finish.
Small tip: For extra smooth frosting, chill the cake for 15-20 minutes after applying a thin “crumb coat” (first layer of frosting to trap crumbs), then apply your final, thicker layer.
-
Step 18: Decorate Your Masterpiece
Decorate the cake with fresh strawberry slices, chocolate shavings, or colorful sprinkles. Let your creativity shine! Serve immediately or chill until ready to enjoy.
Tips & Variations
- Gluten-Free Option: Easily make this cake gluten-free by substituting the all-purpose flour with a 1:1 gluten-free baking flour blend. Ensure your blend contains xanthan gum or add 1/2 teaspoon separately.
- Vegan or Vegetarian Option: For a vegan version, use plant-based butter, plant-based milk (like almond or soy), and replace eggs with flax eggs (1 tbsp ground flaxseed + 3 tbsp water per egg) or a commercial egg replacer. Ensure your powdered sugar is bone-char free.
- Fruity Boost: Instead of just strawberry puree, consider adding a thin layer of fresh sliced strawberries or raspberries between the strawberry cake and its frosting for an extra burst of fresh fruit flavor and texture.
- Citrus Zest Kick: For a brighter flavor, add 1 tablespoon of orange or lemon zest to the vanilla cake batter.