Introduction
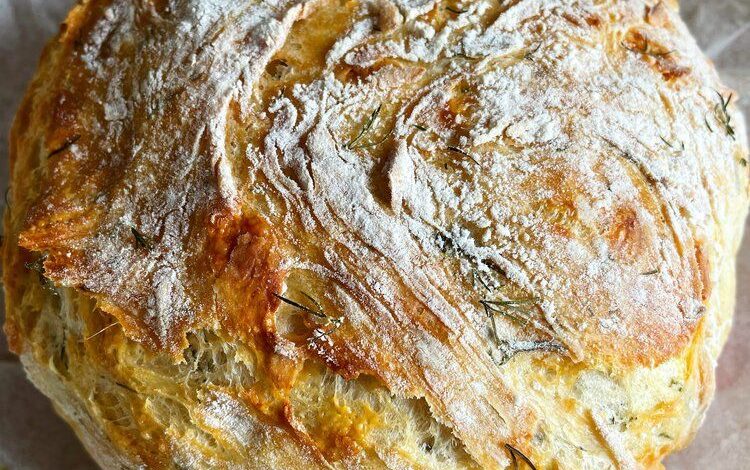
Imagine a warm, crusty loaf of bread, fragrant with fresh dill and studded with pockets of melted, smoky Gouda cheese. This isn’t just any bread; it’s our No Knead Dill Gouda Artisan Bread, and it’s absolutely divine. Every bite offers a delightful crunch on the outside, giving way to a soft, airy interior bursting with savory flavor. It’s truly a special treat that feels gourmet but is incredibly simple to make.
The best part? You don’t need to be a seasoned baker to master this recipe. The “no knead” method means minimal effort from you. Just a quick mix, a long rest, and into the oven it goes. There’s no heavy lifting, no complicated techniques, and no special equipment beyond a Dutch oven. It’s perfect for busy weeknights or a relaxed weekend baking project.
Get ready to fill your home with the irresistible aroma of freshly baked bread. This recipe is a game-changer, promising perfect results every time. Your friends and family will be so impressed, and you’ll love how easy it was. Let’s get baking and create some delicious memories together!
Cooking Time & Prep Time
- Prep Time: 15 minutes (active hands-on time)
- Resting Time: 12-18 hours (passive rise time)
- Cooking Time: 45-50 minutes
- Total Time: Approximately 13-19 hours (mostly passive)
Small tip: The long resting time is crucial for developing flavor and texture, so don’t rush it! Plan to mix your dough the evening before you want to bake.
Ingredients
This recipe makes 1 large loaf (approximately 8-10 servings).
- 3 cups (360g) all-purpose flour, plus more for dusting
- 1 teaspoon instant or active dry yeast
- 1 ½ teaspoons salt
- 1 cup (120g) smoked Gouda cheese, shredded or finely diced
- ¼ cup fresh dill, finely chopped
- 1 ½ cups warm water (about 105-115°F / 40-46°C)
Step-by-Step Instructions
-
Step 1: Combine Dry Ingredients
In a large mixing bowl, combine the all-purpose flour, instant yeast, and salt. Whisk them together thoroughly. This ensures the yeast and salt are evenly distributed throughout the flour. It’s a simple step but important for consistent results.
Small tip: If using active dry yeast, you can bloom it first in a small amount of the warm water with a pinch of sugar for 5 minutes, then add it to the dry ingredients.
-
Step 2: Add Gouda and Dill
Stir in the shredded smoked Gouda cheese and the finely chopped fresh dill. Mix them well into the dry ingredients. You want the cheese and dill to be distributed evenly so every slice of bread gets a burst of flavor.
Small tip: For extra flavor, you can lightly toast the dill in a dry pan for a minute before adding, but be careful not to burn it.
-
Step 3: Mix in Warm Water
Pour the warm water into the bowl with the dry ingredients. Using a wooden spoon or a spatula, mix until just combined. The dough will be shaggy and sticky, not smooth. Do not overmix; just ensure there are no dry pockets of flour left.
Small tip: The warmth of the water helps activate the yeast. Too hot will kill it; too cold will slow it down. Aim for bathwater warm.
-
Step 4: First Rise (Overnight)
Cover the bowl tightly with plastic wrap or a clean kitchen towel. Let the dough rest at room temperature (around 68-72°F / 20-22°C) for 12-18 hours. During this long rise, the dough will double in size and develop incredible flavor and air pockets.
Small tip: Place the bowl in a spot away from drafts. A slightly warmer spot can speed up the rise, but a longer, slower rise generally yields better flavor.
-
Step 5: Preheat Oven and Dutch Oven
About 30 minutes before you’re ready to bake, place your Dutch oven (with its lid) into your oven. Preheat the oven to 450°F (230°C). This step is crucial for achieving that signature crispy crust.
Small tip: Use a Dutch oven that is 5-7 quarts in size. It needs to be oven-safe up to 450°F or higher.
-
Step 6: Shape the Dough
Lightly flour a clean work surface. Gently scrape the dough out of the bowl onto the floured surface. With floured hands, lightly fold the edges of the dough towards the center a few times to form a rough ball. Do not knead it; just gently shape it.
Small tip: The dough will be very sticky. Use just enough flour on your hands and surface to prevent sticking, but don’t add too much to the dough itself.
-
Step 7: Transfer to Dutch Oven and Bake (Covered)
Carefully remove the hot Dutch oven from the oven. Gently place the dough ball into the hot Dutch oven. Be quick and careful, as the pot is extremely hot. Place the lid back on the Dutch oven.
Bake covered for 30 minutes at 450°F (230°C). The steam trapped inside the Dutch oven creates a beautiful, chewy crust.
Small tip: You can line the Dutch oven with parchment paper for easier removal, but it’s not strictly necessary if your pot is well-seasoned.
-
Step 8: Bake (Uncovered)
After 30 minutes, remove the lid from the Dutch oven. Reduce the oven temperature to 425°F (220°C). Continue baking uncovered for another 15-20 minutes, or until the crust is deeply golden brown and sounds hollow when tapped.
Small tip: For an extra crispy crust, you can bake for a few more minutes if needed, but watch it closely to prevent burning.
-
Step 9: Cool Completely
Carefully remove the bread from the Dutch oven and transfer it to a wire rack. Let the bread cool completely for at least 1-2 hours before slicing. Slicing too early can result in a gummy texture inside.
Small tip: Cooling is part of the baking process! It allows the internal structure to set and the flavors to fully develop. Resist the urge to cut into it right away.
Tips & Variations
- Gluten-Free Option: Substitute the all-purpose flour with a 1:1 gluten-free baking flour blend that contains xanthan gum. You might need to adjust the water slightly, adding a tablespoon more if the dough feels too dry, or a tablespoon less if it’s too wet.
- Vegan/Vegetarian Option: This recipe is already vegetarian! To make it vegan, replace the Gouda cheese with a good quality vegan smoked Gouda alternative, or omit the cheese entirely for a delicious Dill Artisan Bread. You could also add 2 tablespoons of nutritional yeast for a cheesy flavor without dairy.
- Add More Vegetables or Protein: Try adding ½ cup of finely chopped sun-dried tomatoes, roasted garlic cloves, or caramelized onions with the dill and Gouda. For a non-vegetarian option, ½ cup of crumbled, cooked bacon would also be fantastic.
- Spicy Version: For a kick, add 1-2 teaspoons of red pepper flakes along with the dry ingredients. You could also mix in 2 tablespoons of finely diced fresh jalapeños (seeds removed for less heat, or left in for more).
- Other Flavor Combinations: Experiment with different cheeses like sharp cheddar, Gruyere, or a pepper jack. Swap dill for other fresh herbs like rosemary, thyme, or chives. A touch of black pepper or garlic powder can also enhance the savory notes.
Nutritional Information
Approximate values per serving (based on 10 servings):
- Calories: 220 kcal
- Protein: 9g
- Carbohydrates: 30g
- Fat: 7g
Note: Nutritional values are estimates and may vary depending on specific brands and quantities of ingredients used.
Health Benefits
This No Knead Dill Gouda Artisan Bread isn’t just delicious; it also offers some great health benefits from its key ingredients.
The main ingredient, flour, provides complex carbohydrates, which are our body’s primary source of energy. If you opt for a whole wheat flour blend (as a variation), you’ll gain even more dietary fiber. Fiber is essential for digestive health, helping to keep things regular and contributing to a feeling of fullness.
Yeast, while a small component, is a powerhouse of B vitamins. These vitamins play a crucial role in energy metabolism, nerve function, and red blood cell production. They help convert your food into fuel, keeping you energized throughout the day.
Fresh dill contributes more than just flavor. It’s rich in antioxidants, which help protect your cells from damage. Dill also contains important vitamins like Vitamin A and Vitamin C, both vital for immune function and overall well-being. It even has small amounts of calcium and manganese.
Gouda cheese, in moderation, offers a good source of protein and calcium. Protein is essential for building and repairing tissues, while calcium is critical for strong bones and teeth. Choosing a smoked Gouda can also add a unique flavor dimension without needing excessive amounts.
Serving Suggestions
- With Soup or Stew: This bread is absolutely perfect for dipping into hearty soups like tomato basil, French onion, or a creamy potato soup. It’s also wonderful alongside a rich beef stew.
- As a Side Dish: Serve warm slices with your favorite pasta dishes, a simple green salad, or alongside grilled chicken or fish. It adds a gourmet touch to any meal.
- Sandwiches and Toast: Use it as the base for gourmet sandwiches with deli meats, fresh veggies, or even just a smear of cream cheese. It makes incredible toast for breakfast, especially with a fried egg on top!
- Cheese Board Addition: Slice it thinly and serve it as part of a sophisticated cheese and charcuterie board. The dill and Gouda flavors pair beautifully with other cheeses and cured meats.
Storage Tips
Store leftover bread at room temperature in an airtight container or a bread bag for up to 2-3 days. For longer storage, you can freeze individual slices or the entire loaf (once completely cooled) wrapped tightly in plastic wrap, then in foil, for up to 1 month. To reheat, thaw frozen slices and toast or warm in a preheated oven at 350°F (175°C) for about 5-10 minutes until warmed through and crispy.
Conclusion
And there you have it – your very own No Knead Dill Gouda Artisan Bread! This recipe proves