

Introduction
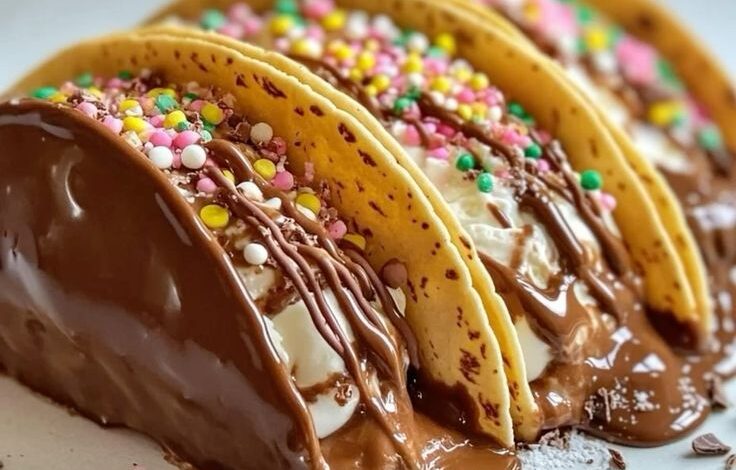
Get ready for a dessert adventure that’s out of this world! Today, we’re diving into the delightful world of Oreo Choco Tacos. Imagine your favorite crispy, creamy Oreo cookies transformed into a fun, handheld dessert taco, complete with a rich chocolate shell and your choice of exciting toppings. It’s a treat that brings smiles to every face and satisfies even the deepest chocolate cravings.
These Oreo Choco Tacos are not just incredibly tasty; they’re also surprisingly easy and quick to make. You don’t need fancy equipment or advanced baking skills. With just a few simple ingredients and a little bit of melting and chilling, you can create a dessert that looks impressive but comes together in a flash. It’s the perfect project for a rainy afternoon or a last-minute party treat.
So, whether you’re a seasoned dessert maker or just starting your culinary journey, these Choco Tacos are a must-try. Gather your ingredients, put on your apron, and let’s get ready to make some magic in the kitchen. Your taste buds (and your friends!) will thank you!
Cooking Time & Prep Time
- Prep Time: 30 minutes
- Chilling Time: 1 hour 30 minutes (minimum)
- Total Time: 2 hours
Small tip: To speed up the chilling process, make sure your freezer is set to its coldest setting. You can also prepare the Oreo filling ahead of time and keep it in the fridge.
Ingredients
This recipe makes approximately 10-12 Oreo Choco Tacos.
For the Oreo Filling
- 24 Oreo cookies (1 standard family pack), crushed finely
- 4 oz (1/2 block) cream cheese, softened
- 1/4 cup unsalted butter, softened
- 1 cup powdered sugar
- 1 teaspoon vanilla extract
- 1/4 teaspoon salt
For the Chocolate Shells
- 12 oz semi-sweet chocolate chips or chopped chocolate
- 2 tablespoons coconut oil (or vegetable shortening)
For the Toppings (Optional)
- 1/2 cup chopped peanuts or pecans
- 1/4 cup sprinkles
- 2 tablespoons white chocolate, melted (for drizzling)
- Extra crushed Oreos
Step-by-Step Instructions
-
Step 1: Prepare the Oreo Cookie Crumbs
Start by crushing your Oreo cookies. You can do this by placing them in a large zip-top bag and crushing them with a rolling pin, or by pulsing them in a food processor until fine crumbs form. Set aside about 1/4 cup of crumbs for garnish later, if desired.
Small tip: For extra fine crumbs, remove the cream filling from about half of the Oreos before crushing, then add it back in with the other ingredients.
-
Step 2: Make the Creamy Oreo Filling
In a medium bowl, combine the softened cream cheese and softened butter. Beat with an electric mixer until smooth and creamy. Add the powdered sugar, vanilla extract, and salt, and beat again until well combined and fluffy.
Small tip: Ensure your cream cheese and butter are truly at room temperature. This makes for a much smoother, lump-free filling.
-
Step 3: Combine and Chill the Filling
Gently fold in the crushed Oreo crumbs (reserving your garnish crumbs) into the cream cheese mixture. Mix until just combined. The mixture should be thick and moldable. Cover the bowl and refrigerate for at least 30 minutes to firm up slightly.
Small tip: Don’t overmix once the crumbs are added, or the filling can become too soft.
-
Step 4: Shape the “Taco” Filling
Line a baking sheet with parchment paper or a silicone mat. Take spoonfuls of the chilled Oreo filling and shape them into small, flattened oval or rectangular shapes, about 3-4 inches long and 1.5-2 inches wide. They should be about 1/2 inch thick. Place them on the prepared baking sheet.
Small tip: Lightly dampen your hands with water to prevent the filling from sticking as you shape it.
-
Step 5: Freeze the Filling Shapes
Once all the filling shapes are on the baking sheet, place the sheet in the freezer for at least 1 hour, or until completely firm. This is crucial for dipping and handling.
Small tip: Don’t rush this step! The firmer the filling, the easier it will be to coat with chocolate.
-
Step 6: Prepare the Chocolate Coating
In a microwave-safe bowl, combine the chocolate chips and coconut oil. Microwave in 30-second intervals, stirring well after each, until the chocolate is completely melted and smooth. Alternatively, melt over a double boiler.
Small tip: The coconut oil helps thin the chocolate slightly, making it easier to dip and giving it a nice, shiny finish.
-
Step 7: Dip the Oreo Tacos
Remove the firm Oreo filling shapes from the freezer. Working quickly, dip each shape into the melted chocolate, ensuring it’s fully coated. Let any excess chocolate drip off. You can use a fork or a dipping tool for this.
Small tip: Have your toppings ready before you start dipping, as the chocolate sets quickly on the cold filling.
-
Step 8: Add Toppings and Chill Again
Immediately after dipping, place the chocolate-coated taco back on the parchment-lined baking sheet. Sprinkle with your desired toppings – chopped nuts, sprinkles, or extra crushed Oreos. Repeat with the remaining tacos.
Small tip: If the chocolate starts to thicken, gently reheat it in the microwave for a few seconds.
-
Step 9: Final Chill and Serve
Once all the tacos are dipped and topped, return the baking sheet to the freezer for another 30 minutes, or until the chocolate is completely set and firm. Once firm, they are ready to serve and enjoy!
Small tip: These are best enjoyed cold, straight from the freezer or fridge.
Tips & Variations
- Gluten-Free Option: Easily make this recipe gluten-free by using gluten-free Oreo cookies and ensuring all other ingredients (like chocolate chips) are certified gluten-free.
- Vegan/Vegetarian Option: For a vegan version, use plant-based Oreo-style cookies, vegan cream cheese, and vegan butter. Ensure your chocolate chips are dairy-free. This recipe is naturally vegetarian if using standard ingredients.
- Add More “Goodness”: While this is a treat, you can add a touch of fiber and healthy fats by incorporating finely chopped nuts (like almonds or walnuts) into the Oreo filling or as a topping. You could also drizzle with a nut butter for extra protein.
- Spicy Kick: For an adventurous twist, add a pinch of cayenne pepper or chili powder to your melted chocolate coating. The slight heat perfectly complements the sweet chocolate!
- Flavor Fun: Experiment with different chocolate coatings – milk chocolate, dark chocolate, or even white chocolate. You can also add a drop of peppermint extract or orange zest to the melted chocolate for a flavored shell.
Nutritional Information
Approximate values per serving (based on 12 servings):
- Calories: 350-400 kcal
- Protein: 3-5 g
- Carbohydrates: 40-50 g
- Fat: 20-25 g
Note: These values are approximate and may vary depending on the specific brands and quantities of ingredients used.
Health Benefits
While Oreo Choco Tacos are definitely a treat, there are small benefits from some of their core ingredients when enjoyed in moderation.
Chocolate, especially darker varieties, contains antioxidants called flavonoids. These compounds can help protect your cells from damage and may contribute to heart health. It also contains minerals like iron, magnesium, and copper.
If you’re using dairy cream cheese and butter, you’re getting some calcium and Vitamin D, which are essential for strong bones and overall health. These dairy products also provide protein.
The act of making and sharing treats like this can also boost mood and provide a sense of well-being. Enjoying delicious food in moderation is part of a balanced lifestyle, bringing joy and satisfaction.
Finally, if you choose to add nuts as a topping, you’re incorporating healthy fats, fiber, and additional protein, which can contribute to satiety and provide essential nutrients.
Serving Suggestions
- Serve these Oreo Choco Tacos as a delightful dessert after any meal, especially a light dinner.
- They make perfect individual treats for parties, potlucks, or family gatherings. Arrange them beautifully on a platter for an impressive display.
- Enjoy them as a fun, indulgent snack during movie night or a casual get-together with friends. They’re best served chilled!
Storage Tips
Store leftover Oreo Choco Tacos in an airtight container in the refrigerator for up to 5-7 days. For longer storage, you can freeze them in an airtight container or freezer bag for up to 1 month. When freezing, place parchment paper between layers to prevent sticking. To reheat, simply let them thaw in the refrigerator for about 15-30 minutes, or enjoy them straight from the freezer for a firmer, ice cream-like texture.
Conclusion
There you have it – a recipe for Oreo Choco Tacos that’s as fun to make as it is to eat! This dish truly embodies the joy of simple, delicious desserts. With its creamy Oreo filling, crisp chocolate shell, and customizable toppings, it’s a guaranteed crowd-pleaser that will have everyone asking for more.
Don’t be shy; give this recipe a try. You’ll be amazed at how easily you can create such a spectacular treat. It’s perfect for satisfying those sweet cravings, celebrating a special occasion, or simply enjoying a moment of pure indulgence.
So, whip up a batch, gather your loved ones, and share the happiness that these Oreo Choco Tacos bring. They’re more than just a dessert; they’re an experience waiting to be made and shared. Happy cooking!




