

Introduction
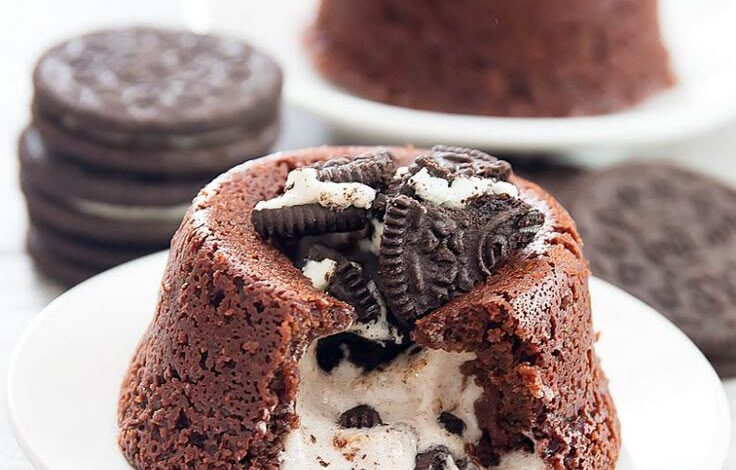
Get ready for a dessert experience that will truly wow your taste buds! We’re talking about the incredible Oreo Lava Cake. Imagine a rich, moist chocolate cake on the outside, with a warm, gooey, molten Oreo filling bursting out from the center with every spoonful. It’s pure chocolate and cookie bliss, a dream come true for any dessert lover.
This show-stopping dessert might look fancy, but it’s surprisingly simple to make. You don’t need any complex techniques or a long list of obscure ingredients. With just a few common pantry staples and a little bit of love, you can create a restaurant-quality dessert right in your own kitchen. It’s perfect for a special occasion or just a cozy night in.
Are you ready to impress your family and friends, or simply treat yourself to something extraordinary? Follow along with this easy recipe, and you’ll be enjoying your very own warm, melty Oreo Lava Cake in no time. Let’s get baking!
Cooking Time & Prep Time
- Prep Time: 20 minutes
- Cooking Time: 12-15 minutes
- Total Time: 32-35 minutes
Small tip: Gather all your ingredients before you start mixing. This “mise en place” makes the baking process much smoother and quicker!
Ingredients
This recipe makes 4 delicious servings.
For the Oreo Lava Cakes
- 1/2 cup (113g) unsalted butter, melted
- 4 ounces (113g) good quality dark chocolate (60-70% cacao), chopped
- 1/2 cup (100g) granulated sugar
- 2 large eggs
- 2 large egg yolks
- 1 teaspoon vanilla extract
- 1/4 cup (30g) all-purpose flour
- Pinch of salt
- 8-10 whole Oreo cookies
For Preparing the Ramekins
- 2 tablespoons unsalted butter, softened, for greasing
- 2 tablespoons cocoa powder, for dusting
Optional Garnish
- Powdered sugar, for dusting
- Extra crushed Oreo cookies
- Vanilla ice cream or whipped cream
Step-by-Step Instructions
-
Step 1: Prepare Your Ramekins
Start by generously buttering four 6-ounce ramekins. Make sure to get into all the nooks and crannies. Then, dust each ramekin with cocoa powder, rotating and tapping to coat evenly. Discard any excess cocoa powder. This step helps prevent sticking and adds a beautiful finish.
Small tip: You can also use a non-stick baking spray with flour for an even quicker preparation.
-
Step 2: Melt Butter and Chocolate
In a heatproof bowl, combine the chopped dark chocolate and melted butter. You can do this over a double boiler or in the microwave. If using the microwave, heat in 30-second intervals, stirring well after each, until smooth and fully melted. Let it cool slightly.
Small tip: Don’t overheat the chocolate, as it can seize and become grainy. Gentle heat is key.
-
Step 3: Whisk Eggs and Sugar
In a separate large bowl, whisk together the granulated sugar, whole eggs, and egg yolks until the mixture is light yellow and slightly thickened. This takes about 2-3 minutes with a hand whisk, or less with an electric mixer. The aeration here is important for the cake’s texture.
-
Step 4: Combine Wet Ingredients
Gently fold the cooled chocolate and butter mixture into the egg and sugar mixture. Add the vanilla extract and mix until just combined. Be careful not to overmix at this stage; a light touch is best.
-
Step 5: Add Dry Ingredients
Sift the all-purpose flour and salt over the wet ingredients. Fold them in gently until just combined and no streaks of flour remain. Overmixing the flour can lead to a tough cake, so stop as soon as it’s incorporated.
Small tip: Sifting the flour prevents lumps and helps create a smoother batter.
-
Step 6: Fill the Ramekins
Divide about half of the batter evenly among the four prepared ramekins. Spoon a portion into each, creating a base layer. This will form the bottom of your lava cake.
-
Step 7: Add the Oreo Core
Place 2-3 whole Oreo cookies (depending on the size of your ramekin and desire for a bigger “lava” core) on top of the batter in each ramekin. Gently press them down slightly so they are nestled into the batter. This is where the magic happens!
-
Step 8: Top with Remaining Batter
Carefully spoon the remaining batter over the Oreos, making sure they are fully covered. Fill the ramekins about two-thirds to three-quarters full. Smooth the tops with a spoon or spatula.
-
Step 9: Bake the Cakes
Preheat your oven to 400°F (200°C). Place the filled ramekins on a baking sheet. Bake for 12-15 minutes. The edges should be set, but the center should still be jiggly when gently shaken. This jiggly center is your molten lava!
Small tip: Oven temperatures can vary, so keep a close eye on your cakes. A minute too long can turn your lava cake into a regular chocolate cake.
-
Step 10: Serve Immediately
Carefully remove the ramekins from the oven. Let them cool for just 1-2 minutes. Then, invert each ramekin onto a serving plate. You can gently tap the bottom to help release the cake. Dust with powdered sugar, sprinkle with crushed Oreos, or add a scoop of vanilla ice cream. Serve warm and enjoy the delicious molten center!
Tips & Variations
- Gluten-Free Option: Simply substitute the all-purpose flour with a 1:1 gluten-free baking flour blend that contains xanthan gum. Also, ensure you use gluten-free Oreo cookies (yes, they exist!).
- Vegan or Vegetarian Option: For a vegan version, use a plant-based butter alternative, an egg replacer (such as flax eggs or a commercial egg substitute), and vegan dark chocolate. Ensure your Oreo cookies are vegan-friendly (most are, but check the label).
- Healthier Additions: While this is a treat, you can boost its nutritional profile by adding a tablespoon of finely ground almonds or walnuts to the batter. You could also serve it with a dollop of Greek yogurt instead of ice cream for added protein.
- Spicy Kick: For a sophisticated twist, add a tiny pinch (about 1/8 teaspoon) of cayenne pepper or chili powder to the chocolate mixture in Step 2. It won’t make it spicy, but it will enhance the chocolate flavor with a subtle warmth.
- Flavor Variations: Experiment with different cookie centers! Try a peanut butter cup, a caramel square, or even a different type of biscuit. You can also add a teaspoon of instant espresso powder to the chocolate for a deeper, richer chocolate flavor.
Nutritional Information
Approximate values per serving (based on 4 servings):
- Calories: 480 kcal
- Protein: 7g
- Carbohydrates: 55g
- Fat: 28g
Please note: These values are approximate and may vary depending on the specific brands and quantities of ingredients used.
Health Benefits
While an Oreo Lava Cake is certainly a decadent treat, some of its core ingredients offer surprising benefits in moderation.
Dark chocolate, a star in this recipe, is packed with antioxidants. These compounds help fight free radicals in your body, which can contribute to various health issues. Dark chocolate also contains minerals like iron, magnesium, and zinc.
Eggs, a fundamental component, are a fantastic source of high-quality protein. They provide all nine essential amino acids your body needs. Eggs also contain important vitamins like D, B6, B12, and minerals such as selenium and choline, which is vital for brain health.
Butter, in moderation, provides energy and contains fat-soluble vitamins like A, E, and K2. While often seen as indulgent, it can be part of a balanced diet. The flour provides carbohydrates for energy, and the sugar, of course, provides that delightful sweetness that makes this dessert so enjoyable.
Serving Suggestions
- Serve warm with a scoop of premium vanilla bean ice cream. The contrast of hot and cold is simply divine!
- Top with a cloud of freshly whipped cream and a sprinkle of extra crushed Oreo cookies for an elegant presentation.
- For a slightly sophisticated touch, pair it with a few fresh raspberries or strawberries. Their tartness cuts through the richness beautifully.
Storage Tips
If you happen to have any leftovers (which is rare!), you can store baked Oreo Lava Cakes in an airtight container in the refrigerator for up to 2-3 days. To reheat, gently warm them in the microwave for 30-60 seconds, or in a preheated oven at 300°F (150°C) for about 5-7 minutes, until the center is gooey again. Unbaked lava cakes can be prepared in advance and stored in the ramekins, covered, in the fridge for up to 24 hours. Just bake them fresh when you’re ready to serve. Freezing baked lava cakes is not recommended as it can affect the molten center, but you could freeze unbaked batter in ramekins for up to a month, then bake from frozen, adding a few extra minutes to the baking time.
Conclusion
There you have it – the ultimate recipe for an irresistible Oreo Lava Cake! This dessert is truly a showstopper, combining the beloved crunch of Oreos with the luxurious indulgence of a molten chocolate center. It’s a dessert that brings smiles and creates wonderful memories.
Don’t be intimidated by its fancy appearance. With our clear, step-by-step instructions, you’ll find that creating this masterpiece is both fun and rewarding. The effort is minimal, but the payoff is huge, delivering a dessert that tastes like it came straight from a gourmet bakery.
So go ahead, preheat your oven, gather your ingredients, and embark on this delicious baking adventure. Share this delightful treat with your family and friends, or simply savor every warm, chocolatey bite all by yourself. Happy baking!




