

Introduction
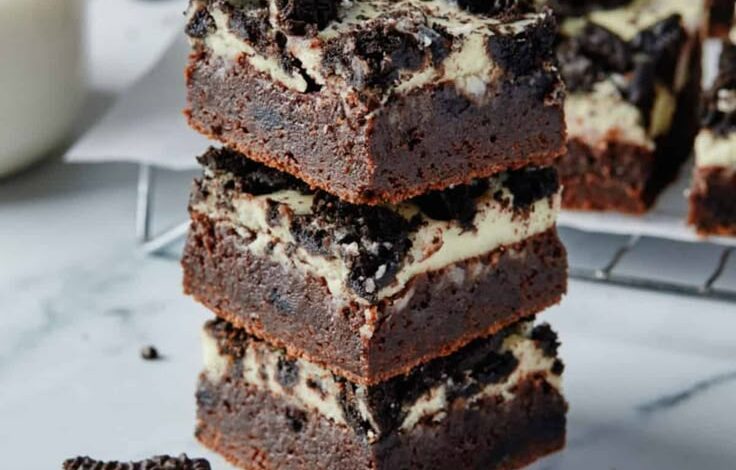
Get ready for a treat that brings all the joy of a campfire s’more right into your kitchen, with an irresistible twist! These Oreo S’mores Bars are a dream come true for anyone who loves the classic combination of gooey marshmallows, melty chocolate, and crunchy cookies. Imagine a buttery, chocolatey Oreo crust topped with a rich layer of melted chocolate, all crowned with fluffy, toasted marshmallows. It’s pure bliss in every bite!
The best part? These bars are incredibly easy and quick to make. You don’t need a campfire or any fancy equipment. With just a few simple ingredients and minimal baking time, you can whip up a batch of these decadent treats. They are perfect for last-minute gatherings, a cozy night in, or when you simply crave something sweet and satisfying without a lot of fuss.
So, ditch the complicated desserts and get ready to impress everyone (including yourself!) with these show-stopping Oreo S’mores Bars. They are guaranteed to be a hit and will disappear faster than you can say “s’mores!” Let’s dive into making some magic.
Cooking Time & Prep Time
- Prep Time: 20 minutes
- Cooking Time: 15 minutes
- Total Time: 35 minutes
Small tip: You can prepare the Oreo crust a day ahead and store it in the fridge to save time on baking day.
Ingredients
This recipe makes approximately 16 delicious bars.
For the Oreo Crust
- 36 Oreo cookies (about 1 package, regular size), finely crushed
- 6 tablespoons unsalted butter, melted
For the Chocolate Layer
- 1 ½ cups semi-sweet chocolate chips (or milk chocolate chips for a sweeter bar)
- ½ cup heavy cream
For the Marshmallow Topping
- 4 cups mini marshmallows (about 10 ounces)
Step-by-Step Instructions
-
Step 1: Prepare Your Pan and Oven
Preheat your oven to 350°F (175°C). Line a 9×13 inch baking pan with parchment paper, leaving an overhang on the sides. This will make it easy to lift the bars out later. Lightly grease the parchment paper with cooking spray.
Small tip: The parchment paper overhang is crucial for easy removal and clean cuts!
-
Step 2: Make the Oreo Crust
Place the entire Oreo cookies (filling and all!) into a food processor. Pulse until they are finely crushed into crumbs. If you don’t have a food processor, you can place them in a large zip-top bag and crush them with a rolling pin.
Transfer the Oreo crumbs to a medium bowl. Pour the melted butter over the crumbs. Stir well with a spoon or spatula until all the crumbs are moistened and resemble wet sand.
-
Step 3: Press the Crust into the Pan
Pour the buttered Oreo crumbs into your prepared baking pan. Use the bottom of a flat glass or a measuring cup to firmly press the crumbs evenly into the bottom of the pan. Make sure it’s a compact and uniform layer.
-
Step 4: Bake the Crust
Place the pan with the pressed crust into the preheated oven. Bake for 8 minutes. This helps to set the crust and give it a nice, firm texture. Remove the pan from the oven and set it aside.
-
Step 5: Prepare the Chocolate Layer
While the crust is baking, prepare your chocolate ganache. In a microwave-safe bowl, combine the semi-sweet chocolate chips and heavy cream. Microwave on high for 30 seconds, then stir.
Continue microwaving in 15-second intervals, stirring after each, until the chocolate is completely melted and smooth. Be careful not to overheat it. Alternatively, you can melt the chocolate and cream together in a double boiler over simmering water.
-
Step 6: Assemble the Chocolate Layer
Pour the warm, melted chocolate ganache evenly over the partially baked Oreo crust. Use an offset spatula or the back of a spoon to spread it all the way to the edges. Ensure the chocolate layer is smooth and covers the entire crust.
-
Step 7: Add the Marshmallows
Evenly scatter the mini marshmallows over the chocolate layer. Try to cover as much of the chocolate as possible. Don’t worry if there are small gaps; they will puff up as they bake.
-
Step 8: Bake Until Golden
Return the pan to the oven and bake for another 7-10 minutes. Keep a close eye on the marshmallows! You want them to be puffed up and beautifully golden brown on top. They can burn quickly, so don’t walk away.
-
Step 9: Cool and Cut
Once the marshmallows are perfectly toasted, remove the pan from the oven. Let the bars cool completely at room temperature for at least 2-3 hours. This is important for the chocolate layer to set properly, making them easier to cut.
Small tip: For cleaner cuts, you can chill the bars in the refrigerator for 30-60 minutes after they’ve cooled to room temperature.
Once cooled and set, use the parchment paper overhang to lift the entire slab of bars out of the pan. Place it on a cutting board and cut into 16 squares. Enjoy your delicious Oreo S’mores Bars!
Tips & Variations
- Gluten-Free Option: Easily make these gluten-free by using gluten-free Oreo-style cookies for the crust and ensuring your chocolate chips are certified gluten-free. Most marshmallows are naturally gluten-free, but always double-check the label.
- Vegan or Vegetarian Option: For a vegan version, use plant-based Oreo-style cookies (many store brands are accidentally vegan, but check labels), vegan butter, dairy-free chocolate chips, and vegan marshmallows. This makes a fantastic treat for everyone!
- Protein Boost: While this is a dessert, you can add a subtle protein boost to the chocolate layer. Stir in a scoop of unflavored or chocolate-flavored protein powder (whey or plant-based) into the melted chocolate ganache. Ensure it’s well combined for a smooth texture.
- Spicy Kick: For a grown-up twist, add a pinch of cayenne pepper or chili powder to your chocolate ganache. Start with ¼ teaspoon and increase to taste. The subtle heat beautifully complements the sweet chocolate and marshmallows.
- Different Chocolate Flavors: Experiment with different types of chocolate! Try dark chocolate for a richer, less sweet bar, or white chocolate for a creamy, distinct flavor. You could even use a mix of different chocolate chips for a unique blend.
Nutritional Information
Approximate values per serving (based on 16 servings):
- Calories: 320 kcal
- Protein: 3g
- Carbohydrates: 45g
- Fat: 16g
Note: These values are approximate and may vary depending on the specific brands and exact amounts of ingredients used.
Health Benefits
While these Oreo S’mores Bars are definitely a treat, there are a few components that offer some surprising benefits when enjoyed in moderation.
The chocolate in these bars, especially if you opt for semi-sweet or dark varieties, contains cocoa. Cocoa is rich in antioxidants called flavonoids. These powerful compounds help fight free radicals in the body, potentially reducing oxidative stress.
Dark chocolate also provides essential minerals. It’s a source of iron, magnesium, copper, and manganese. These minerals play vital roles in various bodily functions, from energy production to bone health and immune support.
Beyond the physical, there’s a significant mental health benefit to enjoying a delicious homemade treat. The act of baking can be therapeutic, and sharing these bars with loved ones can foster connection and joy. Enjoying a dessert in moderation can be part of a balanced lifestyle, providing comfort and satisfaction.
Finally, the carbohydrates in the cookies and marshmallows provide a quick energy boost. While this energy comes from sugar, it can be useful for active individuals or as a pick-me-up, again, when consumed thoughtfully as part of an overall balanced diet.
Serving Suggestions
- Dessert Delight: Serve these bars slightly warm with a scoop of vanilla bean ice cream for an extra indulgent experience.
- Coffee Break Treat: They pair wonderfully with a hot cup of coffee, tea, or even a glass of cold milk for a comforting snack.
- Party Perfect: Cut them into smaller squares for easy grab-and-go treats at parties, potlucks, or family gatherings. They are always a crowd-pleaser!
- Lunchbox Surprise: Pack a square in a lunchbox for a delightful midday treat that will bring a smile to anyone’s face.
Storage Tips
Store leftover Oreo S’mores Bars in an airtight container at room temperature for up to 3 days. If you prefer them firmer, you can store them in the refrigerator for up to 5 days, but they might become a bit chewier. These bars can also be frozen! Wrap individual bars tightly in plastic wrap, then place them in a freezer-safe bag or container for up to 1 month. Thaw at room temperature for a few hours or warm gently in the microwave for a few seconds before enjoying. Reheating in the microwave will bring back some of that gooey marshmallow goodness!
Conclusion
There you have it – a truly magical dessert that combines the nostalgic fun of s’mores with the beloved crunch of Oreos. These bars are incredibly easy to make, yet they deliver big on flavor and texture. The rich chocolate, the sweet, toasted marshmallows, and that perfect Oreo crust create a symphony of deliciousness that’s hard to resist.
Don’t wait another moment to bring this delightful recipe to life in your own kitchen. It’s a fantastic project for bakers of all skill levels and promises a reward that is absolutely worth every single step. You’ll be amazed at how quickly these come together and how utterly satisfying they are.
So go ahead, gather your ingredients, and get ready to create some unforgettable memories. Whether you’re making them for a special occasion, a casual get-together, or just because, these Oreo S’mores Bars are perfect for sharing with family and friends. Get ready for compliments and requests for the recipe!




