

Introduction
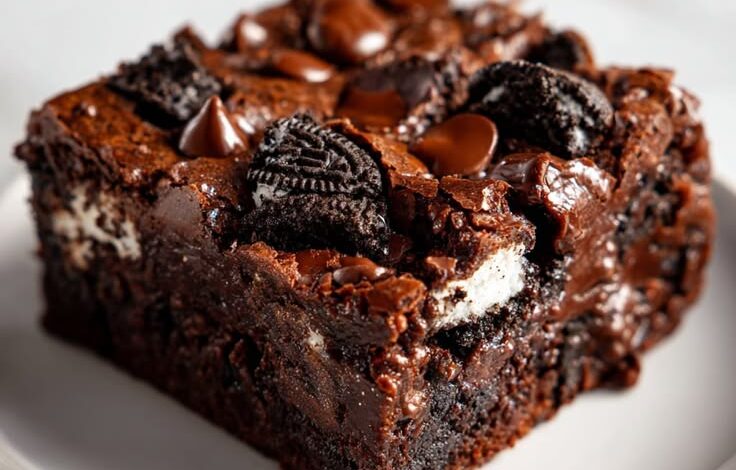
Get ready for a treat that will make your taste buds sing! Imagine a rich, fudgy brownie, baked to perfection. Now, picture a layer of crunchy, creamy Oreo cookies nestled right in the middle. That’s exactly what our Oreo Stuffed Brownies deliver – a delightful combination of textures and flavors in every single bite. It’s truly a dessert masterpiece!
You might think something this amazing would be complicated to make. But guess what? It’s surprisingly easy! This recipe uses simple ingredients and straightforward steps. Even if you’re new to baking, you’ll find this recipe quick and fun. It’s perfect for a last-minute dessert or a special occasion.
So, why wait? Gather your ingredients and let’s dive into making these incredible brownies. Your kitchen is about to smell heavenly, and you’re just moments away from enjoying a truly decadent dessert. Get ready to impress yourself and everyone lucky enough to share them!
Cooking Time & Prep Time
- Prep Time: 15 minutes
- Cooking Time: 28 minutes
- Total Time: 43 minutes
Small tip: Read through the entire recipe before you start. This helps you get organized and makes the cooking process smooth and enjoyable.
Ingredients
This recipe makes 16 generous servings.
For the Fudgy Brownies
- 1 cup (2 sticks) unsalted butter, melted
- 2 cups granulated sugar
- 4 large eggs
- 1 teaspoon vanilla extract
- ¾ cup unsweetened cocoa powder
- 1 cup all-purpose flour
- ½ teaspoon baking powder
- ¼ teaspoon salt
- ½ cup chocolate chips (optional, for extra fudginess)
For the Oreo Layer
- 1 package (about 36 cookies) Oreo cookies
Step-by-Step Instructions
-
Preheat Oven and Prepare Pan
Preheat your oven to 350°F (175°C). Line a 9×13 inch baking pan with parchment paper, leaving an overhang on the sides. This makes it super easy to lift the brownies out later. Lightly grease the parchment paper.
Small tip: The parchment paper overhang acts as handles, making removal and cutting much simpler!
-
Melt Butter and Combine Wet Ingredients
In a large mixing bowl, melt the butter. You can do this in the microwave or on the stovetop. Once melted, add the granulated sugar to the warm butter. Whisk them together until well combined and smooth.
Small tip: Using warm butter helps the sugar dissolve better, leading to a smoother brownie texture.
-
Add Eggs and Vanilla
Crack the eggs one at a time into the butter and sugar mixture. Whisk well after each addition. Stir in the vanilla extract until everything is fully incorporated. The mixture should look light and creamy.
Small tip: Whisking eggs in one at a time adds air, which helps create that desirable crinkly top on your brownies.
-
Mix in Dry Ingredients
In a separate bowl, whisk together the cocoa powder, all-purpose flour, baking powder, and salt. Gradually add these dry ingredients to the wet mixture. Mix until just combined. Be careful not to overmix, as this can make the brownies tough.
Small tip: Overmixing develops gluten, making baked goods chewy. Mix until streaks of flour just disappear.
-
Add Chocolate Chips (Optional)
If you’re using chocolate chips, gently fold them into the brownie batter now. They add an extra layer of chocolatey goodness. Make sure they are evenly distributed throughout the batter.
Small tip: Use good quality chocolate chips for the best flavor and melt.
-
Layer the Batter and Oreos
Pour about half of the brownie batter into your prepared baking pan. Spread it evenly with a spatula. Arrange a single layer of Oreo cookies directly on top of the batter. Place them close together to cover the entire surface.
Small tip: Don’t worry if the Oreo layer isn’t perfectly uniform; it will still be delicious!
-
Cover with Remaining Batter
Carefully spoon the remaining brownie batter over the layer of Oreos. Gently spread it out to cover all the cookies completely. Take your time to ensure an even top layer.
Small tip: A rubber spatula works best for spreading the thick batter without disturbing the Oreos too much.
-
Bake to Perfection
Place the pan in the preheated oven. Bake for 28-32 minutes. The brownies are done when a toothpick inserted into the center (avoiding an Oreo) comes out with moist crumbs, not wet batter.
Small tip: Brownies are better slightly underbaked than overbaked, ensuring they stay fudgy.
-
Cool Completely
Once baked, remove the pan from the oven. Let the brownies cool completely in the pan on a wire rack. This is crucial for them to set properly and be easy to cut. Resist the urge to cut them warm!
Small tip: Cooling can take 2-3 hours, but patience is key for clean slices.
-
Slice and Serve
Once cooled, use the parchment paper overhang to lift the entire brownie slab out of the pan. Place it on a cutting board. Use a sharp knife to cut into 16 squares. Wipe your knife clean between cuts for the neatest edges.
Small tip: For extra clean cuts, you can chill the brownies in the fridge for 30 minutes before slicing.
Tips & Variations
- Gluten-Free Option: Easily make these gluten-free by swapping the all-purpose flour for a 1:1 gluten-free baking flour blend. Ensure your cocoa powder and Oreos are also certified gluten-free (some brands offer GF Oreos!).
- Vegan or Vegetarian Option: For a vegan version, use a plant-based butter substitute (like vegan butter sticks) and a flax egg or other egg replacer for the eggs. Make sure your chocolate chips and Oreos are also vegan-friendly (original Oreos are often considered “accidentally vegan” in many regions, but always check labels!).
- Adding More Protein: For a protein boost, you can stir 1-2 scoops of unflavored or chocolate-flavored protein powder into the dry ingredients. You might need to add a tablespoon or two of milk (dairy or non-dairy) to maintain the batter’s consistency.
- Spicy Kick: If you love a little heat, add a pinch (¼ teaspoon) of cayenne pepper to the dry ingredients. The subtle warmth complements the rich chocolate beautifully without making it overtly spicy.
- Flavor Variations: Get creative! Try using different flavored Oreos (mint, peanut butter, golden). You could also add a swirl of caramel or peanut butter on top of the batter before baking, or sprinkle in some chopped nuts like walnuts or pecans for extra crunch.
Nutritional Information
Approximate values per serving (based on 16 servings):
- Calories: 320 kcal
- Protein: 4g
- Carbohydrates: 45g
- Fat: 16g
Note: Nutritional values may vary depending on specific ingredients used and portion sizes.
Health Benefits
While Oreo Stuffed Brownies are definitely a treat, some of their core ingredients offer a few surprising benefits when enjoyed in moderation.
Dark cocoa powder, a key ingredient, is rich in antioxidants called flavonoids. These compounds can help fight inflammation and may support heart health. It also contains minerals like iron and magnesium, which are important for energy and muscle function.
Eggs are a fantastic source of high-quality protein, essential for building and repairing tissues. They also provide vital vitamins such as B12, D, and A, as well as choline, which is important for brain health and memory.
Even the simple act of baking and enjoying a homemade treat can contribute to mental well-being. The satisfaction of creating something delicious, and the joy of sharing it with others, can be a wonderful mood booster. Sometimes, a little indulgence is good for the soul!
Remember, balance is key! Enjoy these brownies as part of a varied and wholesome diet. They’re perfect for celebrating or simply treating yourself.
Serving Suggestions
- Classic Pairing: Serve warm with a scoop of vanilla bean ice cream or a dollop of fresh whipped cream. A drizzle of chocolate syrup makes it extra special!
- Coffee Break Treat: These brownies are absolutely divine with a hot cup of coffee, a frothy latte, or a cold glass of milk.
- Party Platter Perfection: Cut into smaller squares and arrange on a dessert platter for parties, potlucks, or family gatherings. They’re always a crowd-pleaser!
- Edible Gifts: Wrap individual brownies in cellophane bags with a ribbon for a thoughtful homemade gift for friends, teachers, or neighbors.
Storage Tips
Store leftover Oreo Stuffed Brownies in an airtight container at room temperature for up to 3-4 days. For longer freshness, you can keep them in the refrigerator for up to a week. Brownies also freeze beautifully! Wrap individual squares tightly in plastic wrap, then place them in a freezer-safe bag or container for up to 2-3 months. To reheat, simply microwave a frozen or refrigerated brownie for 15-30 seconds until warm and gooey, or let it come to room temperature on its own.
Conclusion
There you have it – a recipe for the most incredibly fudgy, chocolatey, and delightfully crunchy Oreo Stuffed Brownies! This dessert truly is a testament to how simple ingredients can come together to create something extraordinary. The combination of rich brownie and creamy Oreo is pure magic.
We hope you’re feeling inspired to get into your kitchen and whip up a batch of these beauties. They are so easy to make, and the results are absolutely worth every minute. You’ll be amazed at how quickly they disappear!
Don’t keep all this deliciousness to yourself! These brownies are perfect for sharing with family, friends, or bringing to your next gathering. Prepare for rave reviews and requests for the recipe. Happy baking, and enjoy every single fudgy bite!




