Introduction
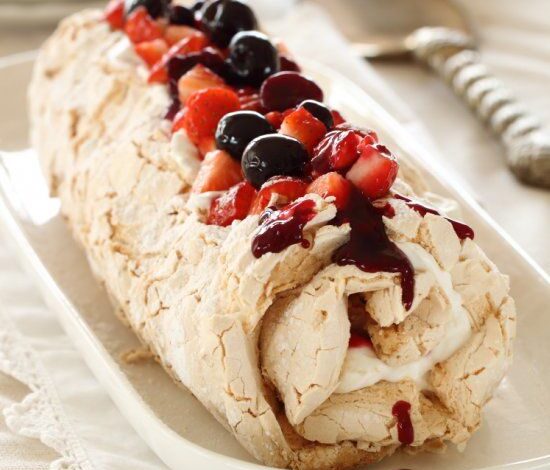
Get ready to discover your new favorite dessert: the Pavlova Cake Roll! This isn’t just any sweet treat; it’s a dreamy, cloud-like meringue creation, rolled up with luscious whipped cream and bursting with fresh, vibrant berries. Every bite offers a delightful contrast of crisp exterior, chewy interior, and creamy, fruity goodness. It’s truly a showstopper that tastes as incredible as it looks!
You might think a dessert this elegant would be complicated, but I’m here to tell you it’s surprisingly simple to make. The meringue bakes into a flexible sheet, perfect for rolling, and the filling comes together in minutes. With just a few key ingredients and some easy steps, you’ll have a stunning dessert that will impress everyone without hours of effort.
So, whether you’re planning a special occasion or just want to treat yourself to something extraordinary, this Pavlova Cake Roll is the perfect recipe. It’s light, refreshing, and utterly irresistible. Let’s dive in and create some magic in your kitchen!
Cooking Time & Prep Time
- Prep Time: 30 minutes
- Cooking Time: 25 minutes
- Cooling & Assembly Time: 60 minutes
- Total Time: 115 minutes
Small tip: Prepare your baking sheet and measure out all ingredients before you start whisking. This makes the process much smoother!
Ingredients
This recipe makes 8-10 servings.
For the Meringue Roll
- 6 large egg whites (at room temperature)
- 1 ½ cups (300g) granulated sugar
- 1 tablespoon cornstarch
- 1 teaspoon white vinegar
- 1 teaspoon vanilla extract
For the Filling
- 1 ½ cups (360ml) heavy cream, very cold
- ¼ cup (50g) powdered sugar (confectioners’ sugar)
- ½ teaspoon vanilla extract
- 1 ½ cups fresh mixed berries (strawberries, raspberries, blueberries), washed and dried
For Garnish (Optional)
- Extra fresh berries
- A dusting of powdered sugar
- Fresh mint leaves
Step-by-Step Instructions
-
Step 1: Preheat Oven and Prepare Pan
Preheat your oven to 325°F (160°C). Line a 10×15 inch (25×38 cm) baking sheet with parchment paper. Lightly grease the parchment paper and dust with a little cornstarch to prevent sticking. This creates a non-stick surface for your delicate meringue.
Small tip: Ensure the parchment paper hangs over the edges slightly. This will help you lift the baked meringue later.
-
Step 2: Whisk Egg Whites
In a very clean, large mixing bowl (or the bowl of a stand mixer), add the room temperature egg whites. Whisk on medium speed until soft peaks form. This means the peaks will just hold their shape and gently flop over.
Small tip: Make sure your bowl and whisk are completely grease-free. Any trace of fat can prevent the egg whites from whipping properly.
-
Step 3: Add Sugar Gradually
Gradually add the granulated sugar, about a tablespoon at a time, while continuing to whisk on medium-high speed. Keep whisking until the mixture is very thick, glossy, and holds stiff peaks. You should not feel any sugar granules when you rub a small amount between your fingers.
Small tip: This step is crucial for stable meringue. Don’t rush it!
-
Step 4: Fold in Cornstarch, Vinegar, and Vanilla
Gently fold in the cornstarch, white vinegar, and vanilla extract. The cornstarch helps make the meringue chewy and flexible, while the vinegar stabilizes it. Use a rubber spatula for this step to maintain the airiness.
Small tip: Folding gently means using a light hand to combine the ingredients without deflating the meringue.
-
Step 5: Spread and Bake the Meringue
Carefully spread the meringue mixture evenly over the prepared parchment paper on your baking sheet. Use an offset spatula to create a smooth, even layer. Bake for 25 minutes until the meringue is lightly golden and crisp on the outside.
Small tip: An even layer ensures uniform baking and makes rolling easier.
-
Step 6: Cool and Flip the Meringue
Once baked, remove the meringue from the oven. Immediately invert the meringue onto a clean piece of parchment paper or a clean kitchen towel that has been lightly dusted with powdered sugar. Carefully peel off the original parchment paper. Let it cool completely for at least 30-45 minutes.
Small tip: Cooling completely is important. If it’s still warm, it might crack when rolled.
-
Step 7: Prepare the Whipped Cream Filling
While the meringue cools, prepare the filling. In a cold bowl, whisk the very cold heavy cream, powdered sugar, and vanilla extract on medium-high speed until stiff peaks form. Be careful not to over-whisk, or it will turn grainy.
Small tip: Chill your mixing bowl and whisk attachment in the freezer for 10-15 minutes before whipping for extra fluffy cream.
-
Step 8: Assemble the Pavlova Roll
Once the meringue is completely cool, spread the whipped cream evenly over the meringue, leaving a 1-inch border on one of the shorter ends. Scatter the fresh mixed berries over the whipped cream. Now, starting from the opposite short end, carefully and gently roll the meringue into a log. Use the parchment paper or towel to help guide the roll.
Small tip: Don’t worry if it cracks a little; that’s part of its rustic charm!
-
Step 9: Chill and Garnish
Transfer the rolled pavlova onto a serving platter, seam-side down. You can leave it wrapped in the parchment paper for easier transfer. Chill in the refrigerator for at least 30 minutes to allow it to set. Before serving, garnish with extra fresh berries, a dusting of powdered sugar, and fresh mint leaves if desired. Slice with a sharp, serrated knife.
Small tip: A sharp, warm knife will give cleaner slices. Wipe the knife between cuts.
Tips & Variations
- Gluten-Free Option: This recipe is naturally gluten-free! Just ensure your cornstarch and vanilla extract are certified gluten-free if you have severe sensitivities.
- Dairy-Free/Vegan Option: For a vegan version, replace egg whites with aquafaba (the liquid from a can of chickpeas). Use 9 tablespoons of aquafaba for 6 egg whites. For the filling, use a chilled can of full-fat coconut cream (just the thick cream, not the liquid) or a store-bought vegan whipped topping.
- Fruity & Nutty Boost: Besides berries, try adding sliced kiwi, passion fruit pulp, mango, or even roasted stone fruits. For a textural crunch, sprinkle toasted slivered almonds or chopped pistachios over the cream before rolling.
- Warming Spice Twist: For a cozy flavor, add ¼ teaspoon of ground cardamom or cinnamon to the egg whites along with the vanilla. You could also infuse your whipped cream with a touch of ginger by steeping a small piece of fresh ginger in the cream for an hour before whipping, then straining it out.
- Chocolate Lover’s Dream: Fold 2 tablespoons of cocoa powder into the meringue along with the cornstarch for a chocolate pavlova. For the filling, add mini chocolate chips or a drizzle of chocolate ganache over the whipped cream and berries.
Nutritional Information
Approximate values per serving (based on 10 servings):
- Calories: 290 kcal
- Protein: 4g
- Carbohydrates: 48g
- Fat: 11g
Note: These values are approximate and may vary depending on specific brands and exact ingredient amounts used.
Health Benefits
While this is a dessert, it still offers some wonderful benefits from its star ingredients!
Egg whites are a fantastic source of lean protein, essential for muscle repair and growth. They are also virtually fat-free and low in calories, making them a great base for a lighter dessert. Plus, they contain essential amino acids that your body needs.
Fresh berries, like those used in our filling, are packed with antioxidants. These powerful compounds help protect your cells from damage and support overall health. Berries are also a good source of Vitamin C, which boosts your immune system, and fiber, which aids digestion.
The cornstarch in the meringue helps create that unique texture, but it’s the natural goodness of the eggs and fruit that truly shine here. Enjoying a dessert with fresh, wholesome ingredients is always a good choice.
Even though sugar is present, the lightness of the meringue and the freshness of the fruit make this a balanced treat. It’s a delightful way to satisfy your sweet tooth while still getting some beneficial nutrients.
Serving Suggestions
- Serve slices of Pavlova Cake Roll on its own as a light, elegant dessert. It’s perfect for afternoon tea or a dinner party.
- Pair it with a light fruit coulis (like raspberry or passion fruit) drizzled around the plate for an extra touch of gourmet flair.
- For a truly indulgent experience, offer a small scoop of vanilla bean ice cream or a dollop of crème fraîche alongside each slice.
Storage Tips
This Pavlova Cake Roll is best enjoyed on the day it’s made, as the meringue can start to soften over time. If you have leftovers, store them in an airtight container in the refrigerator for up to 1-2 days. The meringue will lose some of its crispness but will still be delicious. Freezing the assembled roll is not recommended, as the meringue will become soggy and chewy upon thawing. This dessert is designed to be a fresh, delightful experience!
Conclusion
And there you have it – your very own Pavlova Cake Roll, a dessert that is as beautiful as it is delicious! This recipe proves that you don’t need to spend hours in the kitchen to create something truly spectacular. The crisp-chewy meringue, the cloud-like cream, and the burst of fresh berries all come together in perfect harmony.
Don’t be intimidated by the idea of making meringue; with a little care, you’ll master it in no time. The joy of seeing your creation come to life, and the delightful reactions from those who taste it, will be incredibly rewarding. It’s a dessert that feels luxurious but is wonderfully approachable.
So go ahead, gather your ingredients, and whip up this amazing Pavlova Cake Roll. Share it with your family and friends, or simply savor a slice (or two!) all to yourself. Happy baking, and enjoy every blissful bite!