

Introduction
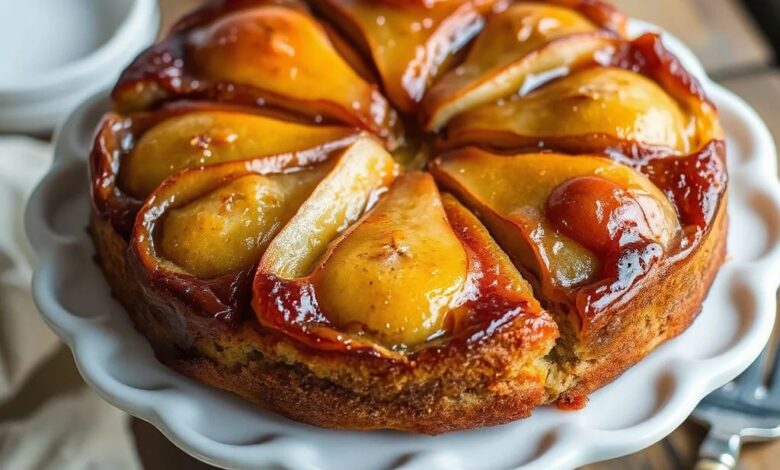
Get ready to discover your new favorite dessert: Pear Ginger Upside Down Cake! This cake is a true showstopper, featuring tender, caramelized pears nestled on top of a warm, spiced ginger cake. Every bite is a delightful balance of sweet, fruity, and gently spicy flavors that will warm you from the inside out.
What makes this cake so special is not just its incredible taste, but also how surprisingly simple it is to create. The “upside-down” magic happens with minimal effort, making it look far more complicated than it actually is. It’s a perfect recipe for both seasoned bakers and those just starting their baking journey, promising a stunning result every time.
So, if you’re looking for a dessert that impresses with both its beauty and its flavor, without requiring hours in the kitchen, this Pear Ginger Upside Down Cake is for you. Gather your ingredients and get ready to bake something truly wonderful. You won’t regret trying this one!
Cooking Time & Prep Time
- Prep Time: 30 minutes
- Cooking Time: 45 minutes
- Total Time: 75 minutes
Small tip: To make your baking process smooth and stress-free, always measure out all your ingredients before you begin mixing. This is called “mise en place” and it helps prevent any last-minute scrambling!
Ingredients
This recipe makes 8 generous servings.
For the Caramelized Pear Topping:
- 1/2 cup (113g) unsalted butter, melted
- 1/2 cup (100g) light brown sugar, packed
- 1 tablespoon fresh ginger, finely grated
- 3-4 medium firm ripe pears (such as Bosc or Anjou), peeled, cored, and sliced 1/4-inch thick
For the Ginger Cake:
- 1 3/4 cups (210g) all-purpose flour
- 2 teaspoons baking powder
- 1 tablespoon ground ginger
- 1 teaspoon ground cinnamon
- 1/2 teaspoon salt
- 1/2 cup (113g) unsalted butter, softened
- 1 cup (200g) granulated sugar
- 2 large eggs, at room temperature
- 1 teaspoon vanilla extract
- 1 cup (240ml) whole milk, at room temperature
Step-by-Step Instructions
-
Step 1: Prepare Your Pan and Oven
Preheat your oven to 350°F (175°C). Take a 9-inch round cake pan and line the bottom with a circle of parchment paper. This parchment paper will make it much easier to release your beautiful cake later.
Small tip: You can trace the bottom of your cake pan onto parchment paper with a pencil, then cut it out.
-
Step 2: Make the Caramel Topping
In a small bowl, melt the 1/2 cup of unsalted butter. Stir in the light brown sugar and the finely grated fresh ginger until well combined. Pour this mixture evenly into the bottom of your prepared cake pan.
-
Step 3: Arrange the Pears
Carefully arrange your sliced pears over the caramel mixture in the cake pan. You can create a beautiful pattern, like overlapping circles, or simply arrange them in a single layer. Try to cover as much of the caramel as possible.
Small tip: Thinner slices of pear will become more tender and meld into the caramel better.
-
Step 4: Whisk the Dry Ingredients
In a medium bowl, whisk together the all-purpose flour, baking powder, ground ginger, ground cinnamon, and salt. Make sure there are no lumps and all the spices are evenly distributed. Set this bowl aside for a moment.
-
Step 5: Cream the Wet Ingredients
In a large mixing bowl, using an electric mixer, beat the softened 1/2 cup of unsalted butter and the granulated sugar together. Beat on medium-high speed until the mixture is light, fluffy, and pale in color. This usually takes about 2-3 minutes.
-
Step 6: Add Eggs and Vanilla
Add the eggs to the creamed butter and sugar, one at a time, beating well after each addition. Scrape down the sides of the bowl as needed to ensure everything is fully incorporated. Stir in the vanilla extract until just combined.
Small tip: Adding eggs one at a time helps the batter emulsify properly, preventing it from curdling.
-
Step 7: Combine Wet and Dry Mixtures
With the mixer on low speed, alternately add the dry ingredient mixture and the milk to the wet ingredients. Start and end with the dry ingredients. For example, add about one-third of the flour mixture, mix briefly, then half the milk, mix, then another third of flour, the remaining milk, and finally the last third of flour. Mix only until just combined; do not overmix.
-
Step 8: Pour Batter Over Pears
Gently spoon the cake batter evenly over the arranged pears in the cake pan. Be careful not to disturb the pear slices too much. Use an offset spatula or the back of a spoon to gently spread the batter to the edges of the pan.
-
Step 9: Bake the Cake
Place the cake pan in the preheated oven and bake for 40-45 minutes. The cake is done when a wooden skewer or toothpick inserted into the center comes out clean or with just a few moist crumbs attached. The top of the cake should be golden brown.
-
Step 10: Invert the Cake
Once baked, remove the cake from the oven and let it cool in the pan on a wire rack for exactly 10 minutes. This cooling time is crucial for the caramel to set slightly but not harden too much. After 10 minutes, place a serving plate upside down over the cake pan, then carefully and confidently flip the pan and plate together. Lift the cake pan away, and carefully peel off the parchment paper. If any pears stick, gently place them back onto the cake.
Small tip: If you wait too long, the caramel might stick. If you flip it too soon, it might be too runny. 10 minutes is the sweet spot!
Tips & Variations
- Gluten-Free Option: To make this cake gluten-free, simply substitute the all-purpose flour with an equal amount of a 1:1 gluten-free baking flour blend. Ensure your blend contains xanthan gum for best results.
- Vegan/Vegetarian Option: For a vegan version, use a plant-based butter alternative (stick form works best), replace the eggs with flax eggs (1 tbsp ground flaxseed + 3 tbsp water per egg, let sit 5 mins), and use your favorite plant-based milk (almond, soy, or oat milk work well).
- Add More Texture or Protein: For an extra layer of flavor and crunch, try adding 1/2 cup of chopped walnuts or pecans to the cake batter in Step 7. This also boosts the protein and healthy fat content slightly.
- Spicy Version: If you love a bolder kick of ginger, increase the ground ginger in the cake batter to 1.5 tablespoons. For a subtle heat, you can also add a pinch (1/4 teaspoon) of cayenne pepper to the dry ingredients.
- Other Flavor Tip: Swap out the pears for firm apples like Honeycrisp or Granny Smith for an Apple Ginger Upside Down Cake. You can also add a teaspoon of orange zest to the cake batter for a brighter, citrusy note.
Nutritional Information
Approximate values per serving (based on 8 servings):
- Calories: ~420
- Protein: ~4g
- Carbohydrates: ~65g
- Fat: ~17g
Please note that these values are approximate and can vary depending on the specific brands and types of ingredients used.
Health Benefits
While this is a dessert, it still offers some wonderful benefits from its star ingredients!
Pears: These delicious fruits are packed with dietary fiber, which is fantastic for digestive health and can help regulate blood sugar levels. Pears also provide a good source of Vitamin C, an antioxidant that supports your immune system, and Vitamin K, which is important for bone health.
Ginger: The fresh and ground ginger in this cake isn’t just for flavor; it’s a powerful ingredient known for its anti-inflammatory properties. Ginger can help soothe an upset stomach, aid digestion, and may even reduce muscle pain. It’s also rich in antioxidants.
Eggs: Eggs are a great source of high-quality protein, essential for muscle repair and growth. They also contain important B vitamins, which are crucial for energy production, and Vitamin D, which supports bone health and immune function.
Milk: Milk contributes calcium, a vital mineral for strong bones and teeth, and Vitamin D, which helps your body absorb calcium. It also adds a good amount of protein to the cake, making it a more satisfying treat.
Serving Suggestions
- Serve warm with a generous scoop of vanilla bean ice cream. The cold, creamy ice cream perfectly contrasts the warm, spiced cake.
- A dollop of freshly whipped cream, lightly sweetened and perhaps with a hint of vanilla, is a classic and elegant accompaniment.
- Enjoy a slice with a hot cup of black tea, herbal tea, or a freshly brewed coffee for a cozy afternoon treat.
- While primarily a dessert, a smaller slice could be a delightful addition to a brunch spread or a special breakfast on




