

Introduction
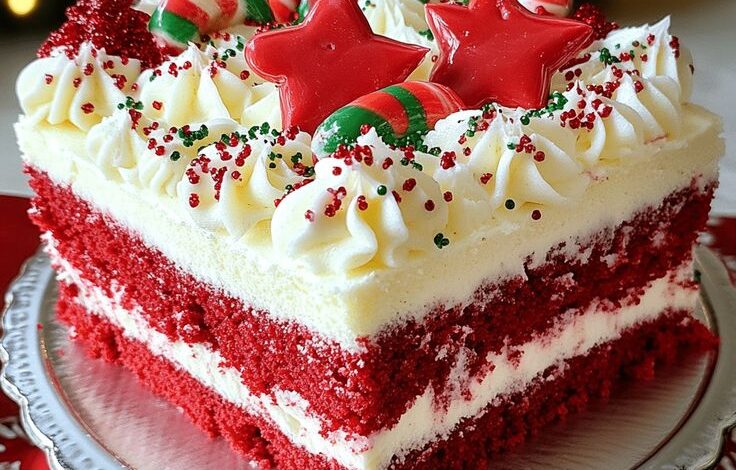
Get ready to bake some magic! Our Red Velvet Christmas Cake is the perfect festive treat. It’s a stunning dessert with its vibrant red color and creamy white frosting, making it a true showstopper for any holiday table. Every bite is moist, tender, and delivers that classic, subtly chocolatey red velvet flavor that everyone adores.
You might think a beautiful cake like this is complicated, but it’s surprisingly simple to make. We’ve broken down every step into easy-to-follow instructions. With a little planning, you’ll be baking like a pro in no time, even if you’re new to cake making. The ingredients are common, and the process is straightforward, ensuring a successful bake every time.
Imagine the smiles when you present this gorgeous cake! It’s not just a dessert; it’s a centerpiece that brings joy and cheer. So, put on your apron, gather your ingredients, and let’s create a delicious Red Velvet Christmas Cake that will delight your family and friends this holiday season. You absolutely have to try this recipe!
Cooking Time & Prep Time
- Prep Time: 45 minutes
- Cooking Time: 30 minutes
- Total Time: 75 minutes
Small tip: You can bake the cake layers a day ahead and store them wrapped at room temperature. This helps save time on the day you plan to assemble and frost your cake.
Ingredients
Makes 12 generous servings
For the Red Velvet Cake
- 2 ½ cups (300g) all-purpose flour
- 1 ½ cups (300g) granulated sugar
- 1 teaspoon baking soda
- 1 teaspoon unsweetened cocoa powder
- ½ teaspoon salt
- 1 cup (226g) unsalted butter, softened
- 2 large eggs, at room temperature
- 1 teaspoon vanilla extract
- 1 cup (240ml) buttermilk, at room temperature
- 2 tablespoons (30ml) red food coloring (liquid or gel)
- 1 teaspoon white vinegar
For the Cream Cheese Frosting
- 16 ounces (450g) cream cheese, softened
- 1 cup (226g) unsalted butter, softened
- 4 cups (480g) powdered sugar, sifted
- 1 teaspoon vanilla extract
- Pinch of salt
For Decoration (Optional)
- Fresh cranberries
- Rosemary sprigs
- White chocolate shavings
Step-by-Step Instructions
-
Step 1: Prepare Your Pans
Preheat your oven to 350°F (175°C). Grease and flour two 8-inch round cake pans. You can also line the bottoms with parchment paper for easy removal. This ensures your beautiful cake layers won’t stick.
Small tip: For extra non-stick insurance, spray with baking spray that contains flour.
-
Step 2: Combine Dry Ingredients
In a large bowl, whisk together the all-purpose flour, granulated sugar, baking soda, cocoa powder, and salt. Make sure there are no lumps and all ingredients are evenly distributed. This step sets the foundation for your cake’s texture.
-
Step 3: Cream Butter and Sugar
In a separate large bowl, using an electric mixer, beat the softened butter until creamy. Gradually add the granulated sugar and continue beating until the mixture is light and fluffy. This process incorporates air, making your cake tender.
-
Step 4: Add Eggs and Vanilla
Beat in the eggs one at a time, mixing well after each addition. Then, stir in the vanilla extract. Scrape down the sides of the bowl to ensure everything is fully combined and smooth.
-
Step 5: Mix Buttermilk and Color
In a small bowl, combine the buttermilk and red food coloring. Whisk them together until the color is vibrant and uniform. This ensures your cake has that signature red hue throughout.
Small tip: Use gel food coloring for a more intense color without adding too much liquid.
-
Step 6: Combine Wet and Dry Mixtures
Gradually add the dry ingredients to the wet ingredients, alternating with the buttermilk mixture. Begin and end with the dry ingredients. Mix on low speed until just combined, being careful not to overmix.
-
Step 7: Add Vinegar
Finally, stir in the white vinegar. The vinegar reacts with the baking soda to create a light and airy texture. Mix just until incorporated, then stop.
-
Step 8: Bake the Cake Layers
Divide the batter evenly between the two prepared cake pans. Bake for 28-32 minutes, or until a wooden skewer inserted into the center comes out clean. The exact time might vary slightly by oven.
Small tip: Avoid opening the oven door too frequently during baking to prevent the cakes from sinking.
-
Step 9: Cool the Cakes
Let the cakes cool in the pans for about 10 minutes. Then, carefully invert them onto a wire rack to cool completely. They must be completely cool before frosting to prevent the frosting from melting.
-
Step 10: Prepare the Cream Cheese Frosting
In a large bowl, beat the softened cream cheese and butter together until smooth and creamy. Gradually add the sifted powdered sugar, a cup at a time, beating until light and fluffy. Stir in the vanilla extract and a pinch of salt. Beat until well combined and smooth.
Small tip: Make sure your cream cheese and butter are very soft for the creamiest, lump-free frosting.
-
Step 11: Assemble and Frost the Cake
Place one cooled cake layer on your serving plate or cake stand. Spread a generous layer of cream cheese frosting evenly over the top. Carefully place the second cake layer on top. Cover the entire cake with the remaining frosting, smoothing the sides and top with an offset spatula or knife.
-
Step 12: Decorate Your Christmas Cake
For a festive touch, decorate your Red Velvet Christmas Cake with fresh cranberries, rosemary sprigs, and white chocolate shavings. Arrange them artfully on top of the cake. This adds a beautiful, natural holiday look.
Small tip: Chill the cake for 15-30 minutes after frosting to help the frosting set before decorating for cleaner lines.
Tips & Variations
- Gluten-Free Option: Simply swap the all-purpose flour for a 1:1 gluten-free baking flour blend. Ensure your blend contains xanthan gum for the best texture.
- Vegan/Vegetarian Option: For a vegan version, use a flax egg (1 tbsp ground flaxseed + 3 tbsp water per egg), plant-based butter, and dairy-free buttermilk (plant-based milk + 1 tbsp vinegar). Use vegan cream cheese and powdered sugar (some brands are not vegan) for the frosting.
- Option to Add Nuts or Alternative Flours: For added texture and a slight nutty flavor, fold in ½ cup of finely chopped pecans or walnuts into the cake batter. You can also experiment with half whole wheat pastry flour for a slightly denser, more wholesome crumb.
- Spicy Version: For a subtle warmth, add ¼ teaspoon of ground ginger or a tiny pinch of cayenne pepper to the dry ingredients for the cake. This enhances the cocoa flavor with a gentle kick.
- Different Frosting or Shape: Instead of cream cheese, you could use a classic ermine frosting for a less sweet, velvety texture. For a different look, bake the cake in a 9×13 inch pan and make it a sheet cake, or use a bundt pan for a beautiful molded design.
Nutritional Information
Approximate values per serving (based on 12 servings):
- Calories: 650 kcal
- Protein: 7g
- Carbohydrates: 85g
- Fat: 35g
Note: Nutritional values may vary depending on specific ingredient brands and exact measurements used.
Health Benefits
While this is a celebratory dessert, some of its ingredients offer surprising benefits!
Cocoa powder, even in small amounts, is rich in antioxidants called flavonoids. These compounds help fight free radicals in your body, contributing to overall cellular health. It’s a tiny boost of goodness in every delicious slice.
Buttermilk provides a good source of calcium, which is essential for strong bones and teeth. It also contains beneficial probiotics, which can support a healthy gut microbiome and aid digestion. Choosing buttermilk adds a subtle tang and a touch of wellness.
Eggs are a fantastic source of high-quality protein, containing all nine essential amino acids. They also provide important vitamins like B12 and D, and minerals such as selenium. These nutrients are vital for energy production and immune function.
Though enjoyed in moderation, this cake can offer a delightful way to incorporate these beneficial ingredients. It’s a treat that tastes good and has a few hidden strengths!
Serving Suggestions
- What to serve with: Enjoy a slice with a warm mug of coffee, a comforting cup of herbal tea, or a glass of cold milk. A scoop of vanilla bean ice cream or a dollop of whipped cream makes it extra decadent.
- How to use as a main or side dish: This Red Velvet Christmas Cake is definitely a show-stopping dessert, meant to be the grand finale of your Christmas meal. It shines brightest as the star of your dessert table!
- Meal prep ideas: Bake the cake layers up to 2 days in advance, wrap them tightly in plastic wrap, and store at room temperature. You can also prepare the cream cheese frosting a day ahead and keep it refrigerated; just let it soften slightly and re-whip before frosting.
Storage Tips
Store any leftover Red Velvet Christmas Cake in an airtight container in the refrigerator for up to 3-4 days. The cream cheese frosting requires refrigeration to maintain its freshness and texture. You can also freeze individual slices or the whole cake (unfrosted layers wrap best) for up to 2 months. Thaw frozen cake in the refrigerator overnight. To reheat, simply bring slices to room temperature before serving for the best flavor and texture.
Conclusion
There you have it – your very own homemade Red Velvet Christmas Cake! This recipe proves that creating a stunning and delicious holiday dessert doesn’t have to be intimidating. Its vibrant color, tender crumb, and luscious cream cheese frosting make it an unforgettable treat that truly captures the spirit of Christmas.
You’ve followed all the steps, and now you have a masterpiece ready to be enjoyed. Don’t hesitate to give this recipe a try; you’ll be so proud of what you create. The satisfaction of baking something so beautiful and tasty from scratch is truly unmatched.
So, go ahead, slice into that gorgeous cake and share the joy with your loved ones. This Red Velvet Christmas Cake is more than just a dessert; it’s a memory in the making, perfect for celebrating the most wonderful time of the year with family and friends. Happy baking!




