Introduction
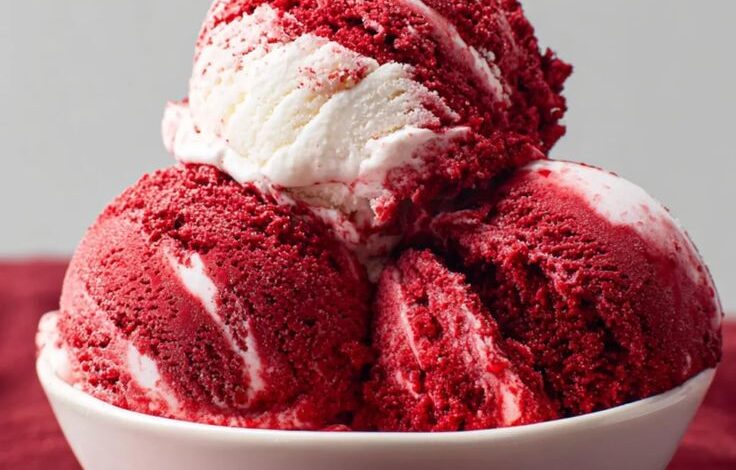
Get ready to fall in love with a dessert that’s as beautiful as it is delicious: Red Velvet Ice Cream! This creamy, dreamy treat takes all the classic flavors of your favorite red velvet cake and transforms them into a scoopable delight. Imagine the subtle cocoa, the tangy cream cheese swirl, and that iconic vibrant red hue, all in a smooth, cold ice cream. It’s truly a special dessert that will impress everyone.
You might think making ice cream at home is complicated, but I promise you, this recipe is incredibly easy. We’re making a no-churn version, which means you don’t need a special ice cream maker! With just a few simple ingredients and a little patience for freezing, you can create a gourmet-quality ice cream right in your own kitchen. It’s quick to put together, making it perfect for a fun weekend project or a spontaneous craving.
So, are you ready to whip up some magic? This Red Velvet Ice Cream is perfect for celebrations, a cozy night in, or just because you deserve a treat. It’s rich, decadent, and utterly irresistible. Gather your ingredients, and let’s get started on making a dessert that will have everyone asking for seconds!
Cooking Time & Prep Time
- Prep Time: 25 minutes
- Freezing Time: 6-8 hours (or overnight)
- Total Time: 6 hours 25 minutes (minimum, including freezing)
Small tip: The freezing time is the longest part, so plan to make this ice cream ahead of time. It’s perfect to prepare in the evening and enjoy the next day!
Ingredients
Makes 8-10 servings
- For the Red Velvet Ice Cream Base:
- 2 cups (470ml) heavy cream, very cold
- 1 (14-ounce/397g) can sweetened condensed milk
- 1 teaspoon vanilla extract
- 2 tablespoons unsweetened cocoa powder
- 1-2 teaspoons red food coloring (gel food coloring works best for vibrant color)
- For the Cream Cheese Swirl:
- 4 ounces (113g) cream cheese, softened
- 1/2 cup (60g) powdered sugar
- 2 tablespoons milk or heavy cream
- 1/2 teaspoon vanilla extract
- Optional Mix-ins/Garnish:
- 1/2 cup crumbled red velvet cake or chocolate cookies
Step-by-Step Instructions
-
Step 1: Chill Your Equipment
Place a large mixing bowl and your whisk attachments (if using an electric mixer) into the freezer for at least 15-20 minutes. This helps the heavy cream whip up faster and achieve a better volume.
Small tip: A very cold bowl and whisk are key to perfectly whipped cream. Don’t skip this step!
-
Step 2: Whip the Heavy Cream
Pour the very cold heavy cream into your chilled mixing bowl. Using an electric mixer on medium-high speed, whip the cream until stiff peaks form. This means when you lift the whisk, the cream holds its shape firmly.
Small tip: Be careful not to over-whip the cream, or it can turn grainy. Stop as soon as stiff peaks appear.
-
Step 3: Prepare the Red Velvet Base
In a separate medium bowl, combine the sweetened condensed milk, vanilla extract, cocoa powder, and red food coloring. Whisk these ingredients together until completely smooth and the color is uniform. Add more red food coloring if you desire a deeper, more vibrant red.
Small tip: Gel food coloring gives a much richer color without adding too much liquid, which can affect the ice cream’s texture.
-
Step 4: Combine the Base Ingredients
Gently fold about one-third of the whipped cream into the red velvet condensed milk mixture. This lightens the mixture and makes it easier to incorporate the rest of the whipped cream. Then, carefully fold in the remaining whipped cream until no streaks remain, being careful not to deflate the air from the cream.
Small tip: Use a spatula and a gentle, upward folding motion to keep the mixture light and airy.
-
Step 5: Make the Cream Cheese Swirl
In a small bowl, beat the softened cream cheese with the powdered sugar, milk (or cream), and vanilla extract until smooth and creamy. Make sure there are no lumps of cream cheese. This is your tangy swirl!
Small tip: Ensure your cream cheese is truly at room temperature for the smoothest swirl. Microwave it for 10-15 seconds if it’s too cold.
-
Step 6: Layer and Swirl
Pour half of the red velvet ice cream base into a freezer-safe container (a loaf pan or shallow dish works well). Dollop half of the cream cheese swirl over the top. Repeat with the remaining red velvet base and cream cheese swirl. Use a knife or skewer to gently swirl the cream cheese through the red velvet base, creating beautiful patterns.
Small tip: Don’t over-swirl! Just a few gentle passes are enough to create lovely ribbons of cream cheese. If using, sprinkle in the optional cake crumbs now.
-
Step 7: Freeze Until Firm
Cover the container tightly with plastic wrap or a lid. Place it in the freezer for at least 6-8 hours, or preferably overnight, until the ice cream is completely firm. For best results, avoid opening the freezer door too often during this time.
Small tip: For extra smooth ice cream, place a piece of plastic wrap directly onto the surface of the ice cream before putting on the lid. This helps prevent ice crystals from forming.
Tips & Variations
- Gluten-Free Option: This recipe is naturally gluten-free if you omit the optional red velvet cake crumbs. If you want a similar texture, use gluten-free chocolate cookie crumbs or simply leave them out.
- Vegan Option: To make this ice cream vegan, use full-fat canned coconut cream (chilled overnight, scoop out the thick cream) instead of heavy cream, and a vegan sweetened condensed milk. For the cream cheese swirl, use a plant-based cream cheese alternative and plant-based milk.
- Add More Texture or Flavor: For a heartier version, consider swirling in some chopped dark chocolate chunks or a handful of toasted pecans for crunch. While not a “vegetable” or “protein” addition in the traditional sense, these add-ins can enhance the flavor and provide healthy fats.
- Spicy Kick: For an unexpected twist, add a tiny pinch (1/8 teaspoon) of cayenne pepper to the red velvet ice cream base along with the cocoa powder. This will give a subtle, warming heat that complements the chocolate notes beautifully.
- Chocolate Lover’s Dream: If you’re a true chocolate fan, increase the cocoa powder to 3 tablespoons for a deeper chocolate flavor, or add a drizzle of chocolate fudge sauce just before serving.
Nutritional Information
Approximate values per serving (based on 8 servings):
- Calories: 385 kcal
- Protein: 5g
- Carbohydrates: 45g
- Fat: 28g
Please note: These values are approximate and may vary depending on the specific brands and quantities of ingredients used.
Health Benefits
While Red Velvet Ice Cream is certainly a treat, some of its key ingredients offer a few surprising health benefits when consumed in moderation.
The star ingredient, cocoa powder, is a powerhouse of antioxidants, particularly flavonoids. These compounds help combat free radicals in the body, potentially reducing inflammation and supporting heart health. Cocoa also contains minerals like magnesium, iron, and zinc, which play vital roles in energy production, oxygen transport, and immune function.
Cream cheese, used in our delightful swirl, provides a source of calcium, which is essential for strong bones and teeth. It also contributes a small amount of protein, important for muscle repair and overall body function. Choosing a full-fat version can also mean beneficial fat-soluble vitamins.
Dairy products like heavy cream, while high in fat, are also a good source of calcium and vitamin D (if fortified). Calcium is crucial for bone health and nerve function, while vitamin D helps the body absorb calcium effectively. They also contain some protein and B vitamins.
Even vanilla extract, used for its comforting aroma and flavor, contains a small amount of antioxidants, including vanillin. While not consumed in large enough quantities to be a major health contributor, it adds a lovely touch to the overall profile.
Serving Suggestions
- Classic Toppings: Serve scoops of Red Velvet Ice Cream with a sprinkle of extra red velvet cake crumbs, a drizzle of chocolate syrup, or a dollop of whipped cream.
- Berry Bliss: Pair it with fresh raspberries or sliced strawberries. The tartness of the berries cuts through the richness of the ice cream beautifully.
- Coffee Companion: Enjoy a scoop alongside a warm cup of coffee or turn it into an indulgent affogato by pouring a shot of hot espresso over it.
- Dessert Platter Star: Make it the centerpiece of a dessert platter, surrounded by mini brownies, shortbread cookies, and other sweet treats for a show-stopping display.
Storage Tips
This Red Velvet Ice Cream is best stored in an airtight freezer-safe container. It will keep beautifully in the freezer for up to 2-3 weeks. To serve, simply take it out of the freezer about 5-10 minutes before scooping to allow it to soften slightly, making it easier to scoop and giving it a perfectly creamy texture. This is an ice cream, so reheating is not applicable; just enjoy it cold!
Conclusion
There you have it – a truly spectacular Red Velvet Ice Cream recipe that’s surprisingly simple to make at home! This dessert is more than just a sweet treat; it’s an experience. The vibrant color,