Introduction
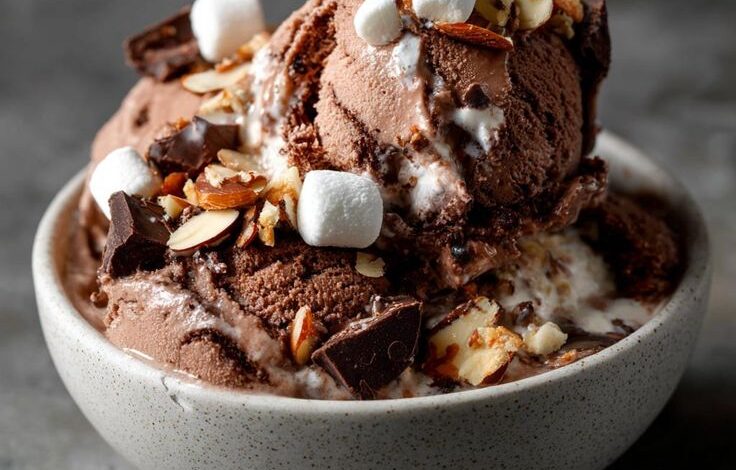
Get ready for a treat that’s a true classic! Rocky Road Ice Cream is a beloved dessert, famous for its delightful mix of textures and flavors. Imagine creamy vanilla ice cream, studded with fluffy marshmallows, crunchy nuts, and rich chocolate pieces. It’s a joyful explosion in every spoonful, making it incredibly special and utterly delicious.
The best part? Making Rocky Road Ice Cream at home is surprisingly easy and quick. You don’t even need an ice cream maker for this fantastic no-churn version! With just a few simple ingredients and minimal effort, you can create a dessert that tastes like it came from your favorite scoop shop. It’s perfect for a spontaneous craving or a last-minute party.
So, are you ready to whip up some magic? This recipe will guide you every step of the way. Gather your ingredients and prepare to impress yourself and everyone you share this amazing ice cream with. Let’s make some Rocky Road!
Cooking Time & Prep Time
- Prep Time: 20 minutes
- Chilling Time: 6 hours (minimum)
- Total Time: 6 hours 20 minutes
Small tip: For the best results, plan to make this recipe in the morning or the day before you want to serve it. This allows plenty of time for the ice cream to freeze solid and develop its full flavor.
Ingredients
This recipe makes about 8-10 generous servings.
For the No-Churn Ice Cream Base
- 2 cups (480ml) heavy cream (cold)
- 1 (14-ounce/397g) can sweetened condensed milk (cold)
- 1 teaspoon pure vanilla extract
- Pinch of salt (optional, but enhances flavor)
For the Rocky Road Mix-ins
- 1 ½ cups mini marshmallows
- 1 cup chopped mixed nuts (such as almonds, walnuts, pecans, or a combination)
- 1 cup semi-sweet chocolate chips or chopped dark chocolate
Step-by-Step Instructions
-
Step 1: Prepare Your Pan
First, get your freezing container ready. Line a 9×5 inch loaf pan or an 8×8 inch square pan with plastic wrap, leaving an overhang on the sides. This makes it super easy to lift out the ice cream later. You can also use an airtight freezer-safe container.
Small tip: Lining with plastic wrap not only helps with removal but also protects the ice cream from freezer burn.
-
Step 2: Whip the Heavy Cream
In a large mixing bowl, pour in the cold heavy cream. Using an electric mixer (handheld or stand mixer with a whisk attachment), beat the cream on medium-high speed. Continue beating until stiff peaks form. This means the cream will hold its shape when you lift the whisk.
Small tip: Make sure your cream is very cold, and even chill your mixing bowl and whisk attachment for 10-15 minutes beforehand. This helps the cream whip up faster and fluffier.
-
Step 3: Combine with Condensed Milk
In a separate medium bowl, combine the cold sweetened condensed milk, vanilla extract, and the pinch of salt (if using). Stir these ingredients together until they are well combined and smooth. The salt helps to balance the sweetness.
Small tip: Using cold condensed milk helps maintain the chill of the mixture, which is important for the no-churn process.
-
Step 4: Fold in the Condensed Milk Mixture
Gently pour the condensed milk mixture into the whipped cream. Using a rubber spatula, carefully fold the two mixtures together. Use an upward motion from the bottom of the bowl, bringing the cream over the condensed milk. Continue until no streaks of condensed milk remain and the mixture is light and airy.
Small tip: Be very gentle when folding! Overmixing will deflate the whipped cream, making your ice cream less airy and creamy.
-
Step 5: Add the Rocky Road Mix-ins
Now for the fun part! Gently fold in the mini marshmallows, chopped nuts, and chocolate chips (or chopped chocolate) into the ice cream base. Distribute them evenly throughout the mixture. Don’t be afraid to be generous with your favorite bits!
Small tip: If you like, reserve a small handful of mix-ins to sprinkle on top of the ice cream before freezing for a pretty finish.
-
Step 6: Transfer and Freeze
Pour the entire Rocky Road ice cream mixture into your prepared loaf pan or freezer-safe container. Smooth the top with your spatula. Cover the pan tightly with the plastic wrap overhang or with a lid.
Small tip: Ensure the ice cream is covered well to prevent any ice crystals from forming on the surface during freezing.
-
Step 7: Chill Until Firm
Place the covered pan in the freezer for a minimum of 6 hours, or preferably overnight. The longer it freezes, the firmer and more scoopable your ice cream will be. It needs to be completely solid before serving.
Small tip: If your freezer is very cold, it might firm up faster. Test by pressing a spoon into the center.
-
Step 8: Serve and Enjoy
Once completely frozen, remove the ice cream from the freezer. Let it sit at room temperature for 5-10 minutes before scooping. This makes it easier to get perfect scoops. Then, serve and enjoy your homemade Rocky Road Ice Cream!
Small tip: If you lined your pan with plastic wrap, you can lift the entire block of ice cream out, remove the wrap, and slice it for a fun presentation!
Tips & Variations
- Gluten-Free Option: This recipe is naturally gluten-free! Just ensure your marshmallows and chocolate chips are certified gluten-free if you have a severe allergy, though most brands are.
- Vegan/Vegetarian Option: For a vegan version, use full-fat coconut cream (chilled, only the thick part) instead of heavy cream, and a vegan sweetened condensed milk. Ensure marshmallows and chocolate are also vegan (gelatin-free marshmallows, dairy-free chocolate).
- Add More Protein/Fiber: Boost the nutritional value by adding a scoop of your favorite protein powder (vanilla or chocolate work well) to the condensed milk mixture, or by increasing the amount of nuts. You could also swirl in some nut butter.
- Spicy Version: For a delightful kick, add ¼ teaspoon of cayenne pepper or a pinch of chili powder to the condensed milk mixture. This creates a Mexican hot chocolate-inspired flavor that pairs wonderfully with the chocolate.
- Flavor Fun: Experiment with different mix-ins! Try chopped pretzels for extra crunch (not GF), crushed cookies, different types of chocolate (white, milk, dark), dried cranberries, or even a swirl of caramel or fudge sauce before freezing. A touch of almond extract can also enhance the nut flavors.
Nutritional Information
Approximate values per serving (based on 10 servings):
- Calories: 420-450 kcal
- Protein: 6-8 g
- Carbohydrates: 40-45 g
- Fat: 28-32 g
Please note: These values are approximate and may vary depending on the specific brands and quantities of ingredients used.
Health Benefits
While Rocky Road Ice Cream is a delightful treat, some of its ingredients offer surprising benefits!
Nuts: The nuts in rocky road, like almonds or walnuts, are packed with healthy fats, including omega-3 fatty acids in walnuts, which are good for heart health. They also provide protein and fiber, helping you feel satisfied. Nuts are a great source of Vitamin E, magnesium, and selenium, which support overall body function and act as antioxidants.
Chocolate: Especially if you opt for dark chocolate, you’re getting a dose of antioxidants called flavanols. These compounds have been linked to improved blood flow and heart health. Chocolate also contains minerals like iron, magnesium, and copper. Plus, it’s known to be a mood booster!
Dairy (Heavy Cream & Condensed Milk): These provide calcium, which is essential for strong bones and teeth. They also offer Vitamin D (often fortified), which aids in calcium absorption, and Vitamin A, important for vision and immune function. Dairy products also contain protein, contributing to muscle repair and growth.
Remember, this is a dessert to be enjoyed in moderation, but it’s nice to know there are some good-for-you elements mixed in!
Serving Suggestions
- Classic Scoop: Serve a generous scoop (or two!) in a bowl or cone, just as it is. It’s perfect on its own!
- Dessert Topping: Top your Rocky Road Ice Cream with a drizzle of chocolate fudge, caramel sauce, or a dollop of extra whipped cream. A sprinkle of chopped nuts or a cherry on top makes it extra special.
- A la Mode: Serve alongside a warm brownie, a slice of apple pie, or a fruit crisp for a decadent dessert experience. The contrast of warm and cold is simply divine.
Storage Tips
Your homemade Rocky Road Ice Cream will keep beautifully in an airtight freezer-safe container in the freezer for up to 2 weeks. Make sure it’s well-sealed to prevent freezer burn and keep it tasting fresh. It cannot be stored in the fridge as it will melt. There’s no need to reheat it; simply let it sit at room temperature for 5-10 minutes before scooping to soften slightly for the best texture.
Conclusion
And there you have it – your very own homemade Rocky Road Ice Cream! This recipe truly proves that you don’t need fancy equipment to create an incredibly delicious and satisfying dessert. The rich, creamy base, combined with the delightful chew of marshmallows, the satisfying crunch of nuts, and the melt-in-your-mouth chocolate, makes every spoonful an adventure.
So, go ahead and give this recipe a try. You’ll be amazed at how simple it is to achieve such a professional-tasting treat right in your own kitchen. It’s a wonderful way to treat yourself, practice your baking (or rather, no-baking!) skills, and fill your home with the joy of homemade goodness.
Don’t keep this deliciousness all to yourself! Share your amazing Rocky Road Ice Cream with family and friends. It’s the perfect dessert for gatherings, celebrations, or just a cozy night in. Happy scooping!